Snowflake Intelligence 概述
Snowflake Intelligence is a ready-to-use agentic application with an intuitive, conversational interface that helps business users discover and act on deep insights. It lets users interact with their structured and unstructured enterprise data using natural language. Snowflake Intelligence uses AI-powered "data agents" to:
Understand questions
Perform analysis
Generate trusted insights
Take action
It bridges the gap between valuable enterprise data and the people who need it, empowering users to move beyond stale dashboards and rigid reports. Users are empowered to find answers independently, reducing their reliance on data teams. Insights are trustworthy with full traceability, while respecting Snowflake's robust security and governance policies.
Key capabilities
Business users are often stuck navigating stale dashboards that can't keep up with their questions and waiting on data teams for answers. Snowflake Intelligence solves this with the following capabilities:
Natural Language Interaction: An intuitive, conversational interface allows users to ask questions using natural language and receive deep insights.
Unified Data Access: Analyzes both structured and unstructured data from enterprise sources.
Deep, Trustworthy Insights: Breaks down questions and chooses the best tools to deliver accurate, actionable insights. Provides traceability to source data and queries, while "Verified Answers" allow data teams to add trusted responses.
Built-in Visualization: Instantly generates and customizes charts to help visualize trends and patterns, with clear explanations about how each chart was created. The agent determines whether data is best shown as a chart or table based on the query type. Trends and comparisons render as visualizations, while detailed lookups return tables. Supported visualization types currently include bar charts, line charts, pie charts, and scatter plots. Users can customize chart preferences through agent instructions, including default chart types, colors, and formatting rules. For more information, see 在 Snowflake Intelligence 中自定义图表.
Artifacts: A persistent chart or table object that Snowflake Intelligence generates in response to a question. Save, share, and revisit tables and charts without regenerating them. For more information, see Snowflake Intelligence 中的工件.
Seamless Governance: Automatically inherits and respects all existing Snowflake data governance controls, including row-access policies and column-level security.
Full Administrative Control: Administrators can use existing identity providers to give teams access only to Snowflake Intelligence, making sure users only interact with the data experiences built for them.
Snowflake Intelligence Mobile App (iOS)
The Snowflake Intelligence mobile app for iOS is available in Preview on the App Store (https://apps.apple.com/us/app/snowflake-intelligence/id6755540372). The app supports the same features as the web app, so you can ask questions about your data, continue conversations, and review results from anywhere. It supports chat, agents, file and image attachments, voice input, citations, and role and warehouse selection, extending the core experience to mobile in a secure, touch-first format.
Additional UI options
Snowflake Intelligence offers the following additional options for users from the UI:
Extended thinking
By default, Snowflake Intelligence agents balance speed and quality when answering questions.
If users have a complex question or want the agent to explore more options, they can enable extended thinking in the chat window. With extended thinking, the agent will be more thorough, but the process might take more time and use more tokens. This setting remains selected.
Zero-setup file upload
Snowflake Intelligence supports uploading files directly in the chat interface to provide more context for the agent. The agent can use the content of the files to answer questions and provide insights.
When you upload a file, it is automatically saved in your user stage. The file is accessible within the same thread. Documents are automatically cleaned up when threads are deleted, either by the thread delete API or after the thread TTL (time to live) expires.
Snowflake Intelligence supports the following file types for zero-setup file upload:
CSV
JSON
PDF
PPTX
TXT
XLSX
Each file must be less than 50 MB, but users can upload up to 5 files.
If the document requires complex processing, the user's default warehouse might be used to run Snowpark code for the agent to better analyze and process the data.
重要
Uploaded documents are stored on a personal stage and treated as customer data, following the same data governance and access controls as other Snowflake data. Account administrators have standard access based on existing permissions.
How it works
Snowflake Intelligence combines multiple tools with the following architecture:
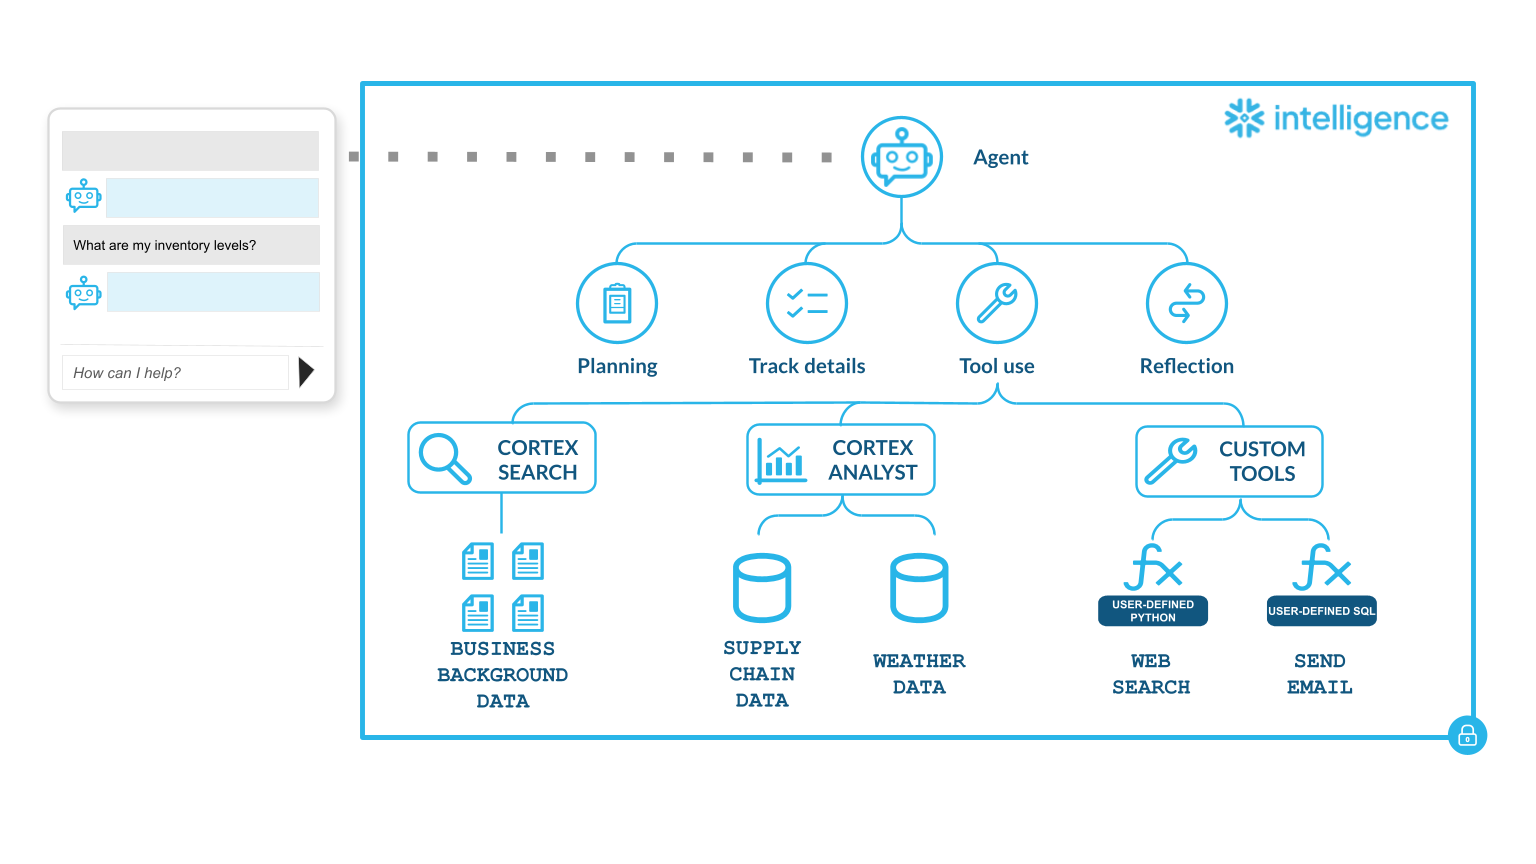
When a user asks a question in Snowflake Intelligence, Cortex Agents turn natural language into governed actions and answers. An interaction with Snowflake Intelligence follows this workflow:
User input: A user submits a natural language question. For example, "How are Q4 sales trending?".
Cortex Agent API: The question is routed to the Cortex Agent API, which powers Snowflake Intelligence. Agents are AI models that can be connected to one or more semantic views, semantic models, Cortex search services, and tools. Agents reason through tasks, choose the right tools, deliver results in natural language, and take actions on your behalf. You can create, update, and deploy these high-quality agents directly inside your Snowflake environment. Agents integrate directly with Snowflake Intelligence. For more information, see Cortex Agents.
Orchestration: An LLM model (the orchestrator) interprets intent, selects the right tools, and plans the sequence of actions. It may use one tool, chain several together, or decide that the question is out of scope.
Tool execution: Runs the tools selected by the orchestrator and returns results. You can integrate tools to give Snowflake Intelligence access to structured and unstructured data, as well as existing functions and procedures. Cortex Agents support the following tool types:
Cortex Analyst: Create SQL queries from natural language, then run these queries on your semantic views for structured data with Cortex Analyst. Semantic views address the mismatch between how business users describe data and how it's stored in database schemas. With semantic views, you can define business metrics and model business entities and their relationships. Cortex Agents use these semantic views to enhance data-driven decisions and provide consistent business definitions across enterprise applications. For more information, see 语义视图概述.
Cortex Search: Search through your unstructured data to return relevant document text with Cortex Search.
Custom Tools: Execute user-defined functions or stored procedures to perform actions.
Reflection & response: The orchestrator reviews and refines results, then generates the final answer, including summaries, tables, or charts, in the Snowflake Intelligence UI.
Legal notices
Where your configuration of Snowflake Intelligence uses a model provided on the Model and Service Flow-down Terms, your use of that model is further subject to the terms for that model on that page.
The data classification of inputs and outputs are as set forth in the following table.
Input data classification |
Output data classification |
Designation |
|---|---|---|
Usage Data |
Customer Data |
Covered AI Features [1] |
For additional information, refer to Snowflake AI 和 ML.