Snowflake Model Registry 用户界面
备注
模型注册表 Snowsight UI 已在所有部署中正式发布。
Inference Services UI for SPCS Model Serving is in preview in AWS, Azure and GCP commercial deployments only.
在 Snowsight 的 Models 页面上,您可以找到所有机器学习模型。您还可以查看它们的元数据和部署情况。
模型详细信息
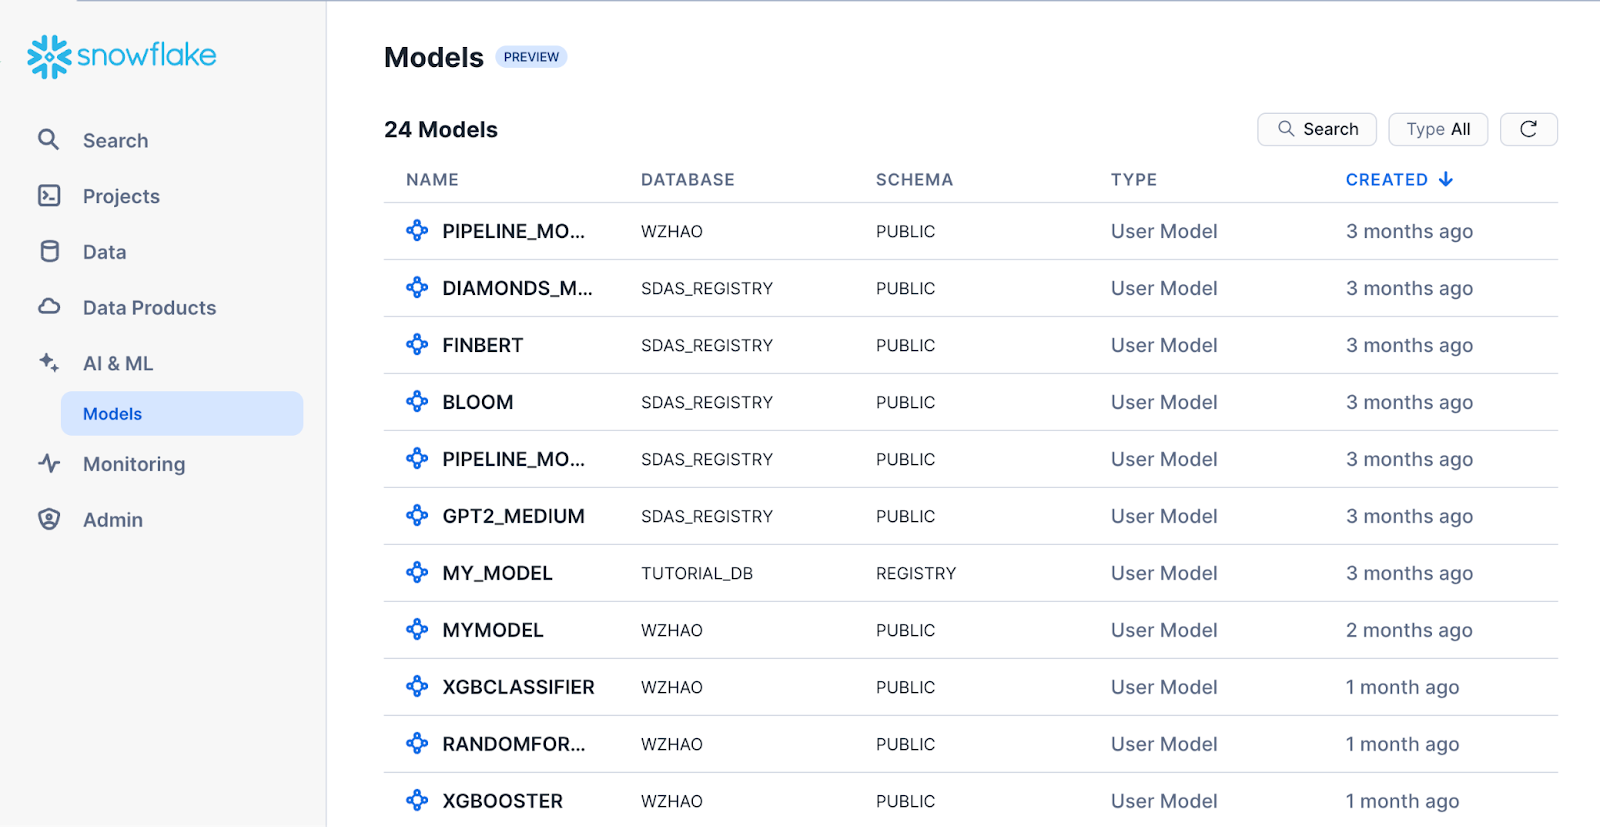
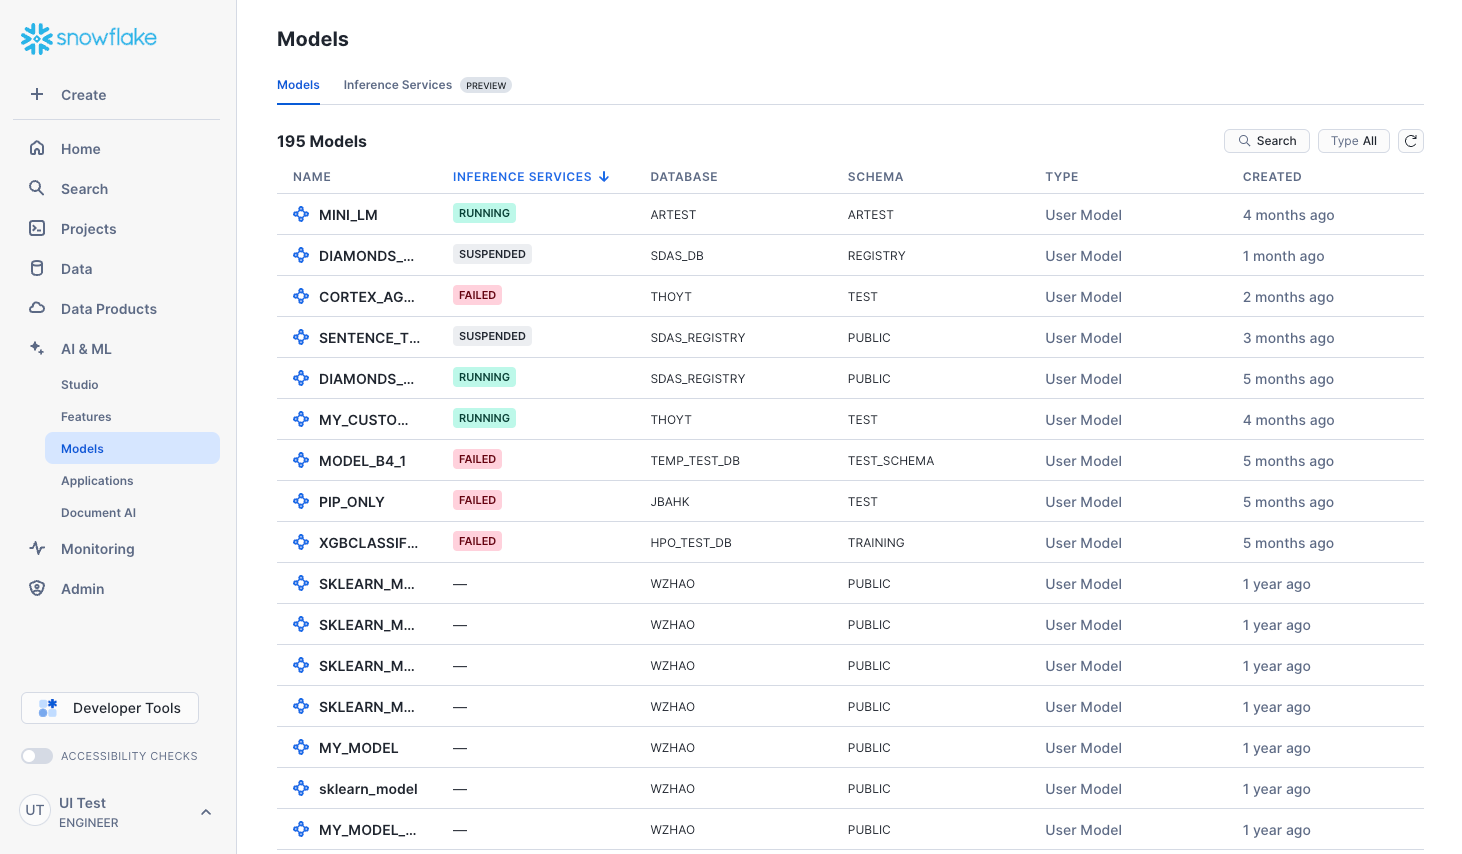
Models 页面显示了已创建并登录到 Snowflake Model Registry 的模型,或您可以通过 USAGE 或 READ 权限访问的模型。这些模型既有使用 Snowpark ML 开发的模型,也有外部来源的模型(如来自 Hugging Face 的模型)。它还显示了 Cortex Fine-tuned 模型,并可能包括您在未来版本中可以在 Snowflake 中创建的其他模型类型。
To display the Models page, in the navigation menu, select AI & ML » Models. The resulting list contains all the models in the Snowflake Model Registry in all the databases and schemas that your current role has access to.
备注
如果您看不到任何模型,请确保您的角色具有 所需权限。
要打开模型的详细信息页面,请在 Models 列表中选择相应行。详细信息页面显示关键模型信息,包括模型的描述、标签和版本。
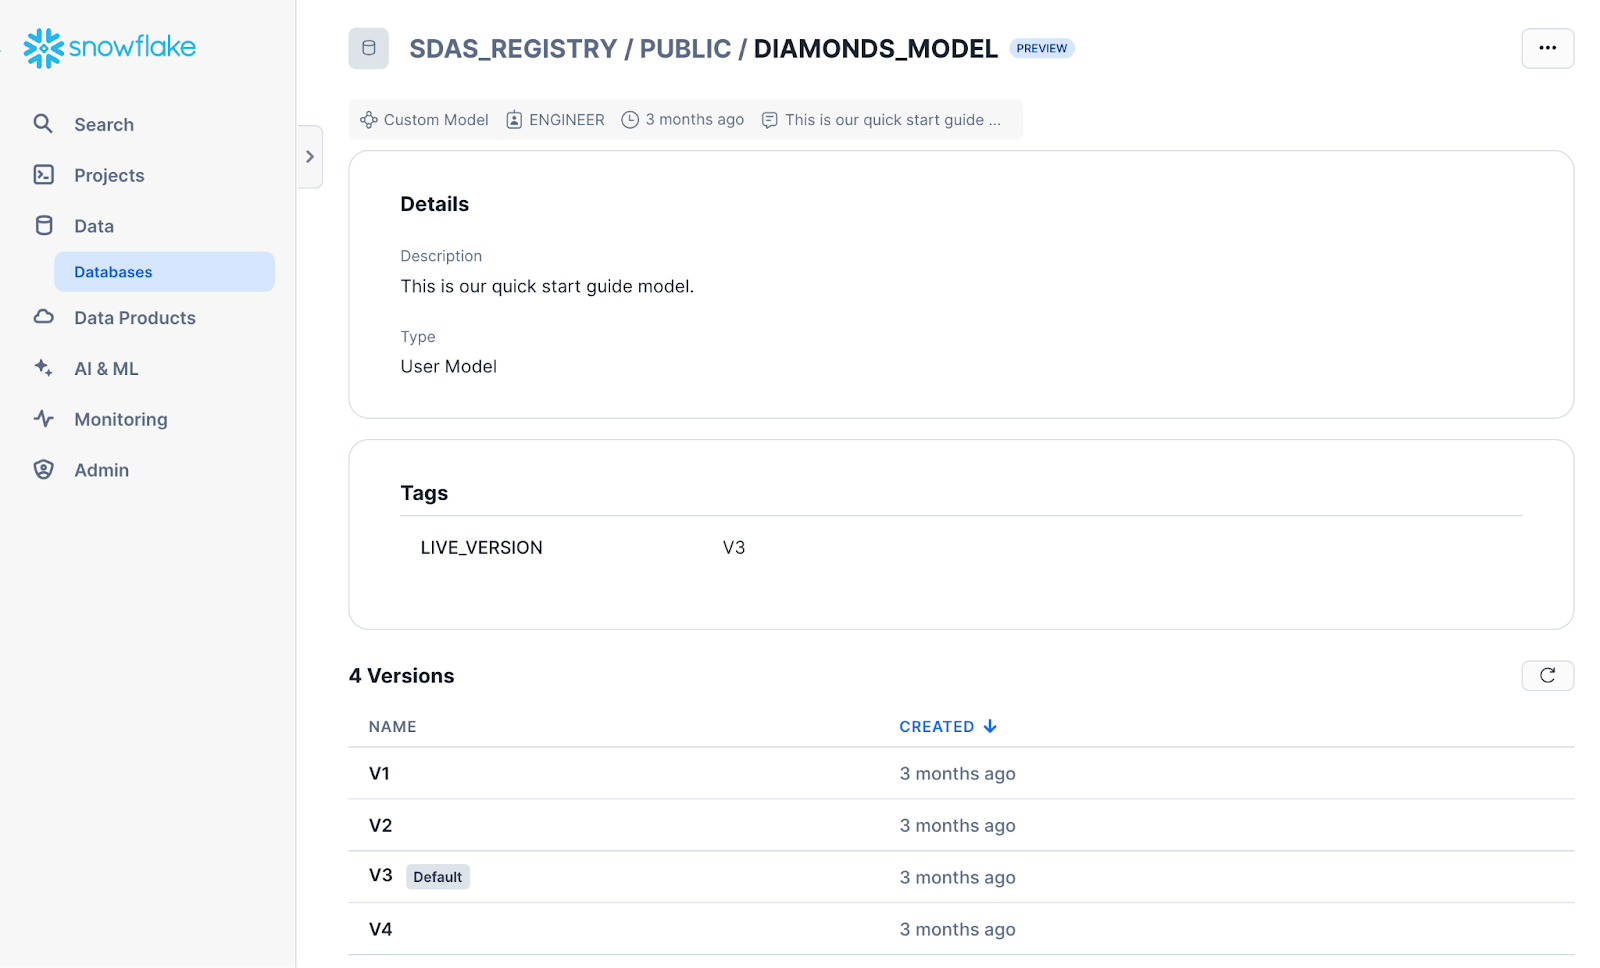
要编辑模型描述或删除模型,请选择右上角的 ...。
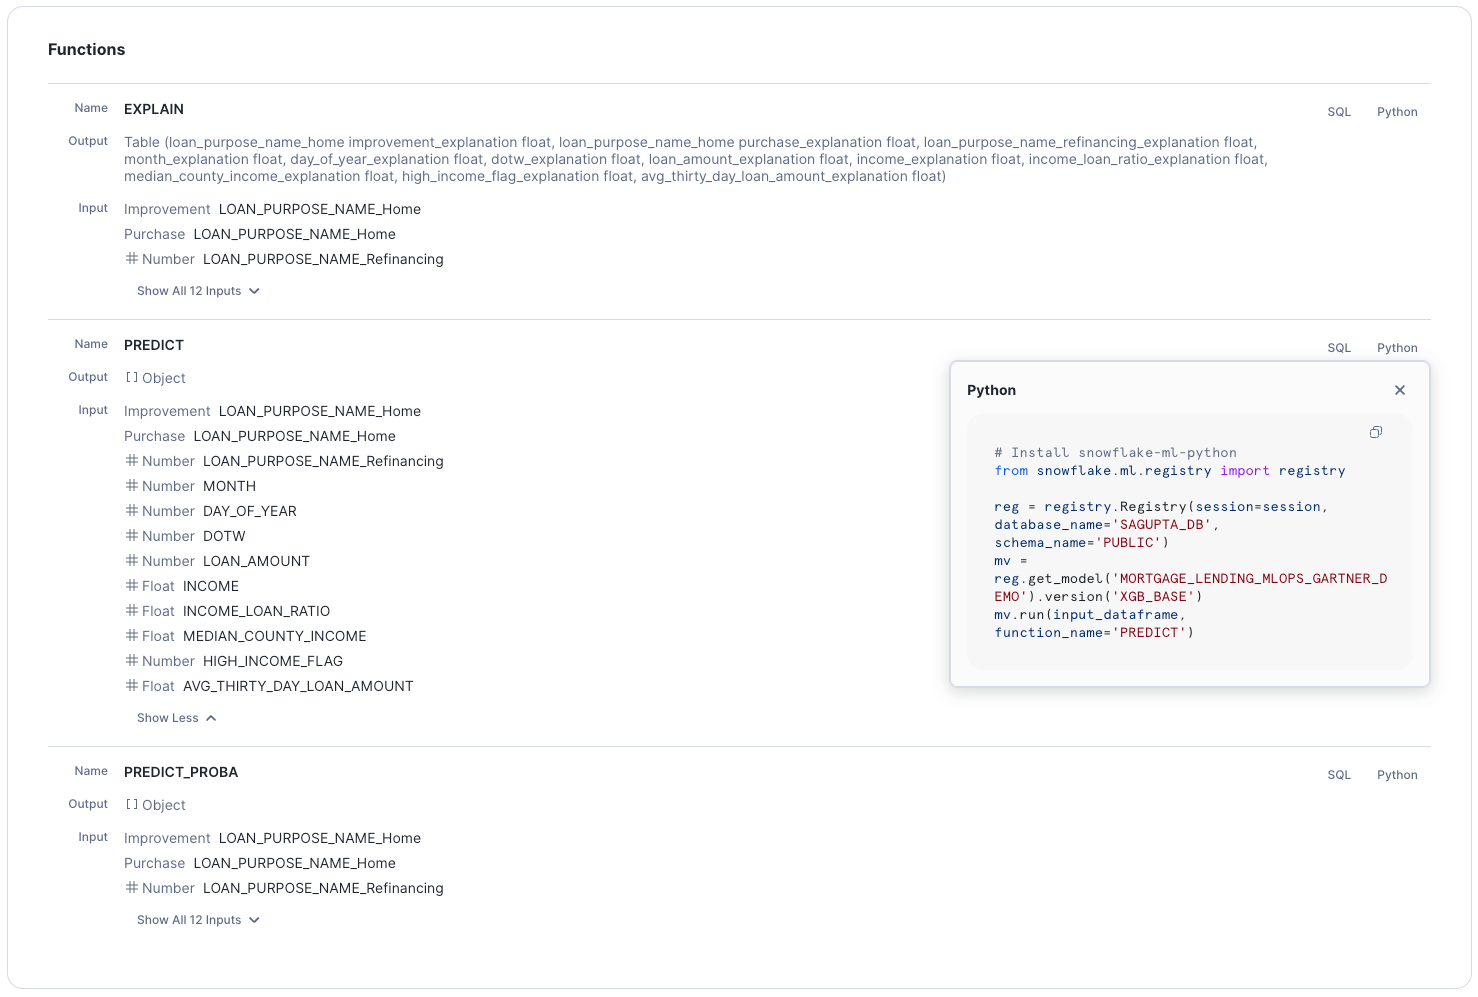
要打开版本的详细信息页面,请选择模型版本。此页面显示模型版本元数据(例如指标),以及可从 Python 或 SQL 调用的可用方法列表。
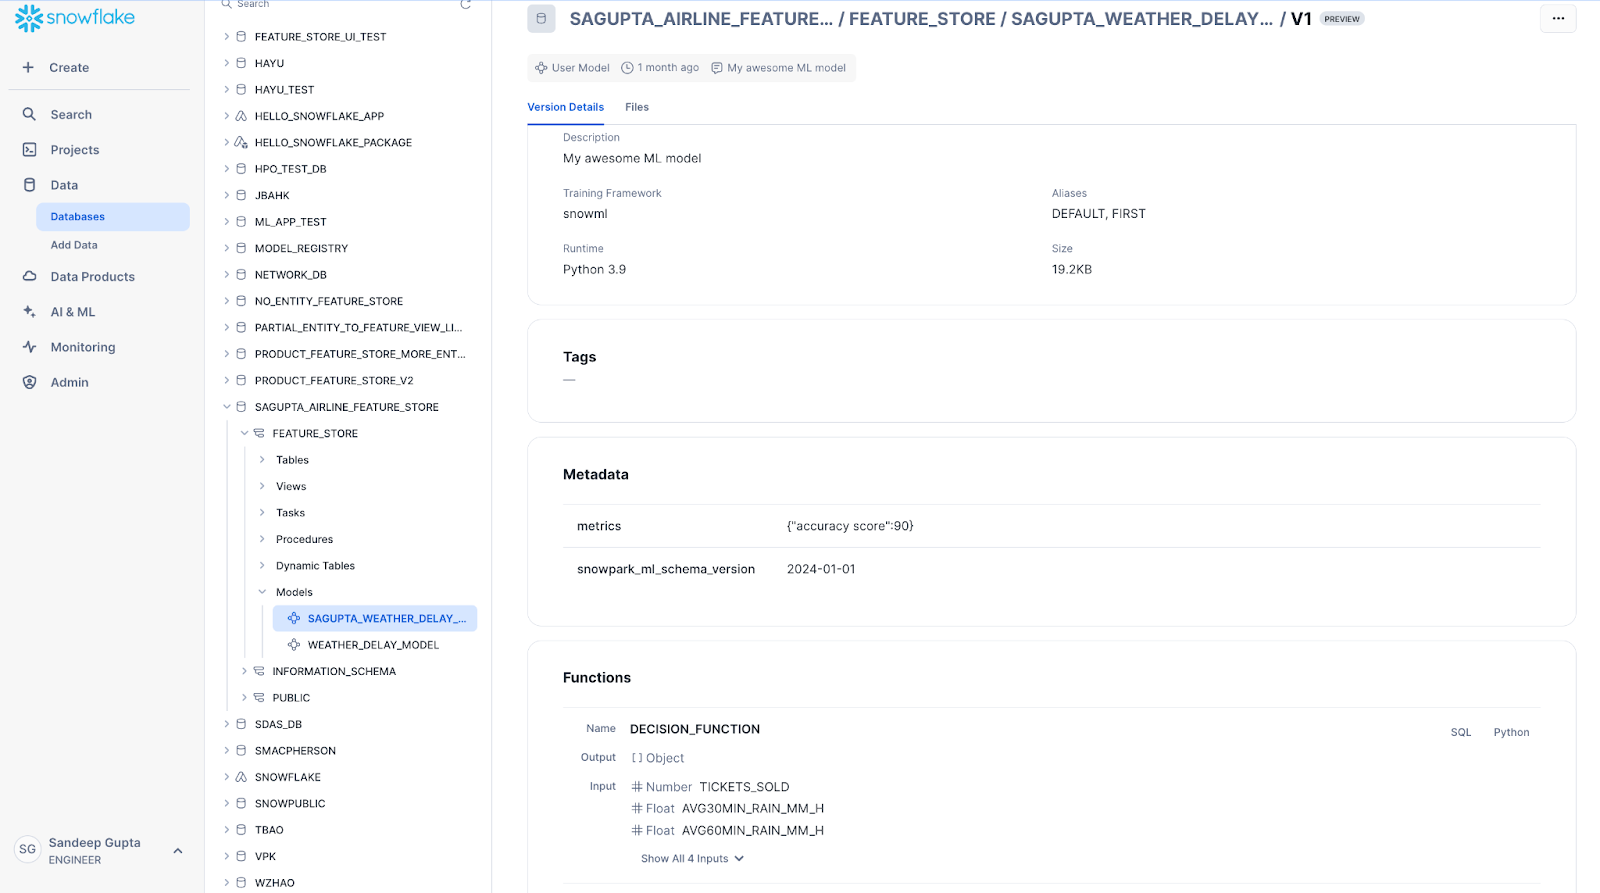
要查看调用模型函数的代码,请选择 SQL 或其旁边的 Python 链接。您可以将此代码片段复制到 Snowsight SQL 工作表或 Python 笔记本中。
要添加或修改元数据或删除模型版本,请选择右上角的 ...。
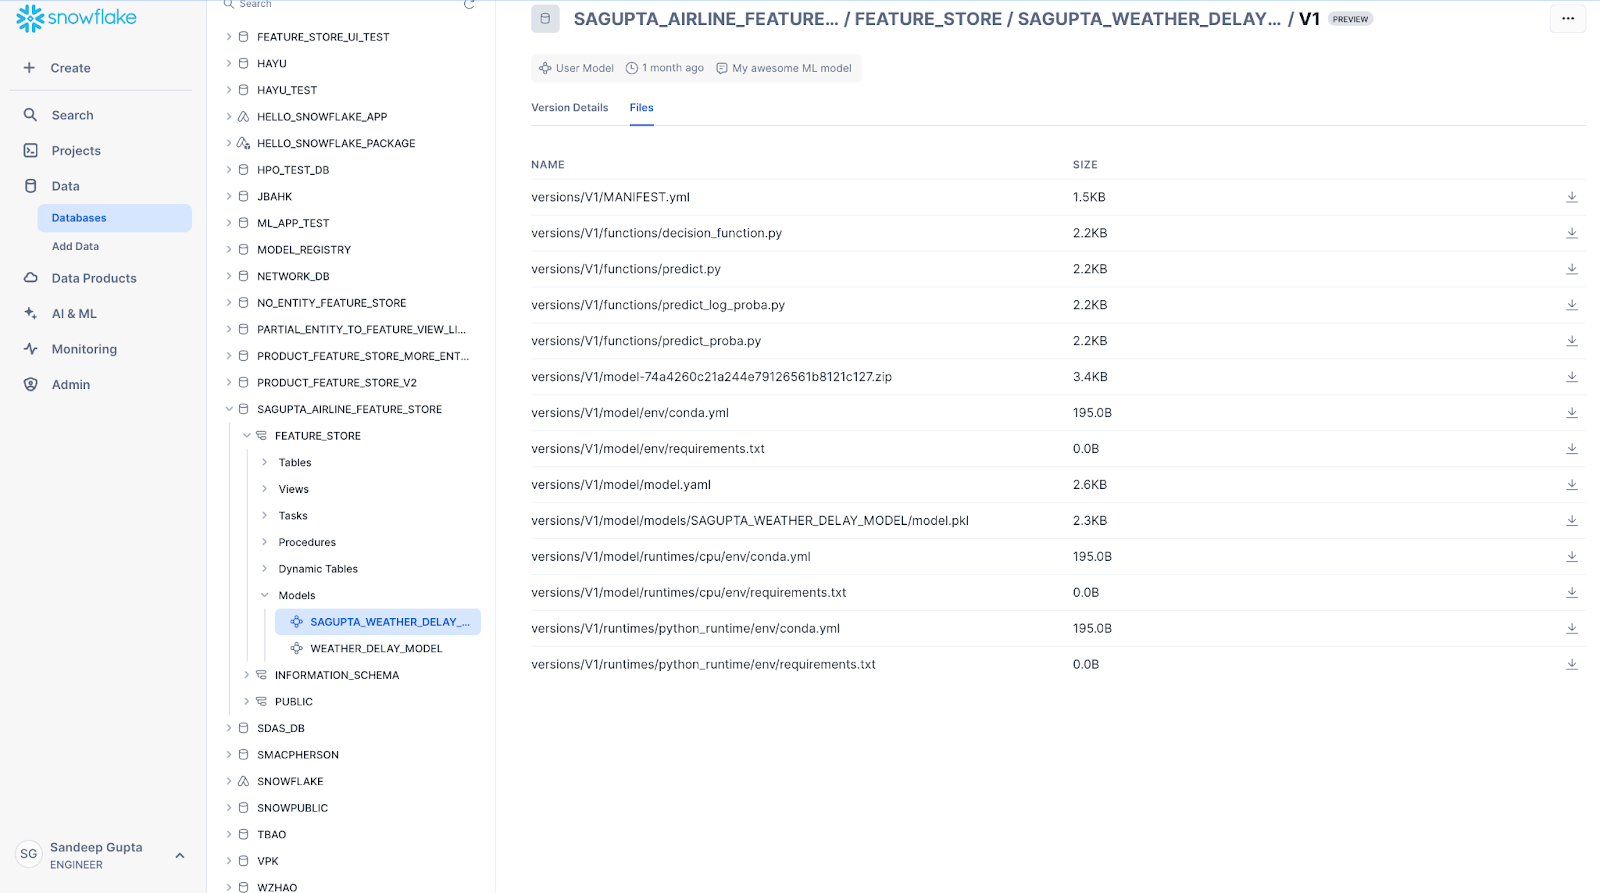
Files 选项卡包含模型版本的底层工件列表。您可以从本页面下载单个文件。仅当用户对模型具有 OWNERSHIP 或 READ 权限时,此页面才可用。
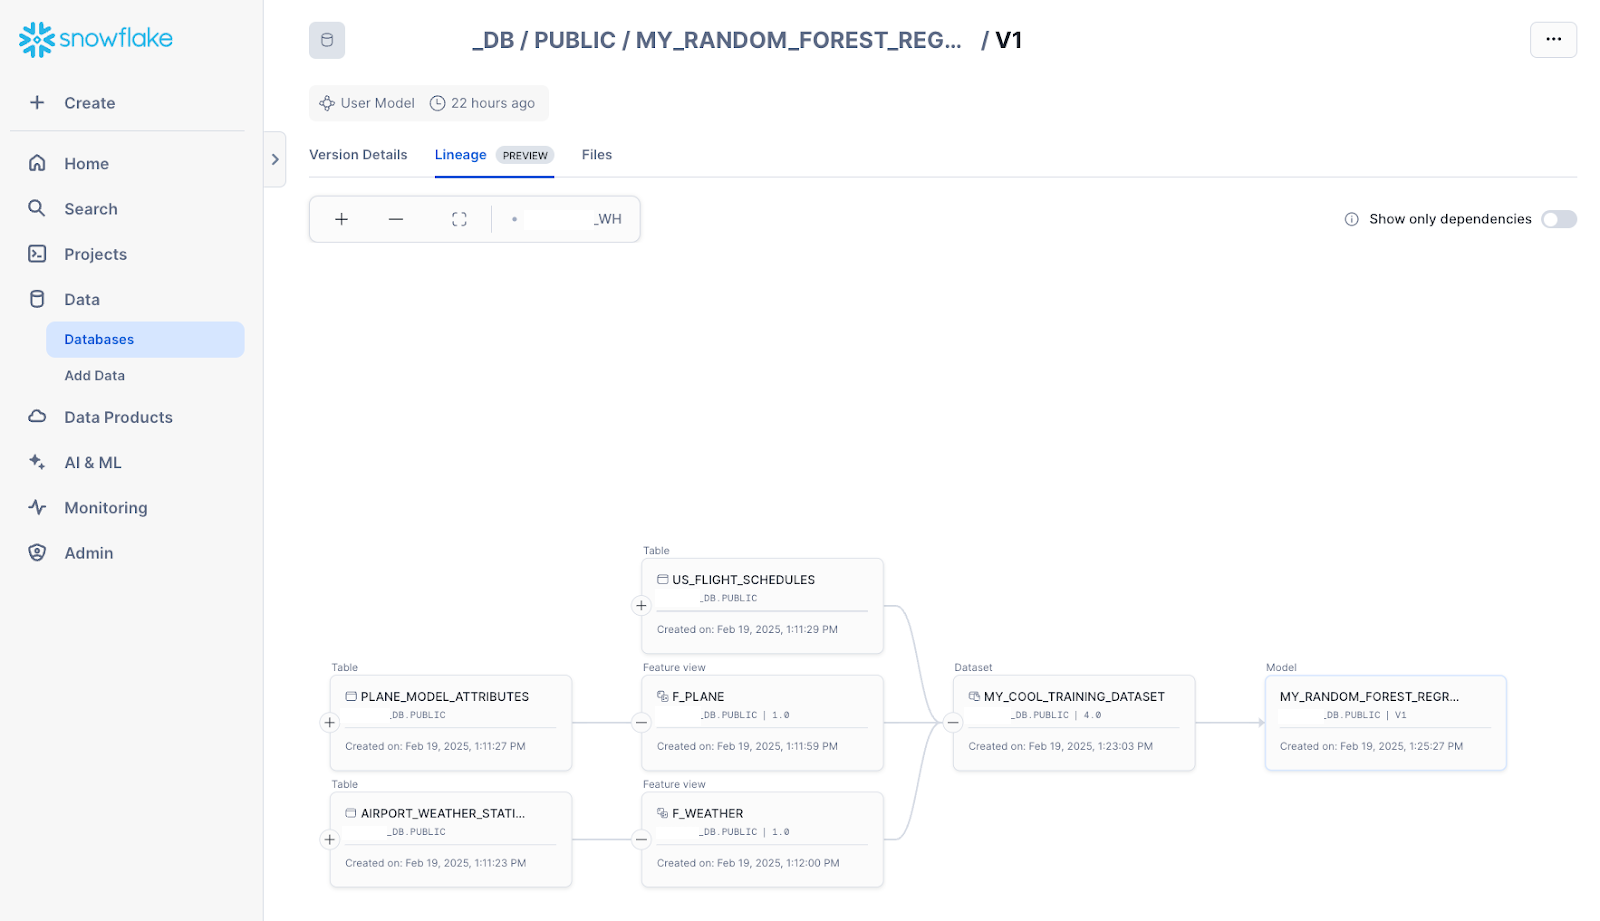
Lineage 选项卡显示模型的完整数据流沿袭信息,包括用于训练模型的任何数据集、来自功能商店的任何功能视图以及源数据表。
Deploy user models
You can deploy models to SPCS Model Serving directly from the Model Registry page.
备注
Snowflake Model Registry only supports deploying user models to SPCS Model Serving.
To deploy a model, complete the following steps:
Select a model from the list of models.
From the model details page, navigate to the Versions section.
To open the version details page, select a model version from the list of versions.
From the version details page, select the Deploy button.
From the opened pane, enter a name for the service to be deployed.
Select whether to create a REST API endpoint for the deployed service.
Select a compute pool for the deployed service.
(Optional) To customize performance and resource usage, you can adjust details, such as the number of workers, CPU, and memory, from the advanced settings.
选择 Deploy。
The deployment process can take up to 15 minutes to create the service.
After the deployment is complete, the service is displayed on the Inference Services tab on the main Model Registry page.
Import and deploy models from an external service
![]() Preview Feature --- Open
Preview Feature --- Open
Available to all accounts.
备注
Currently, only Hugging Face (link removed) is supported as a model provider.
You can import pre-trained models from an external provider and deploy them as Snowflake services for inference. To import an external model, follow these steps:
In the navigation menu, select AI & ML » Models.
Select Import model.
The Import model dialog opens.
In the Model handle field, enter the model handle from your provider, or select one from the list of Snowflake-verified models.
In the Task list, select the task that the model will perform.
Optional: To enable downloading custom Python code from the model repository, select the Trust remote code checkbox.
警告
Allowing models to download arbitrary code should be considered a security risk. Only allow remote code from models you've thoroughly evaluated and trust to run on Snowflake.
Optional: To import a gated model, enter the name of the Snowflake secret for your Hugging Face token in the Hugging Face token secret field.
Your Hugging Face token secret should be a generic text secret, with your Hugging Face token as a value. For information on how to create a generic text secret, see CREATE SECRET.
Optional: Expand Advanced settings:
To perform input and output token conversion for your model, in the Tokenizer model field, enter a tokenizer model.
To add a hyperparameter, select Add parameter, and then enter a name and value that are recognized by the model.
In the Model name field, enter a name for use in the Snowflake model registry.
In the Version name field, enter a version for registration.
In the Database and schema list, select a database to link this model to.
Optional: Expand Advanced settings:
To add pip requirements to the model's runtime environment, select Add Pip requirement, and then add a pip requirement specifier (https://pip.pypa.io/en/stable/reference/requirement-specifiers/) for your package. Only packages served from PyPi are supported.
In the Comment field, enter any useful information about the model.
Select Continue to deployment.
The Deploy (model handle) dialog opens.
To deploy your model, follow these steps:
In the Service name field, enter a name that the service will run under.
Snowflake provides a default based on the model name and version.
Optional: To change whether an API endpoint is automatically created for your model's service, select or clear Create REST API endpoint.
In the Compute pool list, select an existing compute pool for the service to run on.
Optional: Adjust the number of instances in the compute pool that the service runs on.
The maximum is limited by the number of nodes in your compute pool.
Optional for CPU compute pools: To provide details for the service's available resources in the compute pool, expand Advanced settings:
Number of workers
Max batch rows
CPU: The number of virtual cores, in milli-units
GPU: The number of physical GPUs (Required for GPU compute pools)
Memory: The amount of maximum available memory
To import the model and create the service that users access your model through, select Deploy.
You can also cancel the model import or return to the model details.
Once deployment starts, a dialog displays a Query ID. This query creates the jobs to import the model and deploy your service; it is not a query to monitor either job.
Do one of the following:
To dismiss the dialog, select Done.
To monitor the query, select Open query monitoring.
Snowflake performs the following actions for your model and service deployment:
Downloads the required files from your provider.
Uploads and logs the model to your model registry.
Creates a model-specific container image for your service to run in.
Deploys the model image as a service.
备注
The length of time that Snowflake takes to perform these operations is dependent on several factors, including the model size, available compute resources, and network setup.
If an error occurs in deployment, find the associated SQL query for more information. In the navigation menu, select Monitoring » Query History to find your deployment query, which contains a call to SYSTEM$DEPLOY_MODEL.
Monitoring model and service deployment
When external models are loaded and prepared for deployment, Snowflake automatically starts registering the associated service. Monitor the deployment by following these steps:
In the navigation menu, select Monitoring » Services & jobs.
On the Jobs tab, select the job that matches your service's location and compute pool, created at the time you started the import.
This job has a name in the form
MODEL_DEPLOY_IDENTIFIER. Each service deployment performed by a model import creates a unique identifier for the associated jobs.To monitor the model deployment, select the Logs tab.
When the model deployment is complete, Snowflake starts a job to build and deploy your service.
Return to the Jobs tab, and select the job named
MODEL_BUILD_IDENTIFIER.This identifier is the same as your model deployment job.
To monitor the service container build, return to the Logs tab.
When this job is complete, your service is deployed and ready.
模型推理服务
您可以在模型注册表 UI 中查看使用 SPCS 模型服务创建的模型推理服务。主模式列表页面会显示为任何模式创建的推理服务的状态。
如果选择了模型名称和模型版本,则可以使用模型版本详细信息页面中的 Inference Services 选项卡查看已部署推理服务的更多详细信息。此选项卡也会显示服务所提供功能的列表。您可以查看或复制 SQL 或 Python 使用代码片段。
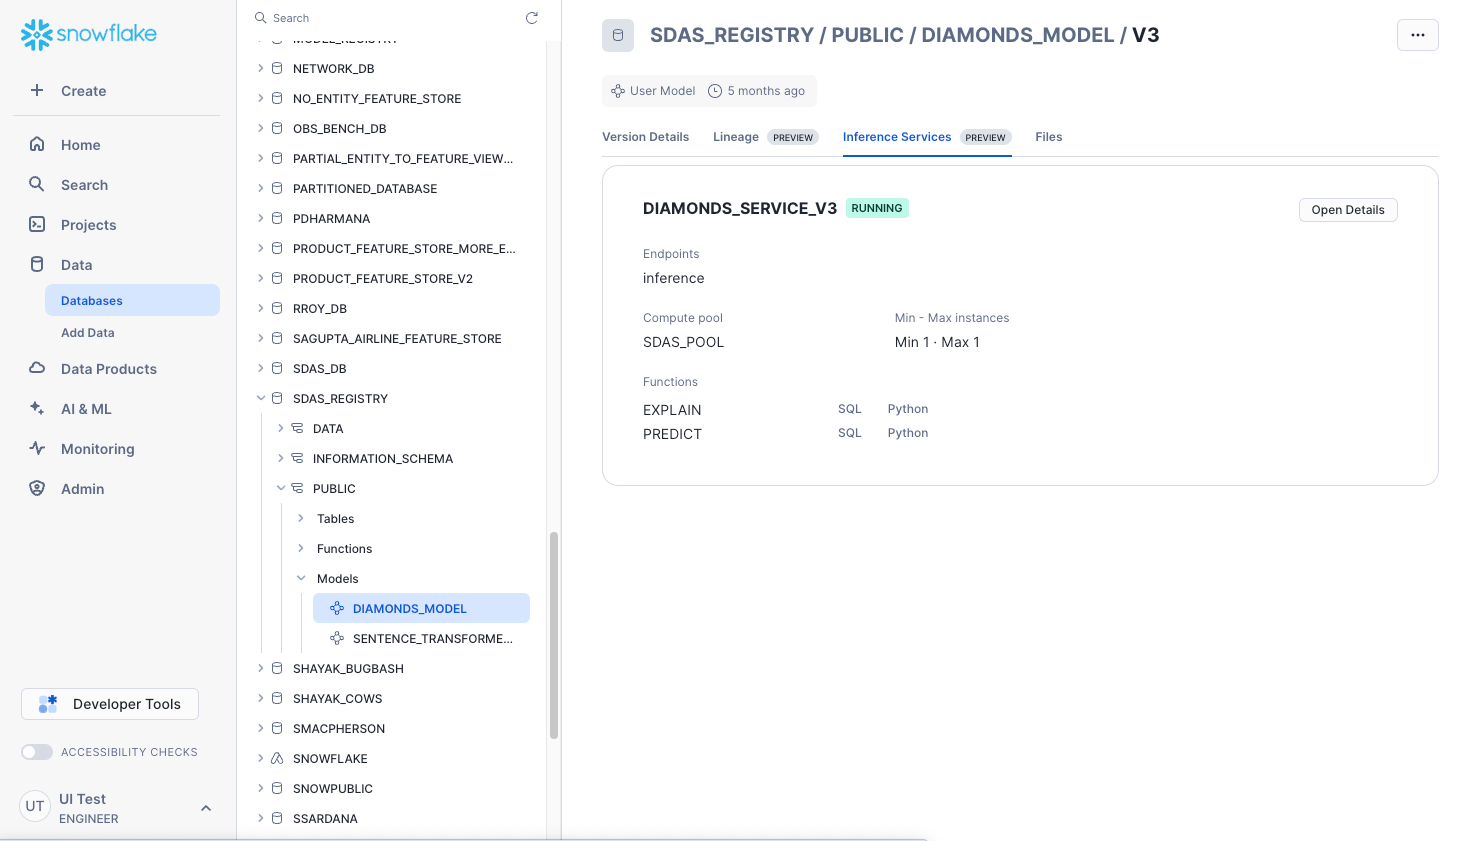
选择 Open Details 可显示服务参数和日志。您还可以从模型注册表主页面上的 Inference Services 选项卡访问服务详细信息。
模型监控
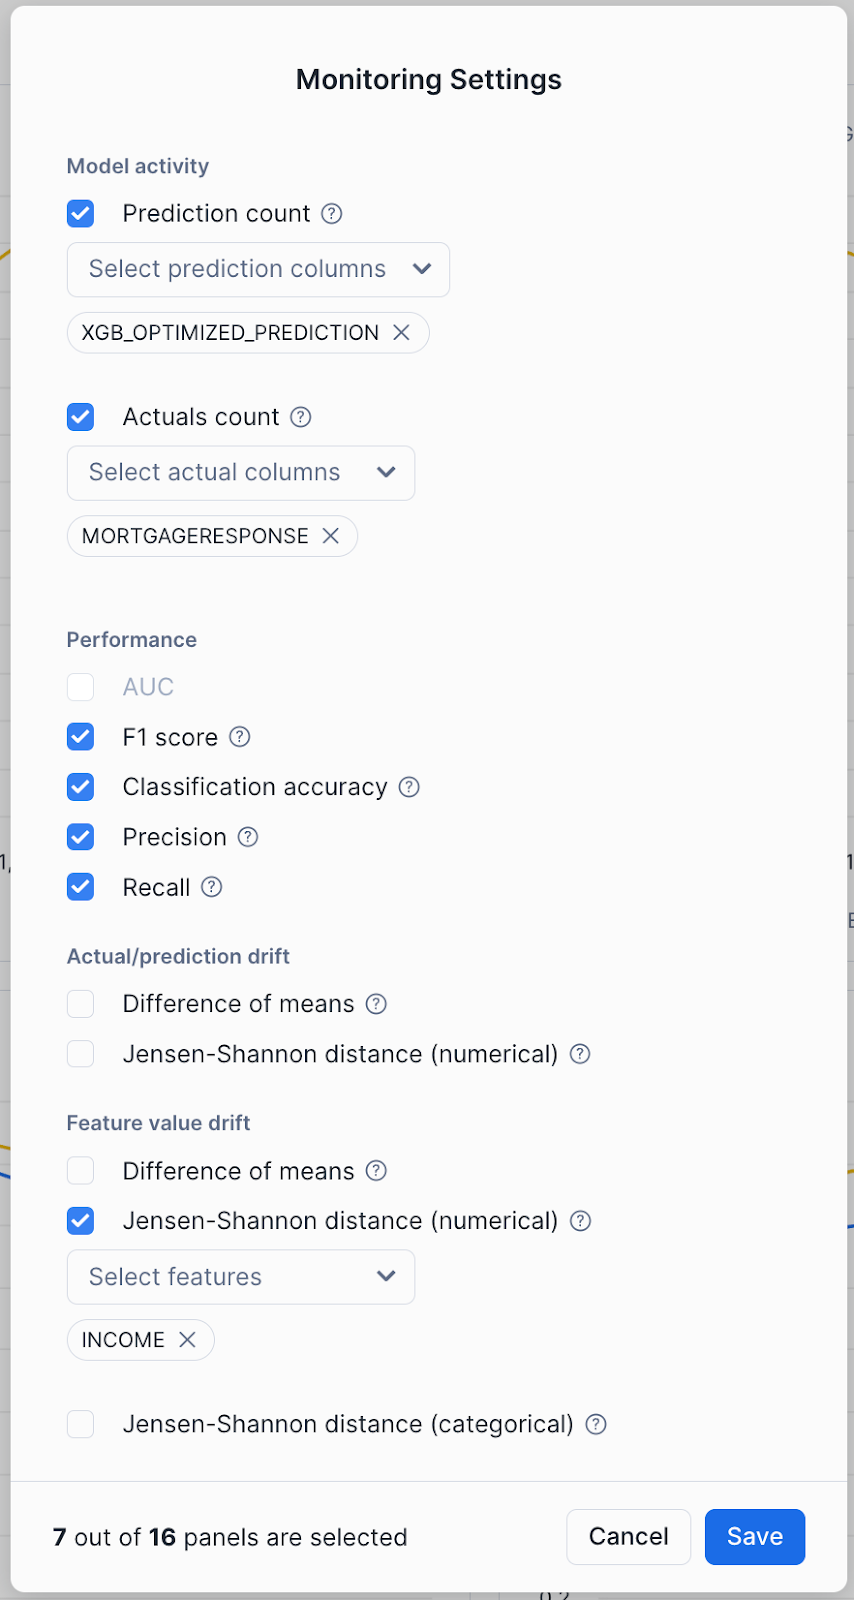
对于已附加模型监视器的任何模型,您可以使用模型详细信息页面中的模型监视器来直观显示模型监控指标。
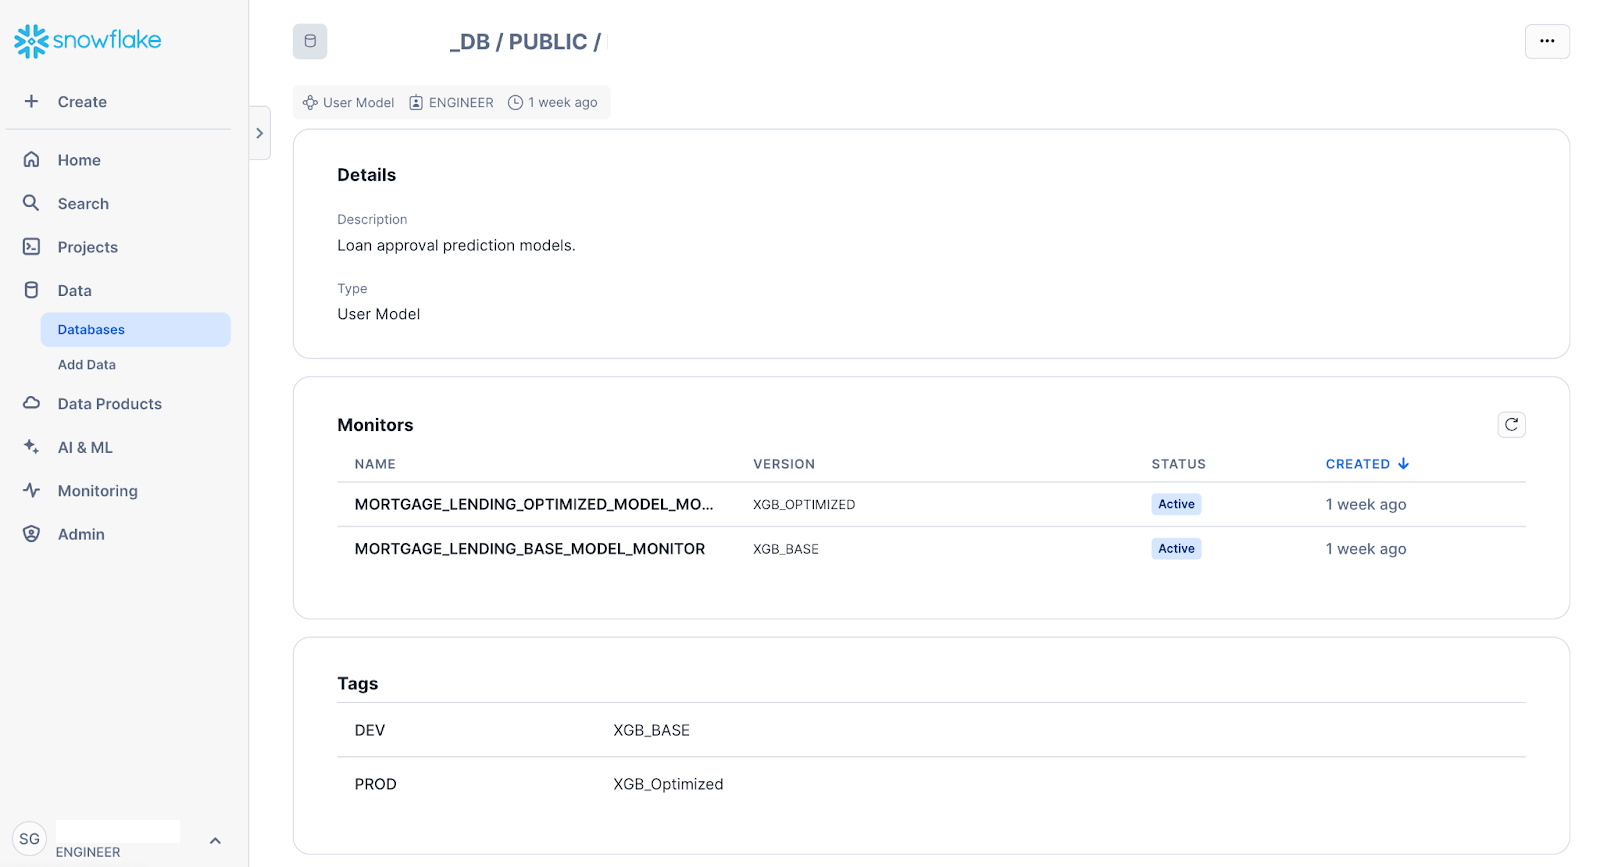
选择所需的模型监控器以显示监控仪表板:
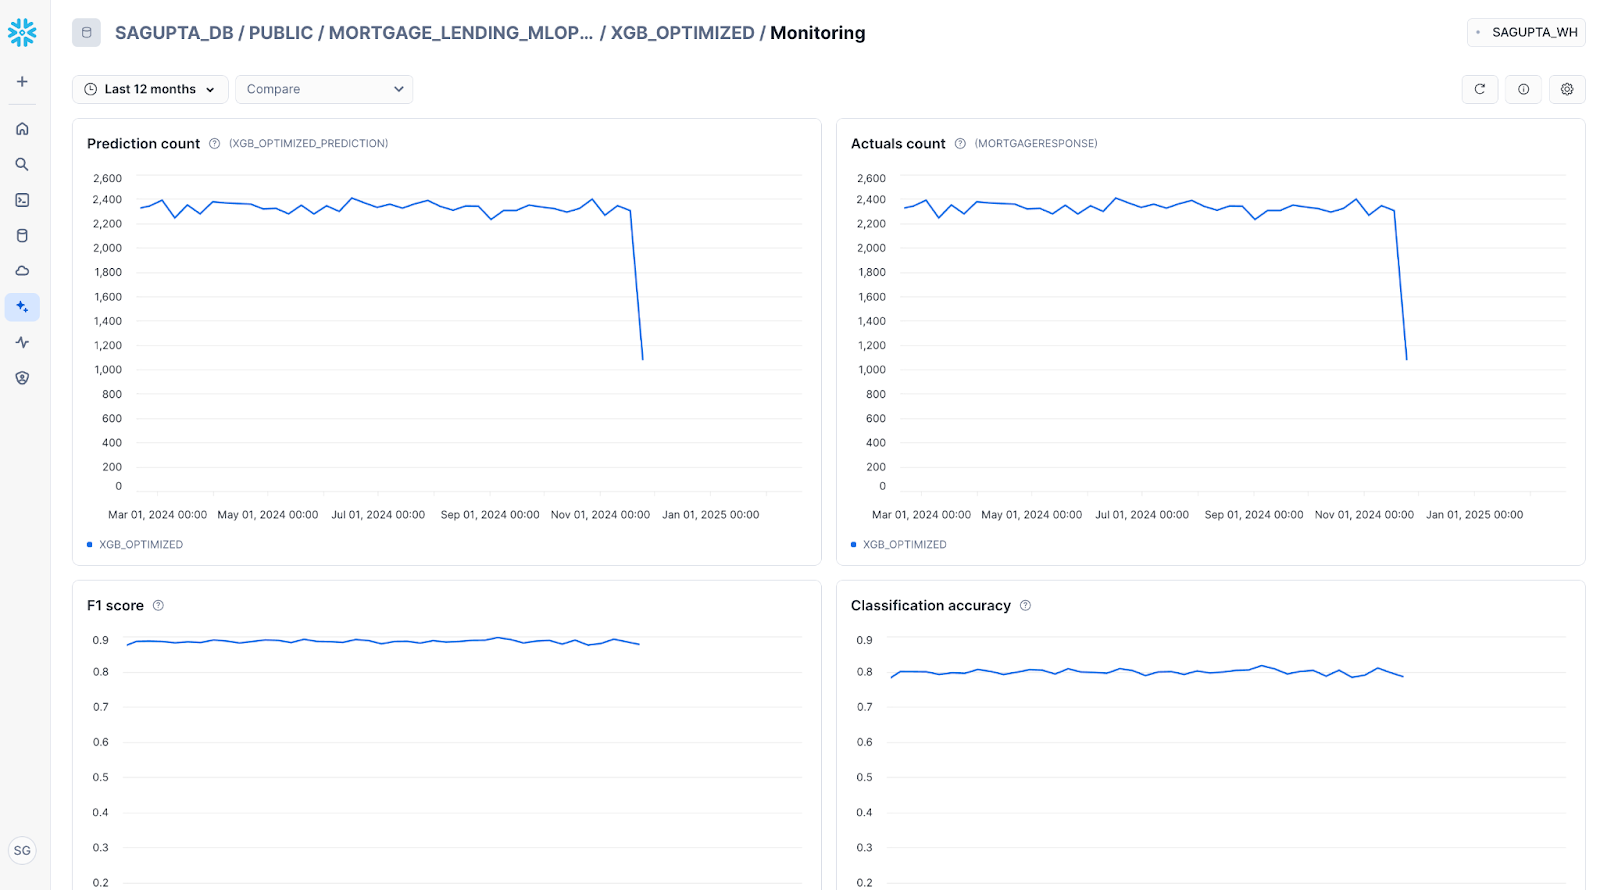
选择 Compare 以查看模型版本菜单,选择第二个模型版本与此模型版本进行比较:
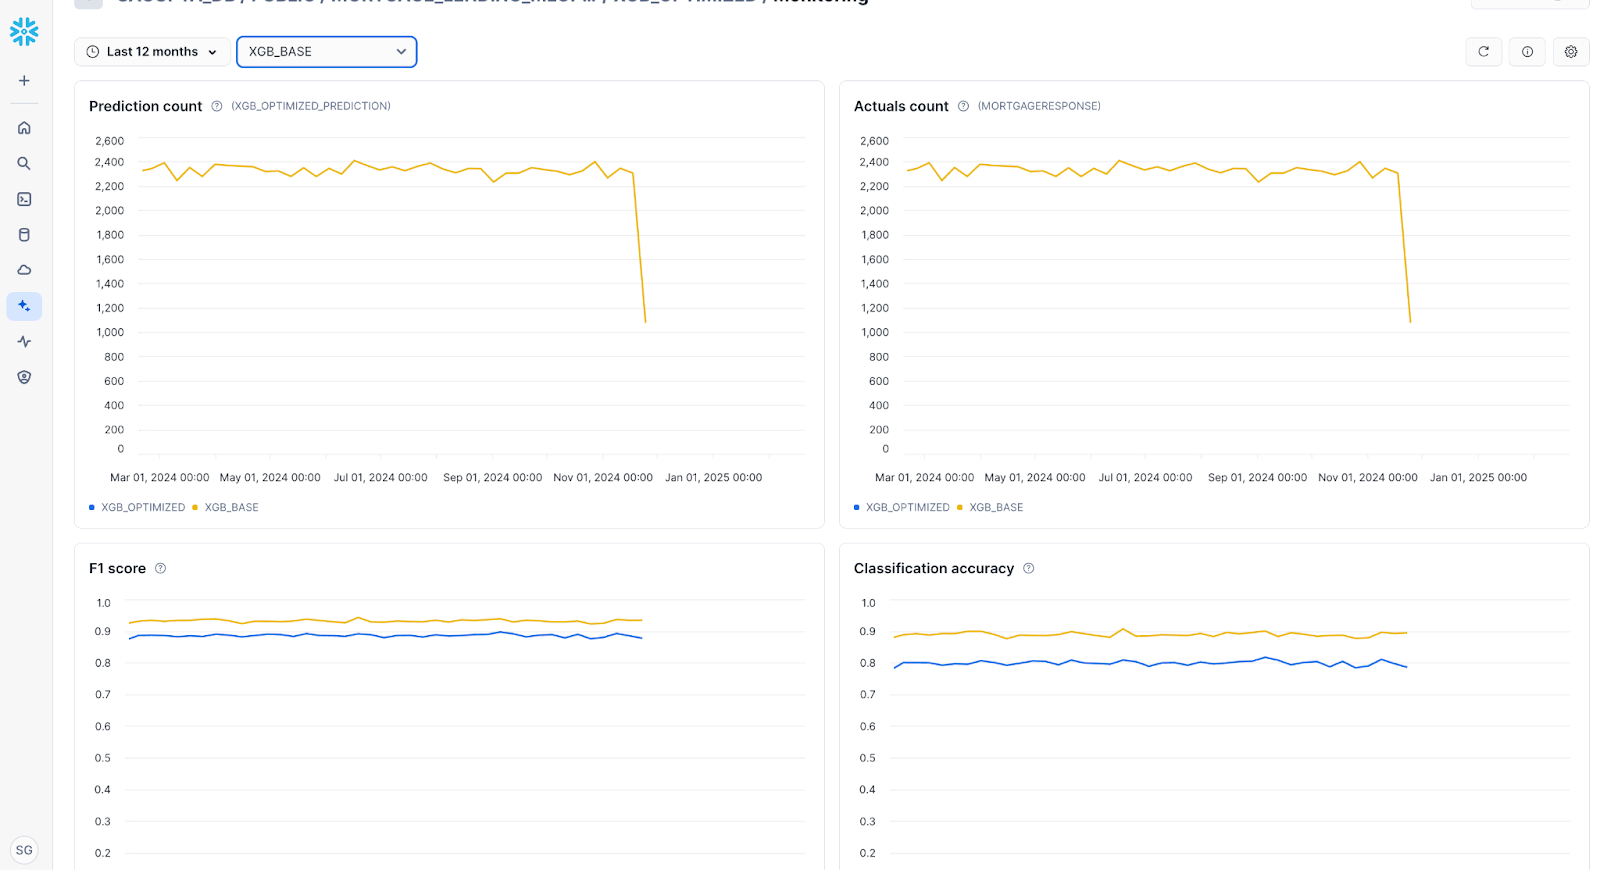
监控支持大量的模型准确性、模型偏移和特征偏移指标。要选择计算和显示的指标,请选择 Settings 图标,以选择所需的指标: