为 Azure 配置外部卷
使用外部卷向 Snowflake 授予对您自己的 Microsoft Azure 容器的受限访问权限。对于外部卷,Snowflake 支持以下 Azure 云存储服务:
Blob 存储
Data Lake Storage Gen2
 Preview feature --- Open
Available to all accounts. Configuring an external volume that is connected to Data Lake Storage Gen2 (Data Lake Storage) is in public preview.
常规用途 v1
General-purpose v2
Microsoft Fabric OneLake
重要
To enable interoperability between Snowflake and remote catalogs that are only configured to use Data Lake Storage, you must configure your external volume to connect to Data Lake Storage. For more information, see Enable interoperability with remote catalogs that use Data Lake Storage.
备注
为了加强安全态势,您可以将外部卷配置为使用专用连接(而不是公共互联网)传输网络流量。有关更多信息,请参阅 Microsoft Azure 外部存储卷的专用连接。
To configure an external volume for Azure, you can use SQL or use Snowsight.
先决条件
在配置外部卷之前,您需要具备以下条件:
Azure 存储容器。
要将外部卷用于外部管理的 Iceberg 表,所有表数据和元数据文件都必须位于容器中。
为支持数据恢复,为外部云存储位置启用版本控制。
在 Azure 中创建和管理 IAM 策略和角色的权限。如果您不是 Azure 管理员,请让 Azure 管理员执行这些任务。
如果使用 Azure 存储防火墙阻止未经授权的流量进入存储账户,请按照 Allow the VNet subnet IDs 中的说明明确授予 Snowflake 访问您的 Azure 存储账户的权限。
Enable interoperability with remote catalogs that use Data Lake Storage
This section describes how to configure Snowflake so that Iceberg tables you write to by using Snowflake are interoperable with remote catalogs that are only configured to use Data Lake Storage. For example, Unity Catalog is configured to only use Data Lake Storage.
To enable interoperability with these catalogs, Snowflake must write data files for Iceberg tables to Data Lake Storage. To enable Snowflake to
write data files to Data Lake Storage, you must configure an external volume that connects Snowflake to Data Lake Storage,
which uses the dfs.core.windows.net endpoint.
When you use Snowflake to write to Iceberg tables that are interoperable with a remote catalog that uses Data Lake Storage, the following scenarios are supported:
Use Snowflake to create Snowflake-managed Iceberg tables that the query engine for the remote catalog can read and write to.
备注
To enable interoperability with your existing Snowflake-managed Iceberg tables that are stored in Blob Storage, migrate them to Data Lake Storage. For instructions, see Migrate an Iceberg table to Azure Data Lake Storage.
Use Snowflake to read and write to remote tables in the remote catalog.
Configure an external volume that connects Snowflake to Data Lake Storage
![]() Preview feature --- Open
Preview feature --- Open
Available to all accounts.
To configure an external volume that connects Snowflake to Data Lake Storage, when you create an external volume in Snowflake,
you must specify a STORAGE_BASE_URL that points to an dfs.core.windows.net endpoint.
The following example creates an external volume named exvoldfs that is configured with a STORAGE_BASE_URL that points to a
dfs.core.windows.net endpoint.
Configure an external volume by using SQL
第 1 步:在 Snowflake 中创建外部卷
使用 CREATE EXTERNAL VOLUME 命令创建外部卷。
备注
只有账户管理员(具有 ACCOUNTADMIN 角色的用户)可执行此 SQL 命令。
以下示例创建一个外部卷,该卷定义了采用加密的 Azure 存储位置:
备注
在为 STORAGE_BASE_URL 指定值时,使用
azure://前缀,不使用https://。有关指定 OneLake 位置(预览功能)的信息,请参阅 CREATE EXTERNAL VOLUME 参考页面。
如果您使用 Microsoft Fabric OneLake 存储位置的区域端点,请使用与 Microsoft Fabric 容量相同的区域。这也必须是托管您的 Snowflake 账户的同一区域。
第 2 步:授予 Snowflake 对存储位置的访问权限
要检索 Microsoft 权限请求页面的 URL,请使用 DESCRIBE EXTERNAL VOLUME 命令。指定先前创建的外部卷的名称。
记录以下属性的值:
属性
描述
AZURE_CONSENT_URLMicrosoft 权限请求页面的 URL。
AZURE_MULTI_TENANT_APP_NAME为账户创建的 Snowflake 客户端应用程序的名称。在本部分后面的步骤中,您会授予此应用程序在允许的存储位置获取访问令牌的权限。
您可在以下步骤中使用这些值。
在 Web 浏览器中,导航到 Microsoft 权限请求页面 (
AZURE_CONSENT_URL)。选择 Accept。此操作允许为 Snowflake 账户创建的 Azure 服务主体获取租户内指定资源的访问令牌。仅当您在存储账户级授予服务主体适当的权限时,才能成功获取访问令牌(请参阅下一步)。
Microsoft 权限请求页面会重定向到 Snowflake 公司站点 (snowflake.com)。
登录 Microsoft Azure 门户。
Go to Azure Services » Storage Accounts. Select the name of the storage account that the Snowflake service principal needs to access.
备注
您必须在存储账户级别(而非容器级别)为外部卷设置 IAM 权限。
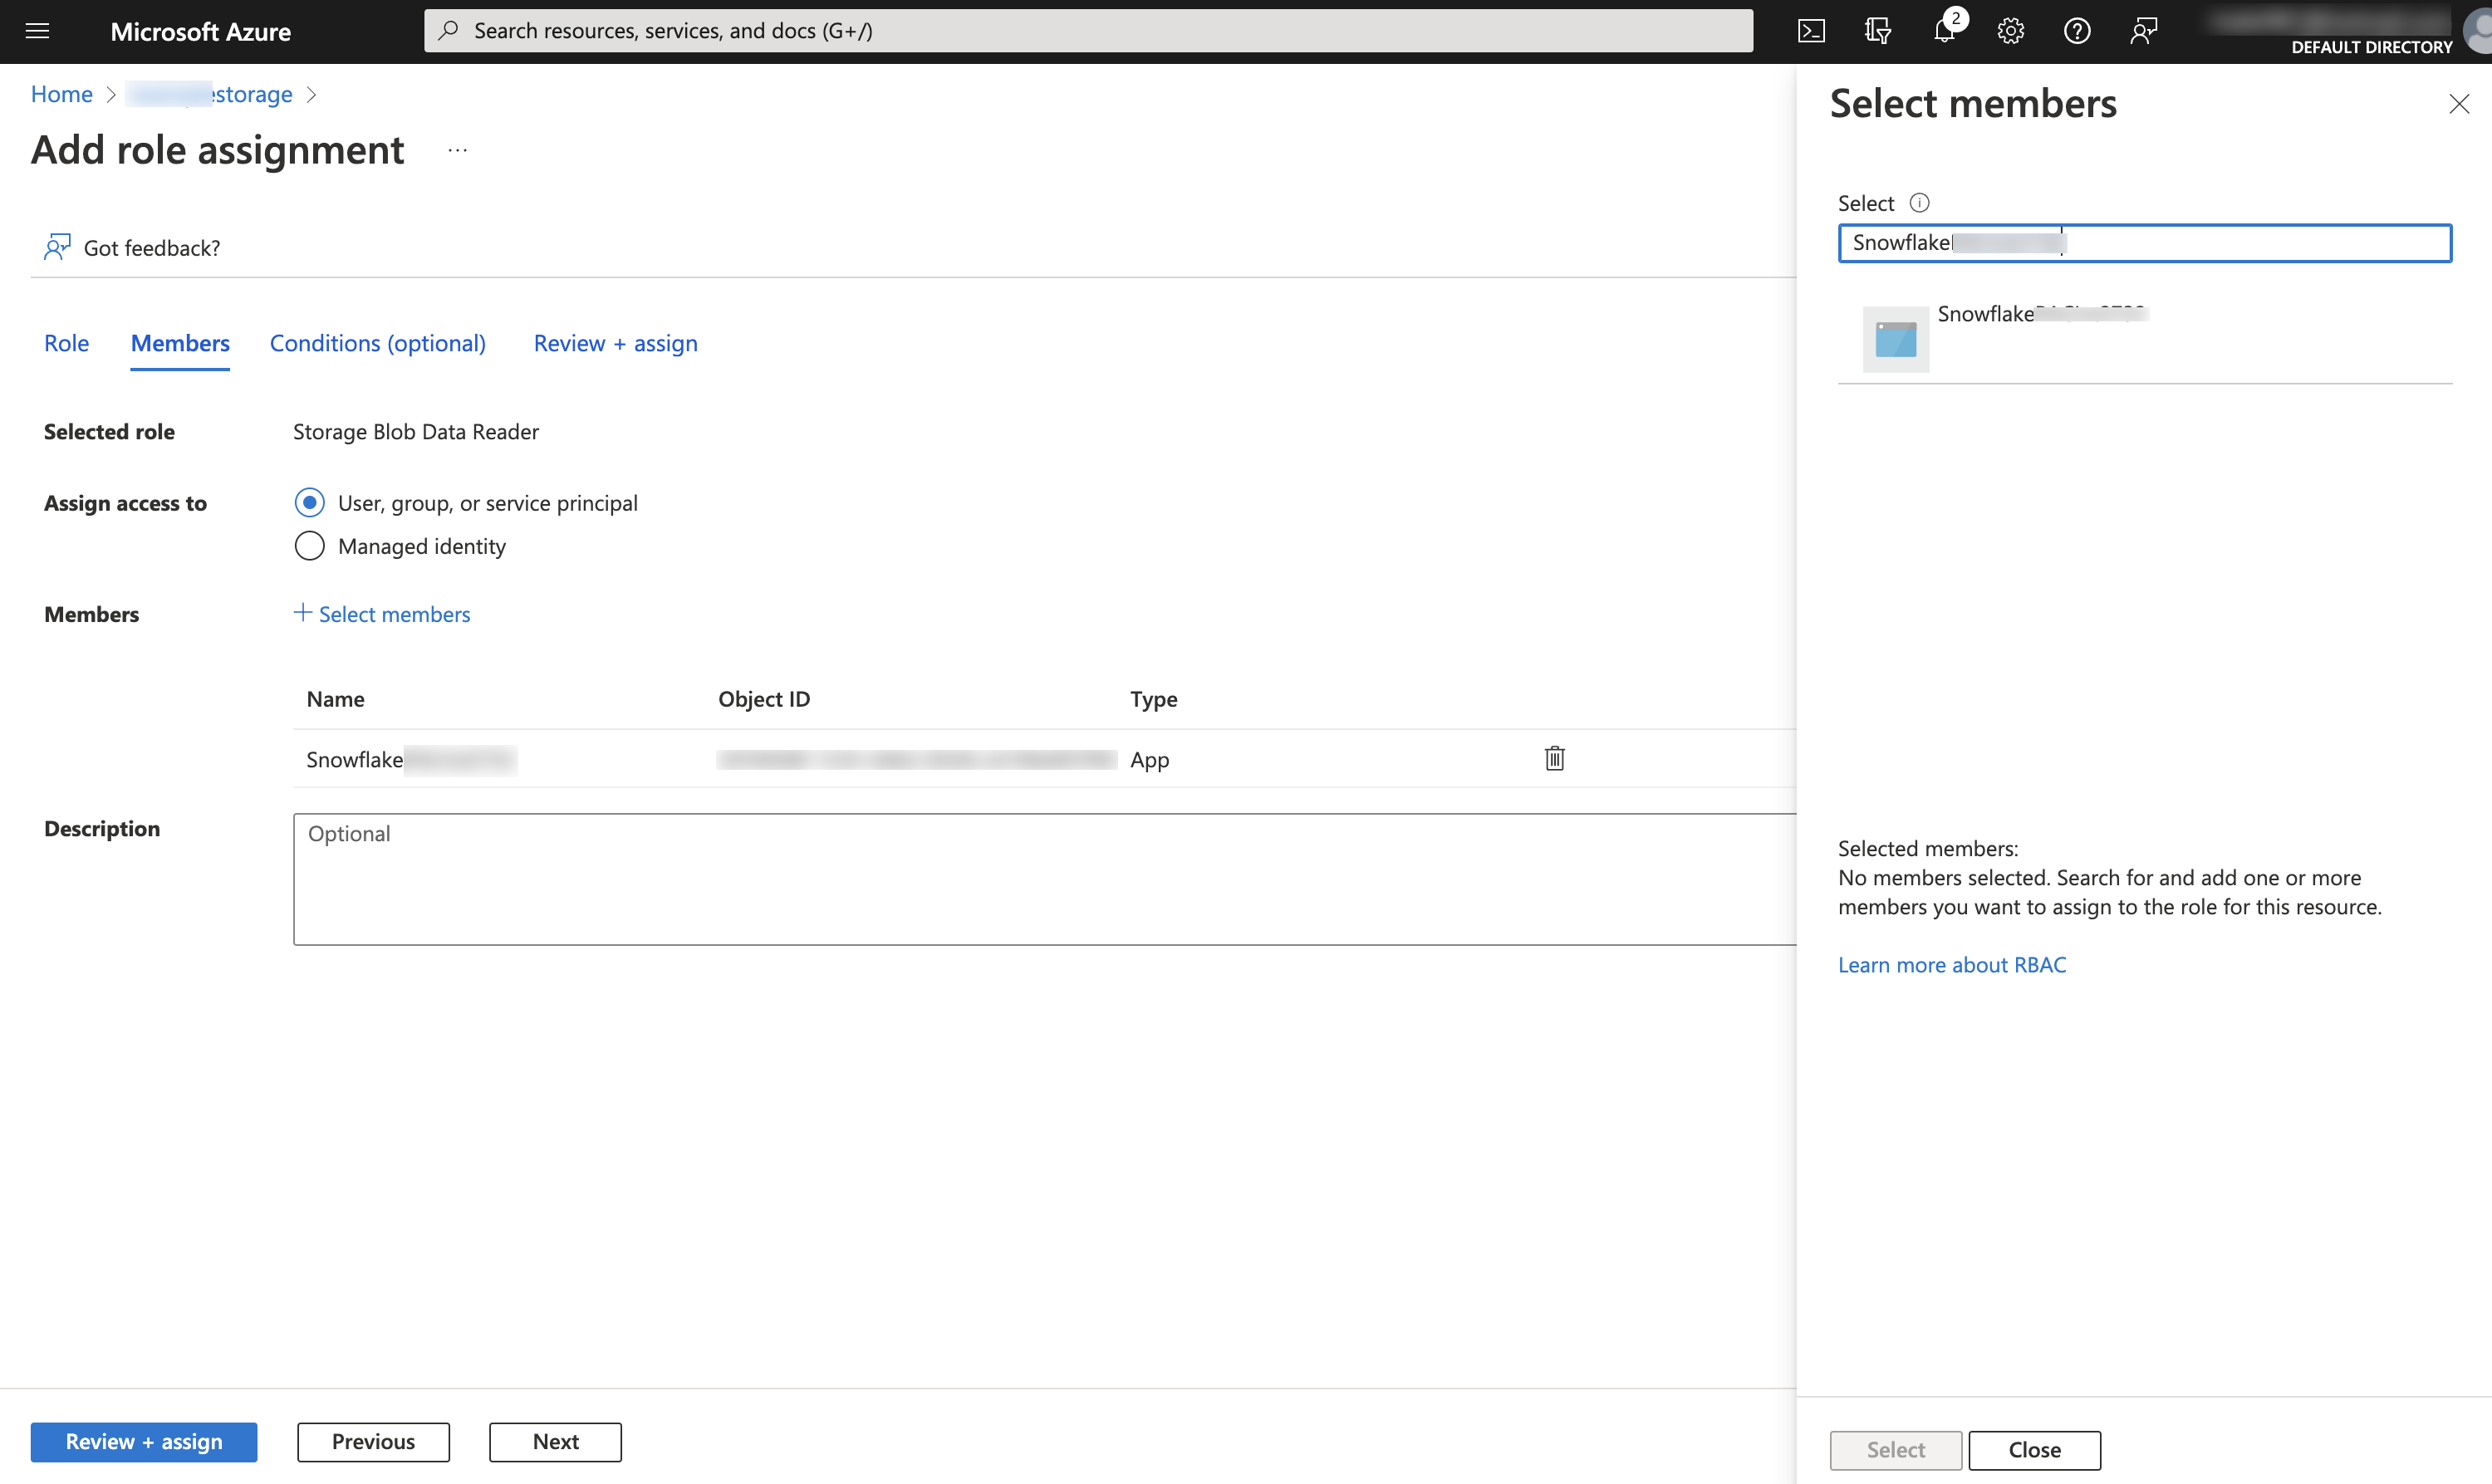
Select Access Control (IAM) » Add role assignment.
选择要授予 Snowflake 服务主体的读写访问权限的
Storage Blob Data Contributor角色。备注
The
Storage Blob Data Contributorrole grants write access to the external volume location, which is necessary for generating Iceberg metadata. To completely configure write access, set theALLOW_WRITESparameter of the external volume toTRUE(the default value).For read-only access to Delta Lake data on Azure, you can use
Storage Blob Data ReaderwithALLOW_WRITES = FALSEinstead. See Azure roles and Delta Direct on this external volume and Read-only vs write access for Delta Direct on each storage provider.Select + Select members.
搜索 Snowflake 服务主体。这是 DESC EXTERNAL VOLUME 输出(第 1 步中)中 AZURE_MULTI_TENANT_APP_NAME 属性的身份。在 AZURE_MULTI_TENANT_APP_NAME 属性中搜索下划线 之前 的字符串。
重要
Azure 可能需要一个小时或更长时间才能创建通过此部分中的 Microsoft 请求页面请求的 Snowflake 服务主体。如果服务主体不能立即使用,请等待一两个小时,然后再次搜索。
如果删除了服务主体,外部卷将停止工作。
选择 Review + assign。
备注
分配角色时,变更最多可能需要 10 分钟才能生效。有关更多信息,请参阅 Microsoft Azure 文档中的 症状 – 未检测到角色分配变更 (https://learn.microsoft.com/en-us/azure/role-based-access-control/troubleshooting?tabs=bicep#symptom---role-assignment-changes-are-not-being-detected)。
Azure roles and Delta Direct on this external volume
For Iceberg tables created from Delta table files, often called Delta Direct, choose an Azure built-in role that matches
ALLOW_WRITES on the external volume: use Storage Blob Data Reader (https://learn.microsoft.com/en-us/azure/role-based-access-control/built-in-roles/storage#storage-blob-data-reader)
with ALLOW_WRITES = FALSE, or Storage Blob Data Contributor (https://learn.microsoft.com/en-us/azure/role-based-access-control/built-in-roles/storage#storage-blob-data-contributor)
with ALLOW_WRITES = TRUE. Follow the consent, IAM, and Access scope steps earlier in this topic for either combination.
For the same read-only and write patterns on Amazon S3 and Google Cloud Storage, see Read-only vs write access for Delta Direct on each storage provider.
第 3 步:验证存储访问
要检查 Snowflake 是否能成功对您的存储提供商进行身份验证,请调用 SYSTEM$VERIFY_EXTERNAL_VOLUME 函数。
备注
如果您收到以下错误,您的账户管理员必须在 Snowflake 部署区域中激活 AWS STS。有关说明,请参阅 AWS 文档中的 在 AWS 区域中管理 AWS STS (https://docs.aws.amazon.com/IAM/latest/UserGuide/id_credentials_temp_enable-regions.html)。
Configure an external volume in Snowsight
Sign in to Snowsight.
In the lower-left corner, select your name » Switch role, and then select ACCOUNTADMIN or a role that has the CREATE EXTERNAL VOLUME privilege.
For more information, see 切换您的主要角色.
In the navigation menu, select Catalog » External data.
Select the External volumes tab.
Select + Create.
Select Microsoft Azure & OneLake and then select Next.
From the Prerequisites page, for Azure tenant ID, specify your Azure tenant ID.
To find your Azure tenant ID, see How to find your Microsoft Entra tenant ID (https://learn.microsoft.com/en-us/entra/fundamentals/how-to-find-tenant) in the Microsoft Entra documentation.
Select Next.
From the Grant storage access page, to grant Snowflake access to the storage location, follow these steps:
To provide consent for Snowflake to connect to your Azure storage or Microsoft OneLake, select Provide consent.
The Microsoft permissions request page opens in a new browser tab.
From the Microsoft permissions request page, select Accept. This action allows the Azure service principal created for your Snowflake account to obtain an access token on a specified resource inside your tenant. Obtaining an access token succeeds only if you grant the service principal the appropriate permissions on the storage account level (see the next step).
Microsoft 权限请求页面会重定向到 Snowflake 公司站点 (snowflake.com)。
In Snowflake, from the Multi-tenant app name field, copy the name of the Snowflake client application created for your account into a text editor. In the next step, you grant this application permission to obtain an access token on your allowed storage location.
To grant your application permission to obtain an access token on your allowed storage location, follow these steps:
登录 Microsoft Azure 门户。
Go to Azure Services » Storage Accounts. Select the name of the storage account that the Snowflake service principal needs to access.
备注
您必须在存储账户级别(而非容器级别)为外部卷设置 IAM 权限。
Select Access Control (IAM) » Add role assignment.
选择要授予 Snowflake 服务主体的读写访问权限的
Storage Blob Data Contributor角色。备注
Storage Blob Data Contributor角色授予对外部卷位置的写入访问权限。要完全配置写入访问权限,请将外部卷的ALLOW_WRITES参数设置为TRUE(默认值)。For read-only access to Delta data on Azure, you can use
Storage Blob Data ReaderwithALLOW_WRITES = FALSEinstead. See Azure roles and Delta Direct on this external volume and Read-only vs write access for Delta Direct on each storage provider.Select + Select members.
Search for the Snowflake service principal.
This is the Multi-tenant app name that you copied from Snowflake in the previous step.
重要
Azure 可能需要一个小时或更长时间才能创建通过此部分中的 Microsoft 请求页面请求的 Snowflake 服务主体。如果服务主体不能立即使用,请等待一两个小时,然后再次搜索。
如果删除了服务主体,外部卷将停止工作。
选择 Review + assign。
备注
分配角色时,变更最多可能需要 10 分钟才能生效。有关更多信息,请参阅 Microsoft Azure 文档中的 症状 – 未检测到角色分配变更 (https://learn.microsoft.com/en-us/azure/role-based-access-control/troubleshooting?tabs=bicep#symptom---role-assignment-changes-are-not-being-detected)。
In Snowflake, select Next.
In Snowflake, to configure your external volume, from the Configure external volume page, complete the fields:
Field
描述
External volume name
Enter a name for your external volume.
Storage base URL
Specifies the base URL for your cloud storage location.
Access scope
Specifies whether write operations are allowed for the external volume; must be set to Allow writes for the following tables:
Iceberg tables that use Snowflake as the catalog.
Iceberg tables that use an external catalog and are writable. Externally managed Iceberg tables are writable when you access them through a catalog-linked database that has the ALLOWED_WRITE_OPERATIONS parameter set to TRUE.
For Iceberg tables created from Delta table files, setting this parameter to Allow writes enables Snowflake to write Iceberg metadata to your external storage. For more information, see 基于 Delta 的表.
The value of this parameter must also match the permissions that you set on the cloud storage account for each specified storage location.
备注
If you plan to use the external volume for only reading externally managed Iceberg tables or Delta Direct tables, you can set this field to Off. Snowflake doesn't write data or Iceberg metadata files to your cloud storage when you read tables in an external Iceberg catalog.
Scope
Choose where this external volume should become the default location for future Iceberg tables. Possible values are:
Do not set a default: Don't set the external volume as a default anywhere.
Account: Set the external volume as the default for Iceberg tables that are created under the entire account.
Specific database: Set the external volume as the default for Iceberg tables that are created under the database you specify. To specify this database, use the Database drop-down that appears when you select Specific database.
Specific schema: Set the external volume as the default for Iceberg tables that are created under the schema you specify. To specify this schema, use the Database drop-down that appears to first select the parent database of the schema and then select the schema.
Comment (optional)
Specifies a comment for the external volume.
Connectivity
Specifies whether to use outbound private connectivity to harden your security posture. For information about using outbound private connectivity, see Microsoft Azure 外部存储卷的专用连接. Possible values are:
Public (default): Use the public internet.
Private (Azure Private Endpoint): Use outbound private connectivity.
Select Next.
On the Verify connection & create volume page, Snowflake verifies your connection to Azure and then displays a "Successfully connected" message.
备注
If Snowflake is unable to verify your connection, check your permission or external volume configuration and then select Verify again.
Select Create.
后续步骤
配置外部卷后,您可以创建 Iceberg 表。
要创建使用外部目录的只读 Iceberg 表,请参阅 配置目录集成。
要创建具有完整 Snowflake 平台支持的 Iceberg 表,请参阅 创建 Snowflake 管理的表。