Create a mirror
Follow these steps to create a mirror from Snowflake Postgres to a Snowflake analytics database.
Step 1: Prepare your Postgres instance
Mirroring requires the latest Postgres extensions on the source instance. Follow the path that applies to you.
Create a new instance
Create a new Snowflake Postgres instance from Snowsight or SQL. See Create a Snowflake Postgres instance for detailed instructions. New instances include the required extensions automatically, so no refresh is needed.
Refresh an existing instance
If you have an existing instance that was created before the mirroring feature was available, refresh the instance from the Postgres Manage options in Snowsight before creating a mirror. Refreshing picks up the latest Snowflake Postgres software patch, which is required for mirroring.
Sizing your instance
Size your Postgres instance for your workload plus mirroring. Mirroring continuously captures changes and temporarily retains them until they’re copied out. This uses some additional compute and storage alongside your normal traffic. On smaller instances this matters most, so for sustained high write throughput use STANDARD_L or larger with extra disk (for example, >250 GB) to absorb load spikes without the mirror falling behind.
Each mirror’s walsender runs at elevated CPU priority by default
(snowflake_cdc.walsender_cpu_priority). Decoding also raises logical_decoding_work_mem per
mirror (derived from shared_buffers unless you set it explicitly).
snowflake_cdc.max_publications caps how many mirrors an instance accepts; the default is twice
the instance’s online CPU count. See
Source instance resources
for details.
Disk size also affects write-ahead log (WAL) retention: max_slot_wal_keep_size defaults to one-tenth of the
allocated disk. If apply lag causes the WAL backlog to exceed that limit, Postgres invalidates
the replication slot and mirroring automatically re-snapshots all tables after 10 minutes. See
Mirror re-snapshots all tables after a WAL-lag spike
for details.
Note
The BURSTABLE tier isn’t supported for mirroring. Use STANDARD or HIGH MEMORY.
Replication slot limit
Each mirror uses one PostgreSQL replication slot. The default max_replication_slots is 10,
which limits the total number of mirrors (and any other logical replication subscribers) on a
single instance. If you plan to run many mirrors, see
CREATE MIRROR fails if max_replication_slots is too low
for how to increase the limit before you reach it.
Source instance resources
Mirroring is prioritized over other work on the source instance because a walsender that falls behind pins WAL and can force a full re-snapshot.
- CPU. Each mirror’s walsender runs at elevated scheduling priority by default
(
snowflake_cdc.walsender_cpu_priority = high). Decoding wins CPU contests against client backends, which can reduce client write throughput on a saturated instance. Set the parameter tolowto yield to client queries, ornormalto leave the inherited priority unchanged. - Memory. Each mirror raises
logical_decoding_work_memfor its decoding session. By default (-1) the limit is a quarter ofshared_buffersdivided across the mirrors on the instance, capped at 1 GB each. An explicit size is used as-is. - Mirror count.
snowflake_cdc.max_publicationsrefuses newcreate_mirrorcalls once the instance hosts that many mirrors. The default is twice the instance’s online CPU count. Set-1for no limit. Lowering the setting does not drop existing mirrors.
Source table requirements
To be mirrored, a source table must meet these requirements:
- Ordinary table or partitioned table. Views, materialized views, foreign tables, sequences, and other relation kinds aren’t replicable. Temporary tables are never replicated because Postgres logical replication excludes them.
- Logged (not UNLOGGED). Unlogged tables generate no WAL and can’t participate in logical replication.
- Not owned by an extension. Extension-owned tables (including the CDC metalog itself) are filtered out.
- No virtual generated columns. Tables containing virtual generated columns can’t be
mirrored.
create_mirrorfails with an error: - No ANSI-reserved column names. Tables containing columns whose names are ANSI-reserved keywords are rejected at publication time.
- No nested UUID.
uuidis supported as a standalone column but is rejected at publication time when nested inside an array or composite type (for example,uuid[]or a composite with auuidfield). See Nested type handling for details. - Unique table names. The case-insensitive
schema.tablemust be unique among mirrored tables, and the table name can’t end in$changesor$live(reserved for companion objects).
Primary key and UPDATE/DELETE support
Tables without a primary key are mirrored as insert-only: the CDC extension sets
REPLICA IDENTITY NOTHING on them, which causes Postgres to reject UPDATE and DELETE on the
source. Add a primary key before mirroring if the table needs to support UPDATE or DELETE.
Step 2: Grant permissions (SQL only)
If you’re creating a mirror using the Snowflake UI, skip this step — the UI grants these
permissions automatically. If you’re using SQL, grant the postgres_mirror_admin application
role to the role that will manage mirrors, and grant USAGE on the Postgres instance to the
snowflake application:
If you create Iceberg targets on your own storage, also grant the volume to the application
before you call create_mirror:
If you pin the apply task to a user-managed warehouse, grant warehouse usage the same way:
Replace "my_instance" with the name of your Postgres instance,
and replace "my_role" with the name of the role that will manage mirrors.
Caution
Don’t revoke USAGE from the snowflake application, because doing so breaks active mirrors.
Step 3: Create the mirror
You can create a mirror using SQL or the Snowflake UI.
Using SQL:
Use the snowflake.postgres.create_mirror procedure to specify which Postgres tables to replicate
and how often to sync:
You must specify postgres_tables, postgres_schemas, or both. postgres_tables tracks exactly
the tables you list. postgres_schemas tracks every current and future table in those schemas.
See Table-level vs schema-level replication
for how to choose. The
refresh_interval defaults to '10 minutes' and accepts values like '30 seconds', '1 minute',
'1 hour', or '1 day' (maximum). For full parameter details, see
create_mirror.
By default, CREATE_MIRROR creates standard Snowflake tables as the target. To mirror into
Snowflake-managed Iceberg tables instead, add target_table_type => 'ICEBERG':
Iceberg target tables use Snowflake-managed storage unless you pass external_volume. External
catalogs aren’t supported. To write Iceberg targets to your own storage, grant the volume first,
then pass both target_table_type => 'ICEBERG' and external_volume:
Using the Snowflake UI:
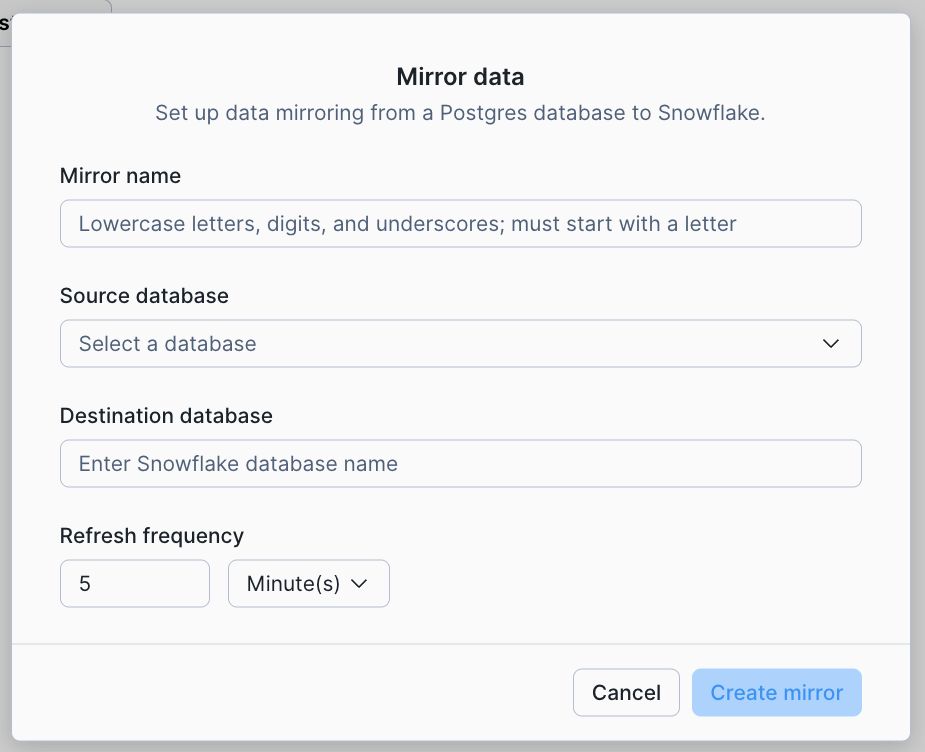
Navigate to your Postgres instance in Snowsight and select Manage to configure mirroring. Enter a mirror name, select the source database, provide a destination database name, and set the refresh frequency.
Important
The target database must not already exist. The mirror creates it automatically. You can’t reuse a target database that was previously used by a mirror, even if that mirror was dropped.
Step 4: Verify data in Snowflake
Once the mirror is created and the initial sync completes, verify that the data has arrived in Snowflake:
The count should match the source table in Postgres. You can also check the $live view, which
includes any changes that haven’t been merged yet:
Use list_mirrored_tables to check the replication state of each table. Tables show as
SNAPSHOTTING during the initial copy and REPLICATING once caught up:
From this point on, any inserts, updates, or deletes in Postgres automatically replicate to Snowflake on the configured refresh interval. A Mirroring tab on the Postgres landing page in Snowsight shows your existing mirrors. This tab may take a few minutes to populate after your first mirror creation.
Next steps
For a richer end-to-end walkthrough with example data, see the Snowflake Postgres mirroring quickstart.
Cloud and region availability
Note
Mirroring is currently available only on Amazon Web Services (AWS) and Microsoft Azure. Mirrors can’t be created between different accounts, regions, or cloud providers.