Snowpark Migration Accelerator: Interactive Assessment Application Installation Guide
This section guides you through deploying the Interactive Assessment Application (IAA) in your Snowflake account. The IAA is a Streamlit app that leverages the power of Snowflake within Snowflake to analyze the output data from the Snowpark Migration Accelerator (SMA). This document provides the necessary steps and resources to analyze your workload within your Snowflake environment using the IAA.
Step-by-step Guide
Before deploying the IAA, ensure you have the following prerequisites:
You have executed the SMA have the output data ready for analysis.
You have a Snowflake account. (This is required to host and run the IAA.) If not, a` Snowflake Trial Account <https://signup.snowflake.com/?utm_cta=sit-iaa-signup (https://signup.snowflake.com/?utm_cta=sit-iaa-signup)?>`_ will work.
You have VSCode or Jupyter installed to run the notebook:` VSCode <https://code.visualstudio.com/ (https://code.visualstudio.com/)>`_ or` Jupyter <https://jupyter.org/ (https://jupyter.org/)>`_.
Ensure you have Python 3.11 or later installed. This version is required for compatibility with the IAA notebook.
You may already have Python installed on your system. If not, follow one of the options below. * For Linux or Mac, you can use the script: deployment/pre_req_install_python_3.sh (https://github.com/Snowflake-Labs/IAA-Support/blob/main/deployment/pre_req_install_python_3.sh). * For Windows, you can get it from the official Python website (https://www.python.org/downloads/) if you don’t have Python. * Another alternative is to install with Miniconda: docs.conda.io (https://docs.conda.io/projects/miniconda/en/latest/)
Note
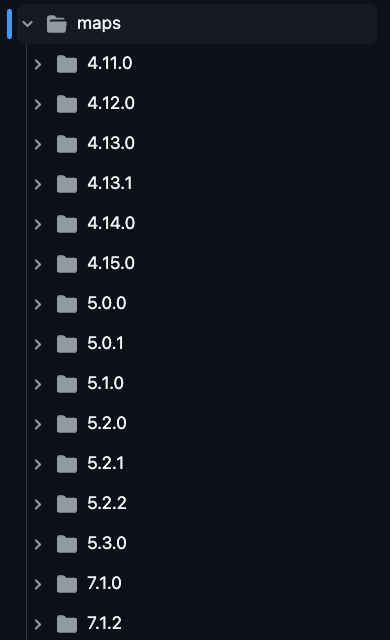
Uploading all the mappings table might take longer than selecting just the latest. We recommend uploading the latest if you are not interested in comparing your execution with previous versions.
In VS Code you can select the Map folder, that contains all the folders with the APIs and EWIs versions and delete those that you would not like to upload, in this case you can leave only the 7.1.2 version.
Once you’ve completed checking the prerequisites, proceed to Deployment.
Let’s deploy the IAA!
Note
This step by step guide applies to VS Code
Repository
Go to the Snowflake Labs’ open-source GitHub: https://github.com/Snowflake-Labs/IAA-Support (link removed).
Click the “Code” button, and copy your preferred method for cloning the repository (e.g., HTTPS or SSH)
Choose the directory where you want to save the repository on your local machine, if applicable
Executing the Notebook in VS Code
Note
Note: This deployment process uses the Snowflake CLI.
Open the downloaded repo in the VSCode environment.
In VS Code click
Yes, I trust the authors
iaa_config.toml file
Part 1: Getting Credentials from “Connect a tool to Snowflake”
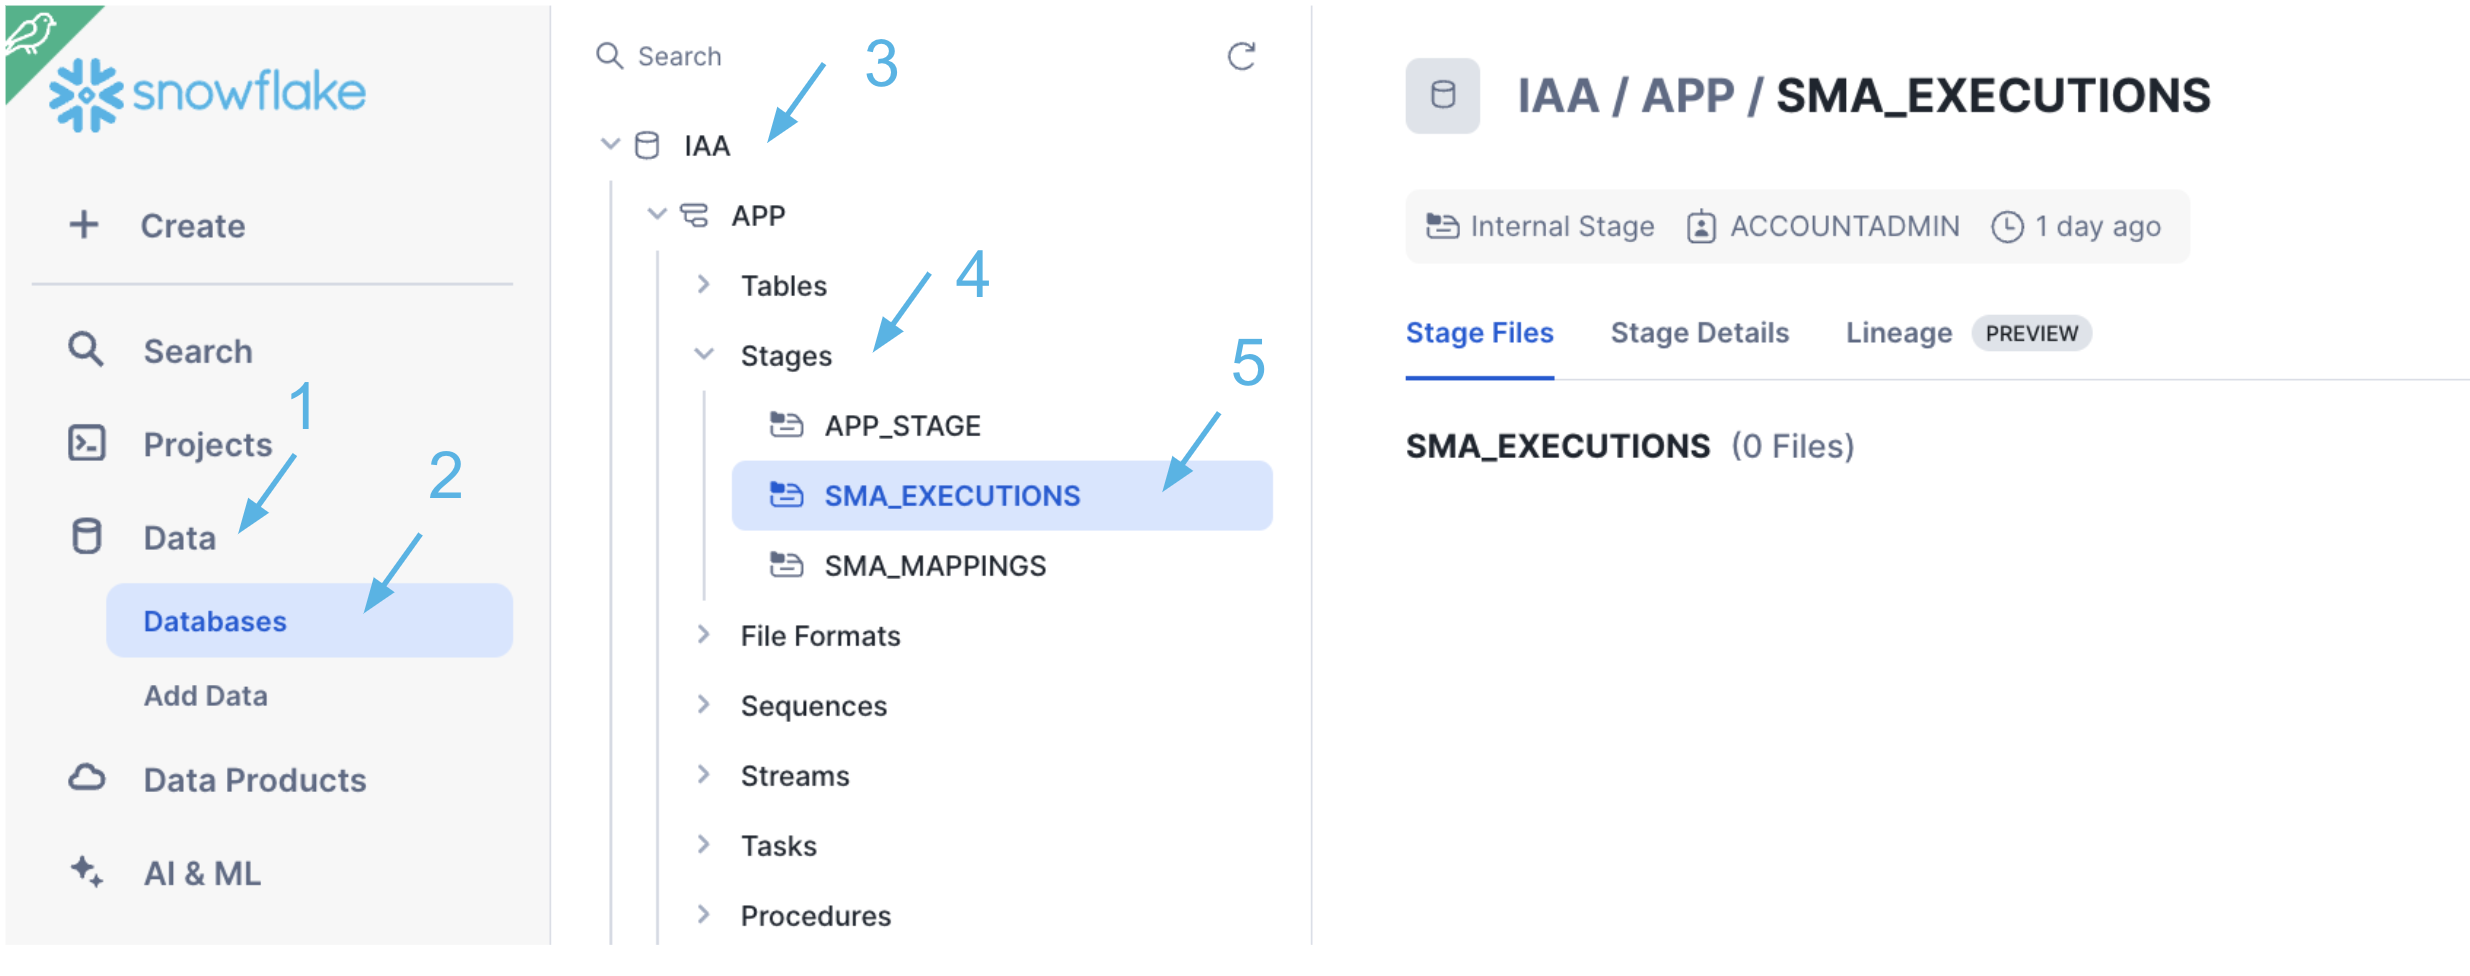
In your Snowflake account, click your initials in the bottom-left corner.
Select “Connect a tool to Snowflake”.
Open the file
iaa_config.toml.Copy the following information from the “Connect a tool to Snowflake” window and paste it into the
iaa_config.tomlfile: 1. Account Identifier 2. User Name
Part 2: Providing Additional Details
In the iaa_config.toml file, also provide the following information:
Password: Enter your Snowflake password.
Database Name: Enter the name of the database you want to use for the IAA.
Schema Name: Enter the name of the schema you want to use for the IAA.
Warehouse Name: Enter the name of the warehouse running in your Snowflake account.
Save the changes in the iaa_config.toml file.
Warning
Warning: The cell that validates the connection entries may fail if the .toml information is wrong, in that case, verify the input information.
Kernel
In order to executes the .ipynb file you need to install the Python and Jupyter extensions in VS Code.
Select the python environment that comply with the version required to execute the notebook. (3.11 or later).
Executing the Notebook
To deploy the app in your Snowflake account, please select “Run all” the cells.
These cells configure automatically the local environment and establish the connection to your Snowflake account to prepare for the Streamlit app deployment. Specifically, these cells will:
Verify the Python3.11 requirement
Verify check the Snowflake CLI Requirement
Execute the iaa_config.toml file is executed to connect with the Snowflake Account Configuration: 1. Read the local .toml file 2. Validate connection Entries 3. Establish a connection to Snowflake
Prepare the environment to deploy the Streamlit app in Snowflake 1. Configure local environment 2. Retrieve Connection Entries
Deploy the Streamlit app to Snowflake using the Snowflake CLI:
Deploy the App Schema to SiS.
Deploy the Maps Stage to SiS.
Deploy the APP to SiS.
Refresh the Deployment
Retrieve the app information and provide an access button.
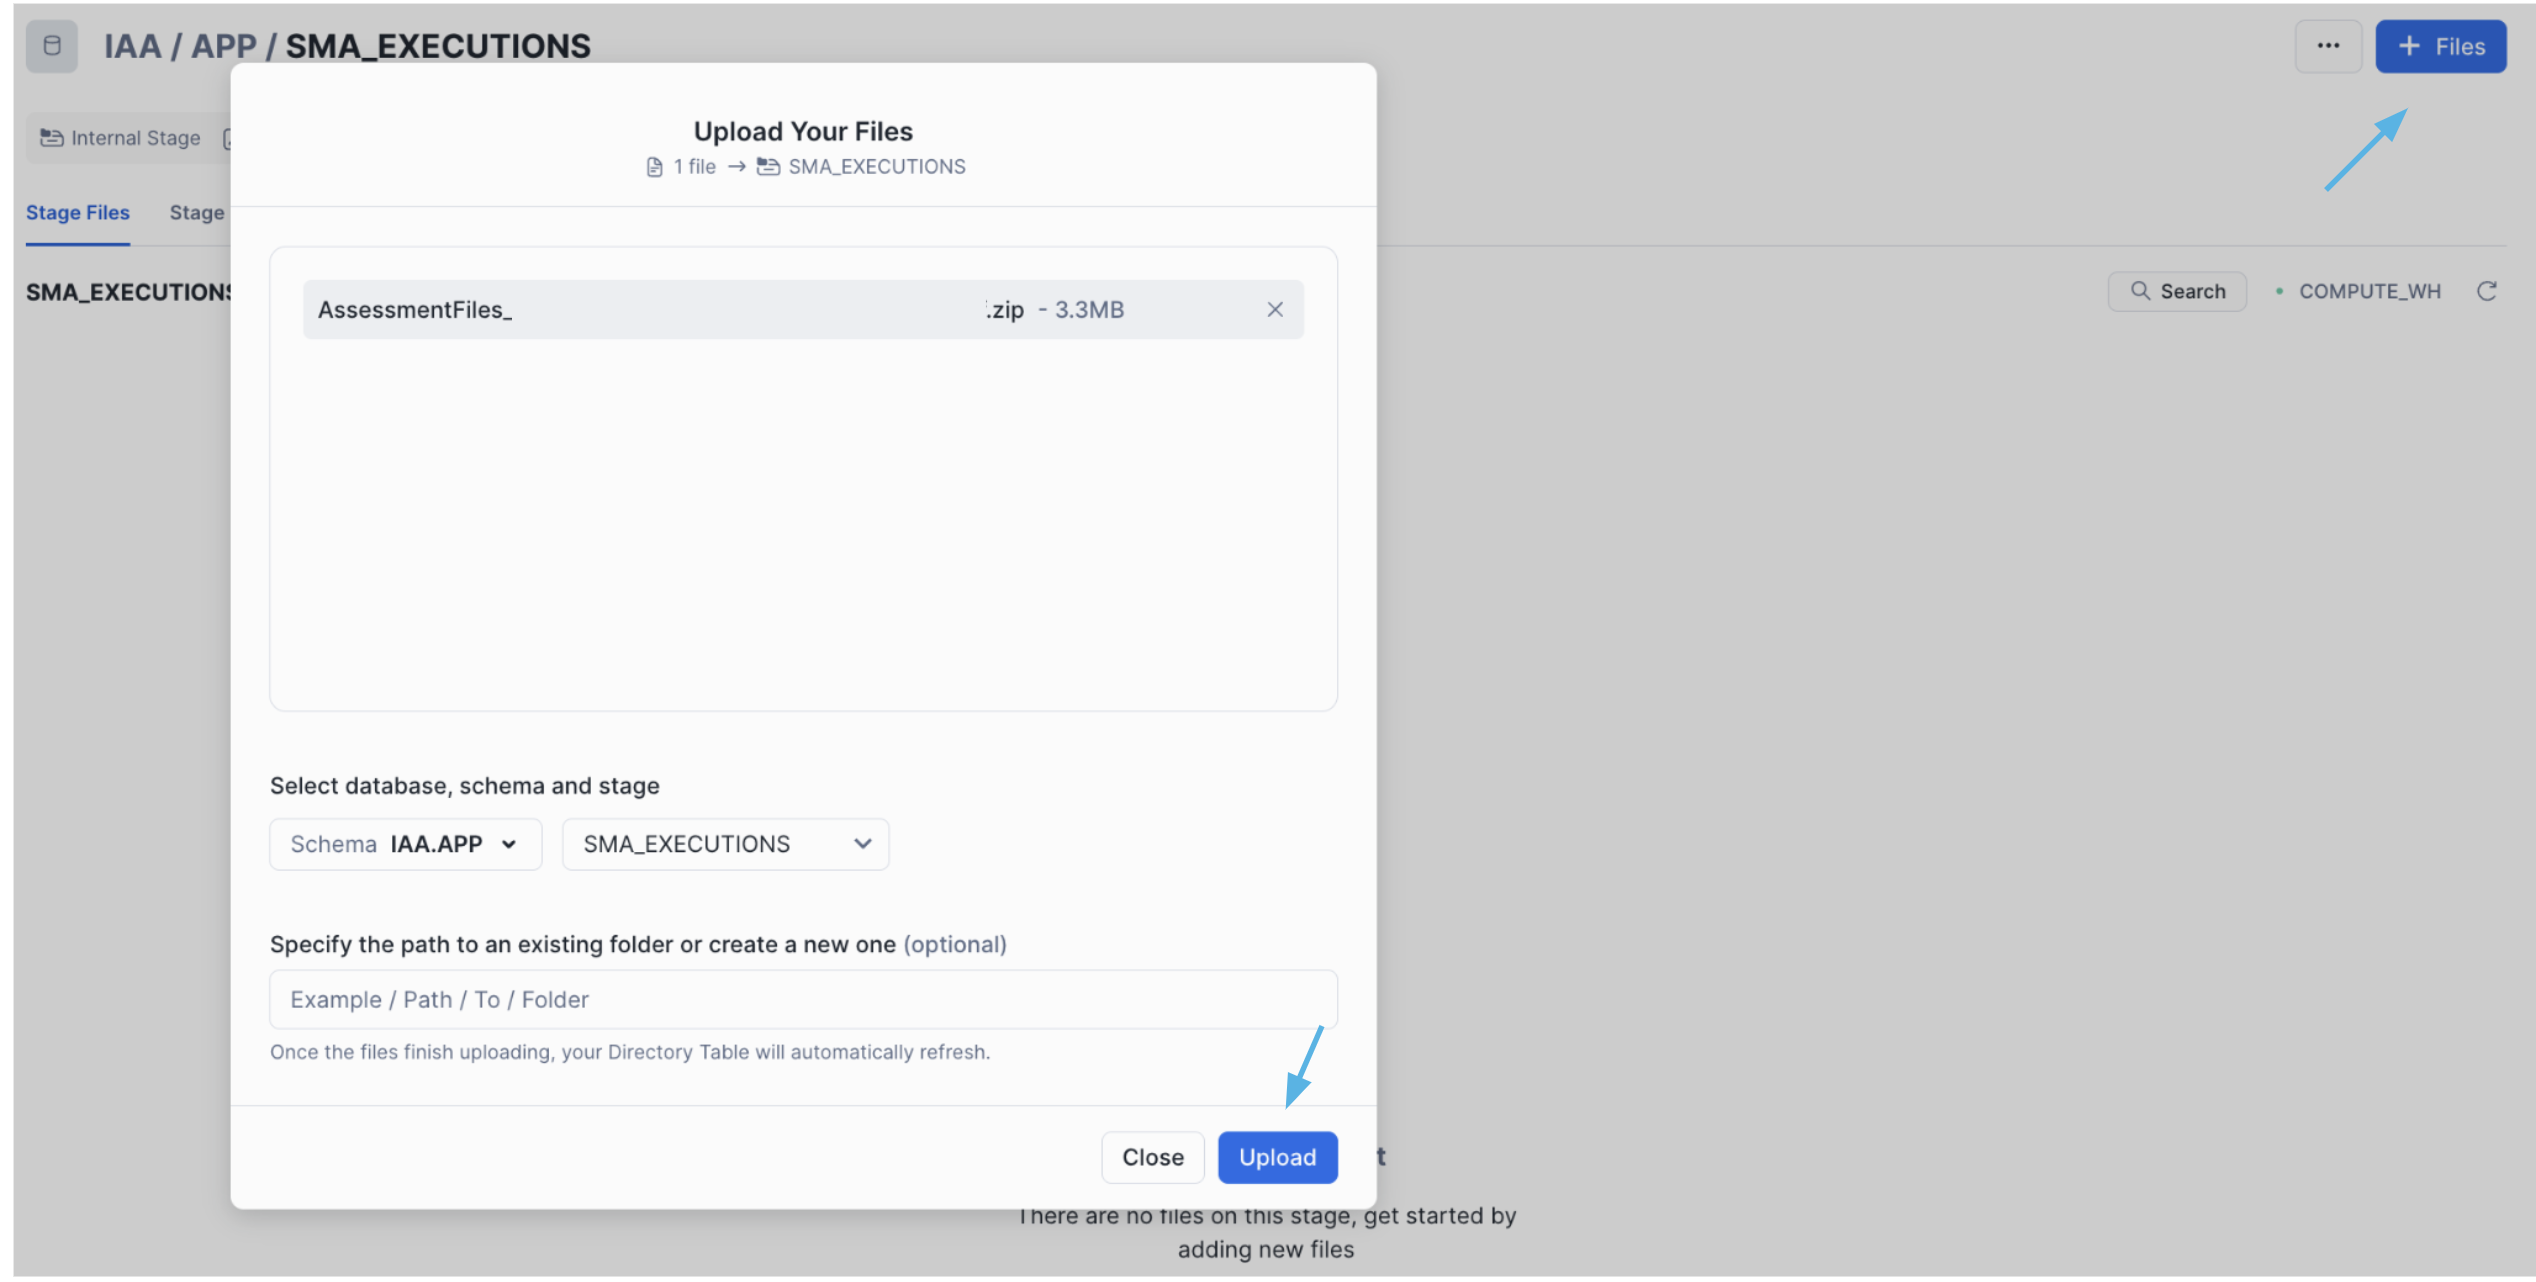
That’s it! It’s time to upload your output.
It is time to upload your SMA Output!
Locate the SMA output zip file, named in the format AssessmentFiles_*.zip, in the output folder.
Go to your Snowflake Account
Upload your AssessmentFiles.zip.
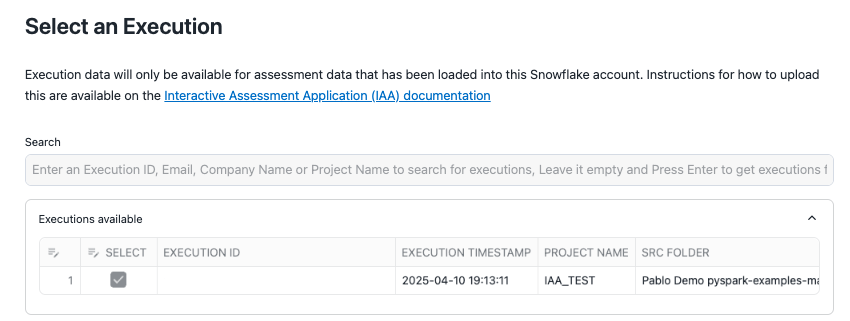
Open the IAA to explore your execution information. This step can take around 30 seconds.
Once open the IAA the landing page will look like this:

Now you can explore your execution using the IAA.
Exploring the IAA
The Interactive Assessment Application (IAA) is now installed in your Snowflake account. You have successfully uploaded your SMA output executions and are ready to explore the compatibility of your Spark code with Snowpark.
Note
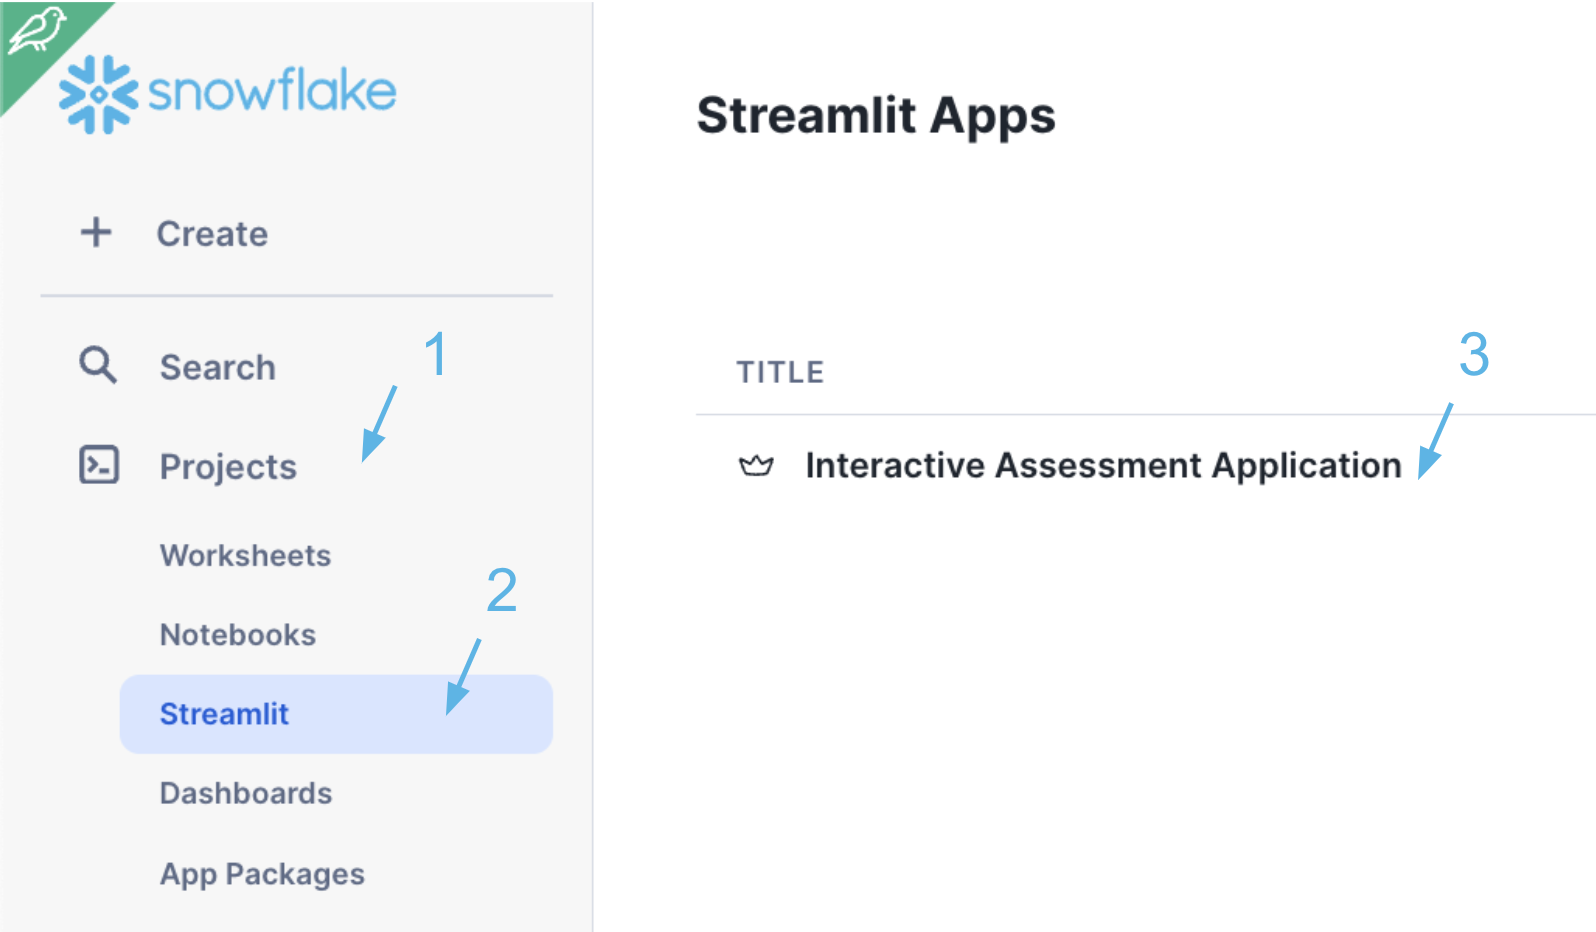
Remember how to access the IAA in your Snowflake account:
Projects > Streamlit > Interactive Assessment Application
The IAA will allow you to identify which parts of your code are directly compatible and which parts require manual intervention or further optimization. It is recommended touse the latest SMA version. However, if you have older executions, the IAA will compare them against the latest API mapping versions.
Navigating the IAA
There are 2 differents sections in the IAA. Explore my executions and Explore the compatibility between Spark and Snowpark

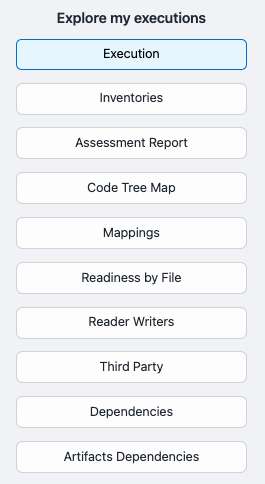
Explore my executions
Select an execution from the list. Your selection will be maintained as you navigate through the different sections of the IAA.
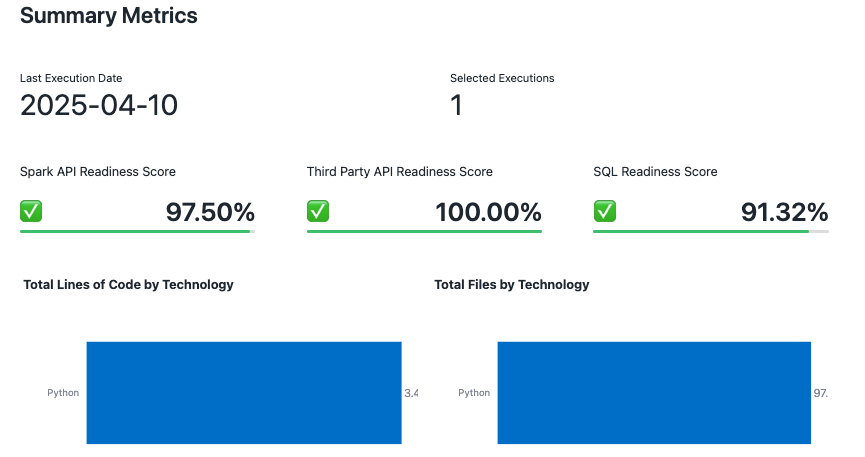
A readiness score will be provided for:
Spark API
Third-Party
SQL
Code metrics by technology:
Total lines of code
Total files
In the left bar you can navigate throught the sections that will guide you to understand how to better plan your migration.
Explore the compatibility between Spark and Snowpark.
How compatible is my Spark code to Snowpark?
This section provides access to the latest API mappings to Spark, PySpark, and Pandas. The SMA team researches these mapping tables and reflects the current compatibility status for each unique element shown below.
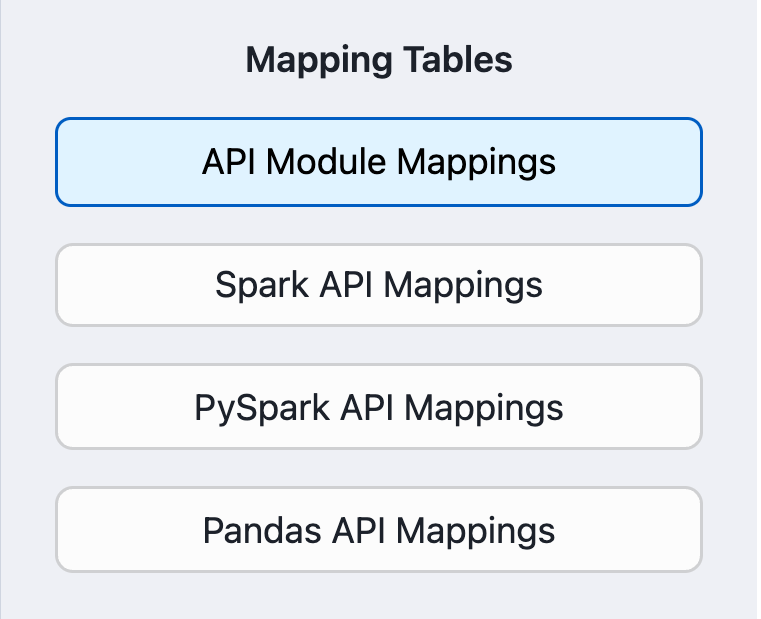
This tables helps users to assess compatibility between the source API and/or the third party libraries to Snowflake library/ Snowpark API:
API Module Mappings
Spark API Mappings
PySpark API Mappings
Pandas API Mappings