pandas on Snowflake

pandas on Snowflake lets you run your pandas code directly on your data in Snowflake. By simply changing the import statement and a few lines of code, you can get the familiar pandas experience to develop robust pipelines, while seamlessly benefiting from Snowflake's performance and scalability as your pipelines scale.

pandas on Snowflake 会智能判断 Pandas 代码是本地执行还是使用 Snowflake 引擎来扩展和提升性能,这一过程称为 混合执行。在处理 Snowflake 中的大型数据集时,它会通过转换为 SQL 的方式在 Snowflake 内部本地运行工作负载,从而充分利用并行计算能力,并获得 Snowflake 的数据治理和安全优势。

pandas on Snowflake 通过 Snowpark pandas API 提供,是 Snowpark Python 库 的一部分,使得 Python 代码可以在 Snowflake 平台上进行可扩展的数据处理。

使用 Pandas on Snowflake 的好处

  • Meeting Python developers where they are: pandas on Snowflake offers a familiar interface to Python developers by providing a pandas-compatible layer that can run natively in Snowflake.

  • Scalable distributed pandas: pandas on Snowflake bridges the convenience of pandas with the scalability of Snowflake by leveraging existing query optimization techniques in Snowflake. Minimal code rewrites are required, simplifying the migration journey, so you can seamlessly move from prototype to production.

  • No additional compute infrastructure to manage and tune: pandas on Snowflake leverages the Snowflake's powerful compute engine, so you do not need to set up or manage any additional compute infrastructure.

开始使用 Pandas on Snowflake

备注

关于如何使用 pandas on Snowflake 的实践示例,请参阅此 笔记本 (https://github.com/Snowflake-Labs/snowflake-python-recipes/blob/main/pandas%20on%20Snowflake%20101/pandas%20on%20Snowflake%20101.ipynb) 并观看此 视频 (link removed)

要安装 Pandas on Snowflake,您可以使用 conda 或 pip 来安装包。有关详细说明,请参阅 安装

pip install "snowflake-snowpark-python[modin]"
Copy

安装 Pandas on Snowflake 后,不要以 import pandas as pd 的方式导入 Pandas,而是使用以下两行:

import modin.pandas as pd
import snowflake.snowpark.modin.plugin
Copy

Here is an example of how you can start using pandas on Snowflake through the pandas on Snowpark Python library with Modin:

import modin.pandas as pd
import snowflake.snowpark.modin.plugin

# Create a Snowpark session with a default connection.
from snowflake.snowpark.session import Session
session = Session.builder.create()

# Create a Snowpark pandas DataFrame from existing Snowflake table
df = pd.read_snowflake('SNOWFALL')


# Inspect the DataFrame
df
Copy
      DAY  LOCATION  SNOWFALL
0       1  Big Bear       8.0
1       2  Big Bear      10.0
2       3  Big Bear       NaN
3       1     Tahoe       3.0
4       2     Tahoe       NaN
5       3     Tahoe      13.0
6       1  Whistler       NaN
7  Friday  Whistler      40.0
8       3  Whistler      25.0
# In-place point update to fix data error.
df.loc[df["DAY"]=="Friday","DAY"]=2

# Inspect the columns after update.
# Note how the data type is updated automatically after transformation.
df["DAY"]
Copy
0    1
1    2
2    3
3    1
4    2
5    3
6    1
7    2
8    3
Name: DAY, dtype: int64
# Drop rows with null values.
df.dropna()
Copy
  DAY  LOCATION  SNOWFALL
0   1  Big Bear       8.0
1   2  Big Bear      10.0
3   1     Tahoe       3.0
5   3     Tahoe      13.0
7   2  Whistler      40.0
8   3  Whistler      25.0
# Compute the average daily snowfall across locations.
df.groupby("LOCATION").mean()["SNOWFALL"]
Copy
LOCATION
Big Bear     9.0
Tahoe        8.0
Whistler    32.5
Name: SNOWFALL, dtype: float64

read_snowflake 支持从 Snowflake 视图、动态表、Iceberg 表等读取数据。您也可以直接传入 SQL 查询,并返回一个 pandas on Snowflake DataFrame,实现 SQL 与 pandas on Snowflake 之间的无缝切换。

summary_df = pd.read_snowflake("SELECT LOCATION, AVG(SNOWFALL) AS avg_snowfall FROM SNOWFALL GROUP BY LOCATION")
summary_df
Copy

混合执行的工作原理

备注

从 Snowpark Python 1.40.0 版本开始,使用 pandas on Snowflake 时默认启用混合执行。

pandas on Snowflake 使用混合执行来判断 Pandas 代码是本地运行还是使用 Snowflake 引擎强化性能。这让您可以继续编写熟悉的 Pandas 代码构建稳健管道,而无需考虑最优和最高效的执行方式,同时无缝享受 Snowflake 的性能和可扩展性。

混合执行

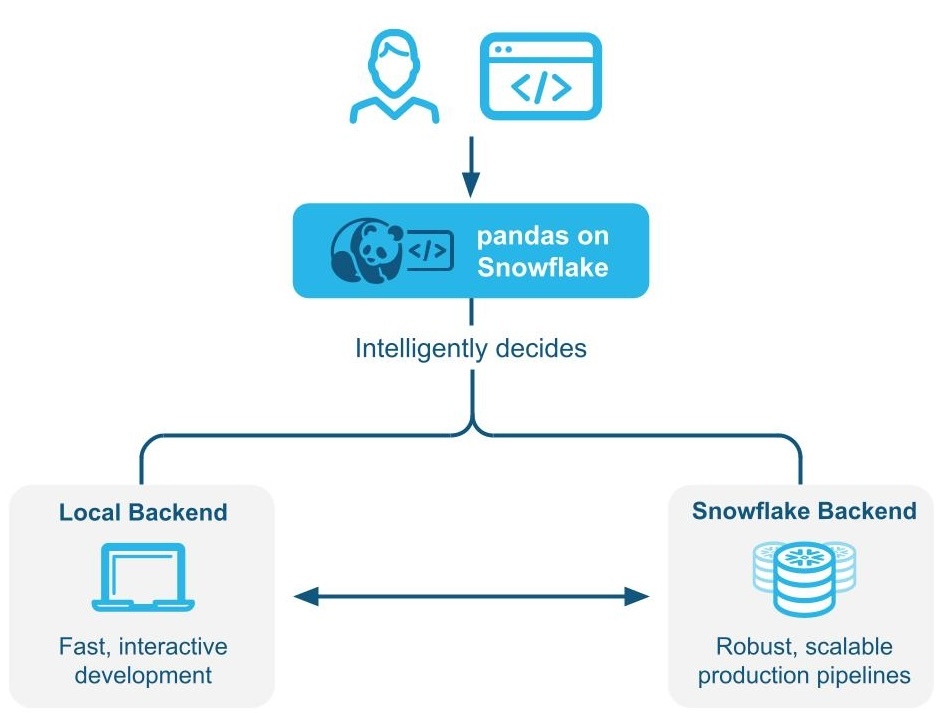
示例 1:直接在代码中创建一个小型的 11 行 DataFrame。使用混合执行时,Snowflake 会选择本地内存中的 Pandas 后端来执行操作:

# Create a basic dataframe with 11 rows
df = pd.DataFrame([
    ("New Year's Day", "2025-01-01"),
    ("Martin Luther King Jr. Day", "2025-01-20"),
    ("Presidents' Day", "2025-02-17"),
    ("Memorial Day", "2025-05-26"),
    ("Juneteenth National Independence Day", "2025-06-19"),
    ("Independence Day", "2025-07-04"),
    ("Labor Day", "2025-09-01"),
    ("Columbus Day", "2025-10-13"),
    ("Veterans Day", "2025-11-11"),
    ("Thanksgiving Day", "2025-11-27"),
    ("Christmas Day", "2025-12-25")
], columns=["Holiday", "Date"])
# Print out the backend used for this dataframe
df.get_backend()
# >> Output: 'Pandas'
Copy

示例 2:向表中插入 1000 万行事务数据

# Create a 10M row table in Snowflake and populate with sythentic data
session.sql('''CREATE OR REPLACE TABLE revenue_transactions (Transaction_ID STRING, Date DATE, Revenue FLOAT);''').collect()
session.sql('''SET num_days = (SELECT DATEDIFF(DAY, '2024-01-01', CURRENT_DATE));''').collect()
session.sql('''INSERT INTO revenue_transactions (Transaction_ID, Date, Revenue) SELECT UUID_STRING() AS Transaction_ID, DATEADD(DAY, UNIFORM(0, $num_days, RANDOM()), '2024-01-01') AS Date, UNIFORM(10, 1000, RANDOM()) AS Revenue FROM TABLE(GENERATOR(ROWCOUNT => 10000000));''').collect()

# Read Snowflake table as Snowpark pandas dataframe
df_transactions = pd.read_snowflake("REVENUE_TRANSACTIONS")
Copy

您会看到表使用 Snowflake 作为后端,因为这是一个驻留在 Snowflake 中的大表。

print(f"The dataset size is {len(df_transactions)} and the data is located in {df_transactions.get_backend()}.")
# >> Output: The dataset size is 10000000 and the data is located in Snowflake.

#Perform some operations on 10M rows with Snowflake
df_transactions["DATE"] = pd.to_datetime(df_transactions["DATE"])
df_transactions.groupby("DATE").sum()["REVENUE"]
Copy

示例 3:筛选数据并进行 groupby 汇总,最终得到 7 行数据。

筛选数据时,Snowflake 会隐式识别从 Snowflake 到 Pandas 的引擎更改的后端选择,因为输出只有 7 行数据。

# Filter to data in last 7 days
df_transactions_filter1 = df_transactions[(df_transactions["DATE"] >= pd.Timestamp.today().date() - pd.Timedelta('7 days')) & (df_transactions["DATE"] < pd.Timestamp.today().date())]

# Since filter is not yet evaluated, data stays in Snowflake
assert df_transactions_filter1.get_backend() == "Snowflake"
# After groupby operation, result is transfered from Snowflake to Pandas
df_transactions_filter1.groupby("DATE").sum()["REVENUE"]
Copy

Notes and limitations

  • 即使后端发生变化,DataFrame 类型始终为 modin.pandas.DataFrame/Series/etc,以确保与下游代码的互操作性和兼容性。

  • 为了确定使用哪个后端,Snowflake 有时会使用行大小的估算值,而不是在每一步计算 DataFrame 的精确长度。这意味着当数据集增大或减小时(例如筛选、汇总),Snowflake 可能不会在操作后立即切换到最优后端。

  • 当有操作需要跨不同后端合并两个或更多 DataFrames 时,Snowflake 会根据最低数据传输成本决定数据的移动位置。

  • 筛选操作可能不会导致数据移动,因为 Snowflake 可能无法估算底层过滤数据的大小。

  • 任何由内存中 Python 数据组成的 DataFrames 都将使用 Pandas 后端,例如:

    pd.DataFrame([1])
    
    Copy
    pd.DataFrame(pandas.DataFrame([1]))
    
    Copy
    pd.Series({'a': [4]})
    
    Copy
    An empty DataFrame: pd.DataFrame()
    
    Copy
  • 在有限操作集合中,DataFrames 会自动从 Snowflake 引擎移动到 Pandas 引擎。这些操作包括 df.applydf.plotdf.iterrowsdf.itertuplesseries.items,以及在数据量较小时的聚合操作。并非所有操作都支持数据迁移。

  • 混合执行不会自动将 DataFrame 从 Pandas 引擎移动回 Snowflake,除非像 pd.concat 等操作涉及多个 DataFrames。

  • Snowflake 不会自动将 DataFrame 从 Pandas 引擎移动回 Snowflake,除非像 pd.concat 等操作涉及多个 DataFrames。

When you should use pandas on Snowflake

如果满足以下任意条件,则您应使用 Pandas on Snowflake:

  • You are familiar with the pandas API and the broader PyData ecosystem.

  • You work on a team with others who are familiar with pandas and want to collaborate on the same codebase.

  • You have existing code written in pandas.

  • You prefer more accurate code completion from AI-based copilot tools.

有关更多信息,请参阅 Snowpark DataFrames 与 Snowpark Pandas DataFrame:我应该选择哪个?

将 Pandas on Snowflake 与 Snowpark DataFrames 结合使用

Pandas on Snowflake 和 DataFrame API 具有高度互操作性,因此您可以构建利用这两个 APIs 的管道。有关更多信息,请参阅 Snowpark DataFrames 与 Snowpark Pandas DataFrame:我应该选择哪个?

您可以使用以下操作在 Snowpark DataFrames 和 Snowpark Pandas DataFrames 之间进行转换:

操作

输入

输出

to_snowpark_pandas

Snowpark DataFrame

Snowpark Pandas DataFrame

to_snowpark

Snowpark Pandas DataFrame 或 Snowpark Pandas Series

Snowpark DataFrame

Pandas on Snowflake 与原生 Pandas 的比较

pandas on Snowflake and native pandas have similar DataFrame APIs with matching signatures and similar semantics. pandas on Snowflake provides the same API signature as native pandas and provides scalable computation with Snowflake. pandas on Snowflake respects the semantics described in the native pandas documentation as much as possible, but it uses the Snowflake computation and type system. However, when native pandas executes on a client machine, it uses the Python computation and type system. For information about the type mapping between pandas on Snowflake and Snowflake, see Data types.

Starting with Snowpark Python 1.40.0, pandas on Snowflake is best used with data which is already in Snowflake. To convert between native pandas and pandas on Snowflake type, use the following operations:

操作

输入

输出

to_pandas

Snowpark Pandas DataFrame

Native pandas DataFrame - Materialize all data to the local environment. If the dataset is large, this may result in an out-of-memory error.

pd.DataFrame(...)

原生 Pandas DataFrame、原始数据、Snowpark Pandas 对象

Snowpark Pandas DataFrame

执行环境

  • pandas: Operates on a single machine and processes in-memory data.

  • pandas on Snowflake: Integrates with Snowflake, which allows for distributed computing across a cluster of machines for large datasets, while leveraging in memory pandas for processing small datasets. This integration enables handling of much larger datasets that exceed the memory capacity of a single machine. Note that using the Snowpark pandas API requires a connection to Snowflake.

Lazy versus eager evaluation

  • pandas: Executes operations immediately and materializes results fully in memory after each operation. This eager evaluation of operations might lead to increased memory pressure because data must be moved extensively within a machine.

  • pandas on Snowflake:提供与 Pandas 相同的 API 体验。它模仿 Pandas 的及早求值模型,但在内部构建了惰性求值的查询图,以实现跨操作的优化。

    通过查询图融合和转译操作为基础分布式 Snowflake 计算引擎提供了额外的优化机会,与直接在 Snowflake 中运行 Pandas 相比,这降低了成本和端到端管道运行时。

    备注

    I/O-related APIs and APIs whose return value is not a Snowpark pandas object (that is, DataFrame, Series or Index) always evaluate eagerly. For example:

    • read_snowflake

    • to_snowflake

    • to_pandas

    • to_dict

    • to_list

    • __repr__

    • The dunder method, __array__ which can be called automatically by some third-party libraries such as scikit-learn. Calls to this method will materialize results to the local machine.

数据源和存储

  • pandas:支持 IO 工具(text、CSV、HDF5 ...)中 Pandas 文档中列出的各种读取器和写入器 (https://pandas.pydata.org/docs/user_guide/io.html)。

  • pandas on Snowflake: Can read and write from Snowflake tables and read local or staged CSV, JSON, or Parquet files. For more information, see IO(读取和写入).

数据类型

  • pandas:具有丰富的数据类型集,例如整数、浮点数、字符串、datetime 类型和分类类型。它还支持用户定义的数据类型。Pandas 中的数据类型通常派生自基础数据,并严格执行。

  • pandas on Snowflake: Is constrained by Snowflake type system, which maps pandas objects to SQL by translating the pandas data types to the SQL types in Snowflake. A majority of pandas types have a natural equivalent in Snowflake, but the mapping is not always one to one. In some cases, multiple pandas types are mapped to the same SQL type.

下表列出了 Pandas 和 Snowflake SQL 之间的类型映射:

Pandas 类型

Snowflake 类型

所有带符号/无符号整数类型,包括 Pandas 扩展整数类型

NUMBER(38, 0)

所有浮点类型,包括 Pandas 扩展的浮点数据类型

FLOAT

boolBooleanDtype

BOOLEAN

strStringDtype

STRING

datetime.time

TIME

datetime.date

DATE

所有 naive 时区 datetime 类型

TIMESTAMP_NTZ

所有 aware 时区 datetime 类型

TIMESTAMP_TZ

listtuplearray

ARRAY

dictjson

MAP

具有混合数据类型的对象列

VARIANT

Timedelta64[ns]

NUMBER(38, 0)

备注

不支持分类、周期、间隔、稀疏和用户定义的数据类型。目前 Pandas on Snowpark 客户端仅支持 Timedelta。将 Timedelta 重新写入 Snowflake 时,它将被存储为 Number 类型。

下表提供了 Snowflake SQL 类型回到 Pandas on Snowflake 类型(使用 df.dtypes)的映射:

Snowflake 类型

Pandas on Snowflake 类型 (df.dtypes)

NUMBER (scale = 0)

int64

NUMBER (scale > 0)、REAL

float64

BOOLEAN

bool

STRING、TEXT

object (str)

VARIANT、BINARY、GEOMETRY、GEOGRAPHY

object

ARRAY

object (list)

OBJECT

object (dict)

TIME

object (datetime.time)

TIMESTAMP、TIMESTAMP_NTZ、TIMESTAMP_LTZ、TIMESTAMP_TZ

datetime64[ns]

DATE

object (datetime.date)

When you convert from the Snowpark pandas DataFrame to the native pandas DataFrame with to_pandas(), the native pandas DataFrame will have refined data types compared to the pandas on Snowflake types, which are compatible with the SQL-Python 数据类型映射 for functions and procedures.

类型转换和类型推理

  • pandas:依赖于 NumPy (https://numpy.org/),默认情况下,遵循 NumPy 和 Python 类型系统进行隐式类型转换和推理。例如,它将布尔视为整数类型,因此 1 + True 返回 2

  • pandas on Snowflake:根据上表将 NumPy 和 Python 类型映射到 Snowflake 类型,并使用基础 Snowflake 类型系统进行隐式 类型转换和推理。例如,根据 逻辑数据类型,它不会隐式将布尔转换为整数类型,因此 1 + True 会导致类型转换错误。

Null 值处理

  • pandas:在 Pandas 1.x 版本中,Pandas 在 处理缺失数据 (https://pandas.pydata.org/docs/user_guide/missing_data.html#values-considered-missing) 时非常灵活,因此它将所有 Python Nonenp.nanpd.NaNpd.NApd.NaT 都视为缺失值。在 Pandas (2.2.x) 的更高版本中,这些值被视为不同的值。

  • pandas on Snowflake:采用与Pandas 早期版本类似的方法,将上述所有值都视为缺失值。Snowpark 重复使用 Pandas 中的 NaNNANaT。但请注意,所有这些缺失值都可互换处理,并在 Snowflake 表中存储为 SQL NULL。

偏移/频率别名

  • pandas:版本 2.2.1 中更改了 Pandas 中的日期偏移。单字母别名 'M''Q''Y' 和其他别名已弃用,而改用双字母偏移。

  • pandas on Snowflake:仅使用 Pandas 时间序列文档 (https://pandas.pydata.org/pandas-docs/stable/user_guide/timeseries.html#dateoffset-objects) 中描述的新偏移。

Install the pandas on Snowflake library

Prerequisites

The following package versions are required:

  • Python 3.9 (deprecated), 3.10, 3.11, 3.12 or 3.13

  • Modin version 0.32.0

  • pandas version 2.2.*

小技巧

要在 Snowflake Notebooks 中使用 Pandas on Snowflake,请参阅 笔记本中的 Pandas on Snowflake 中的设置说明。

To install pandas on Snowflake in your development environment, follow these steps:

  1. 切换到您的项目目录并激活您的 Python 虚拟环境。

    备注

    The API is under active development, so we recommend installing it in a Python virtual environment instead of system-wide. This practice allows each project you create to use a specific version, which insulates you from changes in future versions.

    You can create a Python virtual environment for a particular Python version by using tools like Anaconda (https://www.anaconda.com/), Miniconda (https://docs.conda.io/en/latest/miniconda.html), or virtualenv (https://docs.python.org/3/tutorial/venv.html).

    For example, to use conda to create a Python 3.12 virtual environment, run these commands:

    conda create --name snowpark_pandas python=3.12
    conda activate snowpark_pandas
    
    Copy

    备注

    If you previously installed an older version of pandas on Snowflake using Python 3.9 and pandas 1.5.3, you will need to upgrade your Python and pandas versions as described above. Follow the steps to create a new environment with Python 3.10 to 3.13.

  2. Install the Snowpark Python library with Modin:

    pip install "snowflake-snowpark-python[modin]"
    
    Copy

    conda install snowflake-snowpark-python modin==0.28.1
    
    Copy

备注

Confirm that snowflake-snowpark-python version 1.17.0 or later is installed.

向 Snowflake 进行身份验证

Before using pandas on Snowflake, you must establish a session with the Snowflake database. You can use a config file to choose the connection parameters for your session, or you can enumerate them in your code. For more information, see Creating a Session for Snowpark Python. If a unique active Snowpark Python session exists, pandas on Snowflake will automatically use it. For example:

import modin.pandas as pd
import snowflake.snowpark.modin.plugin
from snowflake.snowpark import Session

CONNECTION_PARAMETERS = {
    'account': '<myaccount>',
    'user': '<myuser>',
    'password': '<mypassword>',
    'role': '<myrole>',
    'database': '<mydatabase>',
    'schema': '<myschema>',
    'warehouse': '<mywarehouse>',
}
session = Session.builder.configs(CONNECTION_PARAMETERS).create()

# pandas on Snowflake will automatically pick up the Snowpark session created above.
# It will use that session to create new DataFrames.
df = pd.DataFrame([1, 2])
df2 = pd.read_snowflake('CUSTOMER')
Copy

The pd.session is a Snowpark session, so you can do anything with it that you can do with any other Snowpark session. For example, you can use it to execute an arbitrary SQL query, which results in a Snowpark DataFrame as per the Session API, but note that the result is a Snowpark DataFrame, not a Snowpark pandas DataFrame.

# pd.session is the session that pandas on Snowflake is using for new DataFrames.
# In this case it is the same as the Snowpark session that we've created.
assert pd.session is session

# Run SQL query with returned result as Snowpark DataFrame
snowpark_df = pd.session.sql('select * from customer')
snowpark_df.show()
Copy

Alternatively, you can configure your Snowpark connection parameters in a configuration file. This eliminates the need to enumerate connection parameters in your code, which allows you to write your pandas on Snowflake code almost as you would normally write pandas code.

  1. Create a configuration file located at ~/.snowflake/connections.toml that looks something like this:

    default_connection_name = "default"
    
    [default]
    account = "<myaccount>"
    user = "<myuser>"
    password = "<mypassword>"
    role="<myrole>"
    database = "<mydatabase>"
    schema = "<myschema>"
    warehouse = "<mywarehouse>"
    
    Copy
  2. To create a session using these credentials, use snowflake.snowpark.Session.builder.create():

    import modin.pandas as pd
    import snowflake.snowpark.modin.plugin
    from snowflake.snowpark import Session
    
    # Session.builder.create() will create a default Snowflake connection.
    Session.builder.create()
    # create a DataFrame.
    df = pd.DataFrame([[1, 2], [3, 4]])
    
    Copy

You can also create multiple Snowpark sessions, then assign one of them to pandas on Snowflake. pandas on Snowflake only uses one session, so you have to explicitly assign one of the sessions to pandas on Snowflake with pd.session = pandas_session:

import modin.pandas as pd
import snowflake.snowpark.modin.plugin
from snowflake.snowpark import Session

pandas_session = Session.builder.configs({"user": "<user>", "password": "<password>", "account": "<account1>").create()
other_session = Session.builder.configs({"user": "<user>", "password": "<password>", "account": "<account2>").create()
pd.session = pandas_session
df = pd.DataFrame([1, 2, 3])
Copy

The following example shows that trying to use pandas on Snowflake when there is no active Snowpark session will raise a SnowparkSessionException with an error like "pandas on Snowflake requires an active snowpark session, but there is none." After you create a session, you can use pandas on Snowflake. For example:

import modin.pandas as pd
import snowflake.snowpark.modin.plugin

df = pd.DataFrame([1, 2, 3])
Copy

以下示例显示,当有多个活动的 Snowpark 会话时,尝试使用 Pandas on Snowflake 将导致 SnowparkSessionException,并显示以下消息:“There are multiple active snowpark sessions, but you need to choose one for pandas on Snowflake.”。

import modin.pandas as pd
import snowflake.snowpark.modin.plugin
from snowflake.snowpark import Session

pandas_session = Session.builder.configs({"user": "<user>", "password": "<password>", "account": "<account1>"}).create()
other_session = Session.builder.configs({"user": "<user>", "password": "<password>", "account": "<account2>"}).create()
df = pd.DataFrame([1, 2, 3])
Copy

备注

You must set the session used for a new pandas on Snowflake DataFrame or Series via modin.pandas.session. However, joining or merging DataFrames created with different sessions is not supported, so you should avoid repeatedly setting different sessions and creating DataFrames with different sessions in a workflow.

API reference

请参阅 Pandas on Snowflake API 参考,了解当前实施的 APIs 和可用方法的完整列表。

有关支持的操作的完整列表,请参阅 Pandas on Snowflake 参考中的以下表格:

APIs 和混合执行的配置参数

混合执行使用数据集大小估计和应用于 DataFrame 的操作组合来确定后端的选择。一般来说,行数少于 10 万的数据集倾向于使用本地 Pandas;行数超过 10 万的数据集倾向于使用 Snowflake,除非数据集是从本地文件加载的。

配置传输成本

要将默认切换阈值更改为其他行数限制值,可以在初始化 DataFrame 之前修改环境变量:

# Change row transfer threshold to 500k
from modin.config.envvars import SnowflakePandasTransferThreshold
SnowflakePandasTransferThreshold.put(500_000)
Copy

设置此值将对从 Snowflake 转移行数据施加惩罚。

配置本地执行限制

一旦 DataFrame 在本地运行,它通常会保持本地状态,除非需要将其移动回 Snowflake 进行合并,但本地可处理数据的最大行数有上限。当前此上限为 1000 万行。

检查和设置后端

要检查当前选择的后端,可以使用 df.get_backend() 命令,该命令返回 Pandas 表示本地执行,返回 Snowflake 表示推送到 Snowflake 执行。

要使用 set_backend 或其别名 move_to 设置当前后端:

df_local = df.set_backend('Pandas')
Copy
df_local = df.move_to('Pandas')
Copy
df_snow = df.set_backend('Snowflake')
Copy

您也可以就地设置后端:

df.set_backend('Pandas', inplace=True)
Copy

要检查并显示数据移动的 原因 信息:

pd.explain_switch()
Copy

通过固定后端手动替换后端选择

默认情况下,Snowflake 会自动为给定的 DataFrame 和操作选择最佳后端。如果您希望替换自动引擎选择,可以对对象及其产生的所有数据禁用自动切换,使用 pin_backend() 方法:

pinned_df_snow = df.move_to('Snowflake').pin_backend()
Copy

To re-enable automatic backend switching, call unpin_backend():

unpinned_df_snow = pinned_df_snow.unpin_backend()
Copy

在 Snowflake 笔记本中使用 Snowpark Pandas

要在 Snowflake 笔记本中使用 Pandas on Snowflake,请参阅 :ref:` 笔记本中的 Pandas on Snowflake <label-notebooks_snowpark_pandas>`。

在 Python 工作表中使用 Snowpark Pandas

要使用 Snowpark Pandas,您需要在 Python 工作表环境中的 Packages 中选择 modin 来安装 Modin。

您可以在 Settings > Return type 下选择 Python 函数的 Return 类型。默认情况下,它被设置为 Snowpark 表。要将 Snowpark Pandas DataFrame 显示为结果,您可以通过调用 to_snowpark() 将 Snowpark Pandas DataFrame 转换为 Snowpark DataFrame。在此转换中不会产生 I/O 成本。

以下是在 Python 工作表中使用 Snowpark Pandas 的示例:

import snowflake.snowpark as snowpark

def main(session: snowpark.Session):
  import modin.pandas as pd
  import snowflake.snowpark.modin.plugin

  df = pd.DataFrame([[1, 'Big Bear', 8],[2, 'Big Bear', 10],[3, 'Big Bear', None],
                  [1, 'Tahoe', 3],[2, 'Tahoe', None],[3, 'Tahoe', 13],
                  [1, 'Whistler', None],['Friday', 'Whistler', 40],[3, 'Whistler', 25]],
                  columns=["DAY", "LOCATION", "SNOWFALL"])

  # Print a sample of the dataframe to standard output.
  print(df)

  snowpark_df = df.to_snowpark(index=None)
  # Return value will appear in the Results tab.
  return snowpark_df
Copy

在存储过程中使用 Pandas on Snowflake

您可以在 存储过程 中使用 Pandas on Snowflake 来构建数据管道,并使用 任务 调度存储过程的执行。

以下是使用 SQL 创建存储过程的方法:

CREATE OR REPLACE PROCEDURE run_data_transformation_pipeline_sp()
RETURNS VARCHAR
LANGUAGE PYTHON
RUNTIME_VERSION = 3.12
PACKAGES = ('snowflake-snowpark-python','modin')
HANDLER='data_transformation_pipeline'
AS $$
def data_transformation_pipeline(session):
  import modin.pandas as pd
  import snowflake.snowpark.modin.plugin
  from datetime import datetime
  # Create a Snowpark pandas DataFrame with sample data.
  df = pd.DataFrame([[1, 'Big Bear', 8],[2, 'Big Bear', 10],[3, 'Big Bear', None],
                    [1, 'Tahoe', 3],[2, 'Tahoe', None],[3, 'Tahoe', 13],
                    [1, 'Whistler', None],['Friday', 'Whistler', 40],[3, 'Whistler', 25]],
                      columns=["DAY", "LOCATION", "SNOWFALL"])
  # Drop rows with null values.
  df = df.dropna()
  # In-place point update to fix data error.
  df.loc[df["DAY"]=="Friday","DAY"]=2
  # Save Results as a Snowflake Table
  timestamp = datetime.now().strftime("%Y_%m_%d_%H_%M")
  save_path = f"OUTPUT_{timestamp}"
  df.to_snowflake(name=save_path, if_exists="replace", index=False)
  return f'Transformed DataFrame saved to {save_path}.'
$$;
Copy

以下是使用 Snowflake Python API 创建存储过程的方法:

from snowflake.snowpark.context import get_active_session
session = get_active_session()

from snowflake.snowpark import Session

def data_transformation_pipeline(session: Session) -> str:
  import modin.pandas as pd
  import snowflake.snowpark.modin.plugin
  from datetime import datetime
  # Create a Snowpark pandas DataFrame with sample data.
  df = pd.DataFrame([[1, 'Big Bear', 8],[2, 'Big Bear', 10],[3, 'Big Bear', None],
                     [1, 'Tahoe', 3],[2, 'Tahoe', None],[3, 'Tahoe', 13],
                     [1, 'Whistler', None],['Friday', 'Whistler', 40],[3, 'Whistler', 25]],
                      columns=["DAY", "LOCATION", "SNOWFALL"])
  # Drop rows with null values.
  df = df.dropna()
  # In-place point update to fix data error.
  df.loc[df["DAY"]=="Friday","DAY"]=2
  # Save Results as a Snowflake Table
  timestamp = datetime.now().strftime("%Y_%m_%d_%H_%M")
  save_path = f"OUTPUT_{timestamp}"
  df.to_snowflake(name=save_path, if_exists="replace", index=False)
  return f'Transformed DataFrame saved to {save_path}.'


dt_pipeline_sproc = session.sproc.register(name="run_data_transformation_pipeline_sp",
                             func=data_transformation_pipeline,
                             replace=True,
                             packages=['modin', 'snowflake-snowpark-python'])
Copy

要调用存储过程,您可以在 Python 中运行 dt_pipeline_sproc() 或在 SQL 中运行 CALL run_data_transformation_pipeline_sp()

在第三方库中使用 Pandas on Snowflake

对于可视化和机器学习应用程序,Pandas 通常与第三方库 APIs 一起使用。Pandas on Snowflake 可与其中大部分库互操作,因此它们无需明确转换为 Pandas DataFrames 即可使用。但请注意,除有限的用例外,大多数第三方库通常不支持分布式执行。因此,这可能会导致大型数据集的性能降低。

支持的第三方库

下面列出的库接受 Pandas on Snowflake DataFrames 作为输入,但并非所有方法都经过测试。要详细了解 API 级别的深度互操作性状态,请参阅 与第三方库的互操作性

  • Plotly

  • Altair

  • Seaborn

  • Matplotlib

  • Numpy

  • Scikit-Learn

  • XGBoost

  • NLTK

  • Streamlit

pandas on Snowflake 目前对某些 NumPy (https://numpy.org/) 和 Matplotlib (https://matplotlib.org/) APIs 的兼容性有限,例如 np.where 的分布式实现以及与 df.plot 的互操作性。在使用这些第三方库时,通过 to_pandas() 转换 Snowpark Pandas DataFrames 将避免多次 I/O 调用。

下面是一个使用 Altair (https://altair-viz.github.io/) 进行可视化和使用 scikit-learn (https://scikit-learn.org/stable/) 进行机器学习的示例。

# Create a Snowpark session with a default connection.
session = Session.builder.create()

train = pd.read_snowflake('TITANIC')

train[['Pclass', 'Parch', 'Sex', 'Survived']].head()
Copy
    Pclass  Parch     Sex       Survived
0       3      0     male               0
1       1      0   female               1
2       3      0   female               1
3       1      0   female               1
4       3      0     male               0
import altair as alt

survived_per_age_plot = alt.Chart(train).mark_bar(
).encode(
    x=alt.X('Age', bin=alt.Bin(maxbins=25)),
    y='count()',
    column='Survived:N',
    color='Survived:N',
).properties(
    width=300,
    height=300
).configure_axis(
    grid=False
)
Copy
survived_per_age_plot

您还可以根据性别分析生存率。

# Perform groupby aggregation with Snowpark pandas
survived_per_gender = train.groupby(['Sex','Survived']).agg(count_survived=('Survived', 'count')).reset_index()

survived_per_gender_pandas = survived_per_gender
survived_per_gender_plot = alt.Chart(survived_per_gender).mark_bar().encode(
   x='Survived:N',
   y='Survived_Count',
   color='Sex',
   column='Sex'
).properties(
   width=200,
   height=200
).configure_axis(
   grid=False
)
Copy
survived_per_gender_plot

You can now use scikit-learn to train a simple model.

feature_cols = ['Pclass', 'Parch']
X_pandas = train.loc[:, feature_cols]
y_pandas = train["Survived"]

from sklearn.linear_model import LogisticRegression

logreg = LogisticRegression()
logreg.fit(X_pandas, y_pandas)
y_pred_pandas = logreg.predict(X_pandas)
acc_eval = accuracy_score(y_pandas, y_pred_pandas)
Copy

备注

为获得更高的性能,我们建议通过 to_pandas() 转换为 Pandas DataFrames,尤其是使用机器学习库(例如 scikit-learn)时。但是,to_pandas() 函数收集所有行,因此最好首先使用 sample(frac=0.1)head(10) 减少数据帧大小。

不支持的库

将不支持的第三方库与 Pandas on Snowflake DataFrame 结合使用时,我们建议通过调用 to_pandas() 将 Snowflake DataFrame 转换为 Pandas DataFrame,然后再将 DataFrame 传递到第三方库方法。

备注

调用 to_pandas() 会将数据从 Snowflake 中提取到内存中,因此对于大型数据集和敏感用例,请注意这一点。

将 Snowflake Cortex LLM 函数与 Snowpark Pandas 结合使用

您可以通过 Snowpark Pandas Apply 函数 使用 Snowflake Cortex LLM 函数

您可以通过特殊的关键字实参应用该函数。当前,支持以下 Cortex 函数:

以下示例在 Snowpark Pandas DataFrame 中的多条记录中使用 TRANSLATE 函数:

import modin.pandas as pd
import snowflake.snowpark.modin.plugin

from snowflake.cortex import Translate
content_df = pd.DataFrame(["good morning","hello", "goodbye"], columns=["content"])
result = content_df.apply(Translate, from_language="en", to_language="de")
result["content"]
Copy

输出:

Guten Morgen
Hallo
Auf Wiedersehen
Name: content, dtype: object

以下示例在名为 reviews 的 Snowflake 表上使用 SENTIMENT (SNOWFLAKE.CORTEX) 函数:

from snowflake.cortex import Sentiment

s = pd.read_snowflake("reviews")["content"]
result = s.apply(Sentiment)
result
Copy

以下示例使用 EXTRACT_ANSWER (SNOWFLAKE.CORTEX) 来回答问题:

from snowflake.cortex import ExtractAnswer
content = "The Snowflake company was co-founded by Thierry Cruanes, Marcin Zukowski, and Benoit Dageville in 2012 and is headquartered in Bozeman, Montana."

df = pd.DataFrame([content])
result = df.apply(ExtractAnswer, question="When was Snowflake founded?")
result[0][0][0]["answer"]
Copy

输出:

'2012'

备注

必须安装 snowflake-ml-python (https://pypi.org/project/snowflake-ml-python/) 包才能使用 Cortex LLM 函数。

限制

Pandas on Snowflake 有以下限制:

  • Pandas on Snowflake 不保证与 OSS 第三方库兼容。但是,从版本 1.14.0a1 开始,Snowpark Pandas 引入了对 NumPy 的有限兼容性,特别是针对 np.where 使用。有关更多信息,请参阅 NumPy 互操作性

    When you call third-party library APIs with a Snowpark pandas DataFrame, Snowflake recommends that you convert the Snowpark pandas DataFrame to a pandas DataFrame by calling to_pandas() before passing the DataFrame to the third-party library call. For more information, see 在第三方库中使用 Pandas on Snowflake.

  • pandas on Snowflake is not integrated with Snowpark ML. When you use Snowpark ML, we recommend that you convert the Snowpark pandas DataFrame to a Snowpark DataFrame using to_snowpark() before calling Snowpark ML.

  • 不支持惰性 MultiIndex 对象。使用 MultiIndex 时,它返回一个原生 Pandas MultiIndex 对象,这需要将所有数据拉取到客户端。

  • Not all pandas APIs have a distributed implementation in pandas on Snowflake, although some are being added. For unsupported APIs, NotImplementedError is thrown. For information about supported APIs, see the API reference documentation.

  • Pandas on Snowflake 与 Pandas 2.2 的任何补丁版本兼容。

  • Snowpark pandas cannot be referenced within Snowpark pandas apply function. You can only use native pandas inside apply.

    • 示例如下:

      import modin.pandas as pd
      import pandas
      
      df.apply(lambda row: pandas.to_datetime(f"{row.date} {row.time}"), axis=1)
      
      Copy

故障排除

This section describes troubleshooting tips for using pandas on Snowflake.

  • When troubleshooting, try running the same operation on a native pandas DataFrame (or a sample) to see whether the same error persists. This approach might provide hints on how to fix your query. For example:

    df = pd.DataFrame({"a": [1,2,3], "b": ["x", "y", "z"]})
    # Running this in Snowpark pandas throws an error
    df["A"].sum()
    # Convert a small sample of 10 rows to pandas DataFrame for testing
    pandas_df = df.head(10).to_pandas()
    # Run the same operation. KeyError indicates that the column reference is incorrect
    pandas_df["A"].sum()
    # Fix the column reference to get the Snowpark pandas query working
    df["a"].sum()
    
    Copy
  • If you have a long-running notebook opened, note that by default Snowflake sessions time out after the session is idle for 240 minutes (4 hours). When the session expires, if you run additional pandas on Snowflake queries, the following message appears: "Authentication token has expired. The user must authenticate again." At this point, you must re-establish the connection to Snowflake. This might cause the loss of any unpersisted session variables. For more information about how to configure the session idle timeout parameter, see Session policies.

最佳实践

本部分介绍在使用 pandas on Snowflake 时要遵循的最佳实践。

  • Avoid using iterative code patterns, such as for loops, iterrows, and iteritems. Iterative code patterns quickly increase the generated query complexity. Let pandas on Snowflake, not the client code, perform the data distribution and computation parallelization. With regard to iterative code patterns, look for operations that can be performed on the whole DataFrame, and use the corresponding operations instead.

for i in np.arange(0, 50):
  if i % 2 == 0:
    data = pd.concat([data, pd.DataFrame({'A': i, 'B': i + 1}, index=[0])], ignore_index=True)
  else:
    data = pd.concat([data, pd.DataFrame({'A': i}, index=[0])], ignore_index=True)

# Instead of creating one DataFrame per row and concatenating them,
# try to directly create the DataFrame out of the data, like this:

data = pd.DataFrame(
      {
          "A": range(0, 50),
          "B": [i + 1 if i % 2 == 0 else None for i in range(50)],
      },
)
Copy
  • Avoid calling apply, applymap, and transform, which are eventually implemented with UDFs or UDTFs, which might not be as performant as regular SQL queries. If the function applied has an equivalent DataFrame or series operation, use that operation instead. For example, instead of df.groupby('col1').apply('sum'), directly call df.groupby('col1').sum().

  • 将 DataFrame 或 Series 传递给第三方库调用之前,调用 to_pandas()。Pandas on Snowflake 不保证与第三方库兼容。

  • Use a materialized regular Snowflake table to avoid extra I/O overhead. pandas on Snowflake works on top of a data snapshot that only works for regular tables. For other types, including external tables, views, and Apache Iceberg™ tables, a temporary table is created before the snapshot is taken, which introduces extra materialization overhead.

  • Pandas on Snowflake 在使用 DataFrames 从 Snowflake 表创建 read_snowflake 时提供快速和零复制克隆功能。

  • 在进行其他操作之前仔细检查结果类型,如果需要,使用 astype 进行显式类型转换。

    由于有限的类型推理功能,如果没有给出类型提示,df.apply 将返回对象(变量)类型的结果,即使结果包含所有整数值。如果其他操作要求 dtypeint,则可以通过调用 astype 方法进行显式类型转换,以在继续之前更正列类型。

  • Avoid calling APIs that require evaluation and materialization unless necessary.

    未返回 SeriesDataframe 的 APIs 需要及早求值和物化以产生正确类型的结果。绘制方法也是如此。减少对这些 APIs 的调用,以尽量减少不必要的求值和物化。

  • 避免在大型数据集上调用 np.where(<cond>, <scalar>, n)<scalar> 将广播到大小为 <cond> 的 DataFrame,这可能很慢。

  • 当使用迭代构建的查询时,df.cache_result 可用于物化中间结果,以减少重复求值,并改善延迟和降低整体查询的复杂性。例如:

    df = pd.read_snowflake('pandas_test')
    df2 = pd.pivot_table(df, index='index_col', columns='pivot_col') # expensive operation
    df3 = df.merge(df2)
    df4 = df3.where(df2 == True)
    
    Copy

    In the example above, the query to produce df2 is expensive to compute and is reused in the creation of both df3 and df4. Materializing df2 into a temporary table (making subsequent operations involving df2 a table scan instead of a pivot) can reduce the overall latency of the code block:

    df = pd.read_snowflake('pandas_test')
    df2 = pd.pivot_table(df, index='index_col', columns='pivot_col') # expensive operation
    df2.cache_result(inplace=True)
    df3 = df.merge(df2)
    df4 = df3.where(df2 == True)
    
    Copy

示例

下面是使用 Pandas 操作的代码示例。我们从名为 pandas_test 的 Snowpark Pandas DataFrame 开始,其中包含三列:COL_STRCOL_FLOATCOL_INT。要查看与以下示例相关的笔记本,请参阅 Snowflake-Labs 存储库中的 Pandas on Snowflake 示例 (https://github.com/Snowflake-Labs/sf-samples/blob/main/samples/snowpark-pandas/api-examples/api_examples.ipynb)。

import modin.pandas as pd
import snowflake.snowpark.modin.plugin

from snowflake.snowpark import Session

CONNECTION_PARAMETERS = {
    'account': '<myaccount>',
    'user': '<myuser>',
    'password': '<mypassword>',
    'role': '<myrole>',
    'database': '<mydatabase>',
    'schema': '<myschema>',
    'warehouse': '<mywarehouse>',
}
session = Session.builder.configs(CONNECTION_PARAMETERS).create()

df = pd.DataFrame([['a', 2.1, 1],['b', 4.2, 2],['c', 6.3, None]], columns=["COL_STR", "COL_FLOAT", "COL_INT"])

df
Copy
  COL_STR    COL_FLOAT    COL_INT
0       a          2.1        1.0
1       b          4.2        2.0
2       c          6.3        NaN

We save the DataFrame as a Snowflake table named pandas_test, which we will use throughout our examples.

df.to_snowflake("pandas_test", if_exists='replace',index=False)
Copy

接下来,通过 Snowflake 表创建 DataFrame。删除列 COL_INT,然后使用名为 row_position 的列将结果保存回 Snowflake。

# Create a DataFrame out of a Snowflake table.
df = pd.read_snowflake('pandas_test')

df.shape
Copy
(3, 3)
df.head(2)
Copy
    COL_STR  COL_FLOAT  COL_INT
0         a        2.1        1
1         b        4.2        2
df.dropna(subset=["COL_FLOAT"], inplace=True)

df
Copy
    COL_STR  COL_FLOAT  COL_INT
0         a        2.1        1
1         c        6.3        2
df.shape
Copy
(2, 3)
df.dtypes
Copy
COL_STR       object
COL_FLOAT    float64
COL_INT        int64
dtype: object
# Save the result back to Snowflake with a row_pos column.
df.reset_index(drop=True).to_snowflake('pandas_test2', if_exists='replace', index=True, index_label=['row_pos'])
Copy

The result is a new table, pandas_test2, which looks like this:

     row_pos  COL_STR  COL_FLOAT  COL_INT
0          1         a       2.0        1
1          2         b       4.0        2

IO(读取和写入)

# Reading and writing to Snowflake
df = pd.DataFrame({"fruit": ["apple", "orange"], "size": [3.4, 5.4], "weight": [1.4, 3.2]})
df.to_snowflake("test_table", if_exists="replace", index=False )

df_table = pd.read_snowflake("test_table")


# Generate sample CSV file
with open("data.csv", "w") as f:
    f.write('fruit,size,weight\napple,3.4,1.4\norange,5.4,3.2')
# Read from local CSV file
df_csv = pd.read_csv("data.csv")

# Generate sample JSON file
with open("data.json", "w") as f:
    f.write('{"fruit":"apple", "size":3.4, "weight":1.4},{"fruit":"orange", "size":5.4, "weight":3.2}')
# Read from local JSON file
df_json = pd.read_json('data.json')

# Upload data.json and data.csv to Snowflake stage named @TEST_STAGE
# Read CSV and JSON file from stage
df_csv = pd.read_csv('@TEST_STAGE/data.csv')
df_json = pd.read_json('@TEST_STAGE/data.json')
Copy

有关更多信息,请参阅 输入/输出

索引

df = pd.DataFrame({"a": [1,2,3], "b": ["x", "y", "z"]})
df.columns
Copy
Index(['a', 'b'], dtype='object')
df.index
Copy
Index([0, 1, 2], dtype='int8')
df["a"]
Copy
0    1
1    2
2    3
Name: a, dtype: int8
df["b"]
Copy
0    x
1    y
2    z
Name: b, dtype: object
df.iloc[0,1]
Copy
'x'
df.loc[df["a"] > 2]
Copy
a  b
2  3  z
df.columns = ["c", "d"]
df
Copy
     c  d
0    1  x
1    2  y
2    3  z
df = df.set_index("c")
df
Copy
   d
c
1  x
2  y
3  z
df.rename(columns={"d": "renamed"})
Copy
    renamed
c
1       x
2       y
3       z

缺少值

import numpy as np
df = pd.DataFrame([[np.nan, 2, np.nan, 0],
                [3, 4, np.nan, 1],
                [np.nan, np.nan, np.nan, np.nan],
                [np.nan, 3, np.nan, 4]],
                columns=list("ABCD"))
df
Copy
     A    B   C    D
0  NaN  2.0 NaN  0.0
1  3.0  4.0 NaN  1.0
2  NaN  NaN NaN  NaN
3  NaN  3.0 NaN  4.0
df.isna()
Copy
       A      B     C      D
0   True  False  True  False
1  False  False  True  False
2   True   True  True   True
3   True  False  True  False
df.fillna(0)
Copy
     A    B    C    D
0   0.0  2.0  0.0  0.0
1   3.0  4.0  0.0  1.0
2   0.0  0.0  0.0  0.0
3   0.0  3.0  0.0  4.0
df.dropna(how="all")
Copy
     A    B   C    D
0   NaN  2.0 NaN  0.0
1   3.0  4.0 NaN  1.0
3   NaN  3.0 NaN  4.0

类型转换

df = pd.DataFrame({"int": [1,2,3], "str": ["4", "5", "6"]})
df
Copy
   int str
0    1   4
1    2   5
2    3   6
df_float = df.astype(float)
df_float
Copy
   int  str
0  1.0  4.0
1  2.0  5.0
2  3.0  6.0
df_float.dtypes
Copy
int    float64
str    float64
dtype: object
pd.to_numeric(df.str)
Copy
0    4.0
1    5.0
2    6.0
Name: str, dtype: float64
df = pd.DataFrame({'year': [2015, 2016],
                'month': [2, 3],
                'day': [4, 5]})
pd.to_datetime(df)
Copy
0   2015-02-04
1   2016-03-05
dtype: datetime64[ns]

二元运算

df_1 = pd.DataFrame([[1,2,3],[4,5,6]])
df_2 = pd.DataFrame([[6,7,8]])
df_1.add(df_2)
Copy
    0    1     2
0  7.0  9.0  11.0
1  NaN  NaN   NaN
s1 = pd.Series([1, 2, 3])
s2 = pd.Series([2, 2, 2])
s1 + s2
Copy
0    3
1    4
2    5
dtype: int64
df = pd.DataFrame({"A": [1,2,3], "B": [4,5,6]})
df["A+B"] = df["A"] + df["B"]
df
Copy
   A  B  A+B
0  1  4    5
1  2  5    7
2  3  6    9

聚合

df = pd.DataFrame([[1, 2, 3],
                [4, 5, 6],
                [7, 8, 9],
                [np.nan, np.nan, np.nan]],
                columns=['A', 'B', 'C'])
df.agg(['sum', 'min'])
Copy
        A     B     C
sum  12.0  15.0  18.0
min   1.0   2.0   3.0
df.median()
Copy
A    4.0
B    5.0
C    6.0
dtype: float64

合并

df1 = pd.DataFrame({'lkey': ['foo', 'bar', 'baz', 'foo'],
                    'value': [1, 2, 3, 5]})
df1
Copy
  lkey  value
0  foo      1
1  bar      2
2  baz      3
3  foo      5
df2 = pd.DataFrame({'rkey': ['foo', 'bar', 'baz', 'foo'],
                    'value': [5, 6, 7, 8]})
df2
Copy
  rkey  value
0  foo      5
1  bar      6
2  baz      7
3  foo      8
df1.merge(df2, left_on='lkey', right_on='rkey')
Copy
  lkey  value_x rkey  value_y
0  foo        1  foo        5
1  foo        1  foo        8
2  bar        2  bar        6
3  baz        3  baz        7
4  foo        5  foo        5
5  foo        5  foo        8
df = pd.DataFrame({'key': ['K0', 'K1', 'K2', 'K3', 'K4', 'K5'],
                'A': ['A0', 'A1', 'A2', 'A3', 'A4', 'A5']})
df
Copy
  key   A
0  K0  A0
1  K1  A1
2  K2  A2
3  K3  A3
4  K4  A4
5  K5  A5
other = pd.DataFrame({'key': ['K0', 'K1', 'K2'],
                    'B': ['B0', 'B1', 'B2']})
df.join(other, lsuffix='_caller', rsuffix='_other')
Copy
  key_caller   A key_other     B
0         K0  A0        K0    B0
1         K1  A1        K1    B1
2         K2  A2        K2    B2
3         K3  A3      None  None
4         K4  A4      None  None
5         K5  A5      None  None

分组

df = pd.DataFrame({'Animal': ['Falcon', 'Falcon','Parrot', 'Parrot'],
               'Max Speed': [380., 370., 24., 26.]})

df
Copy
   Animal  Max Speed
0  Falcon      380.0
1  Falcon      370.0
2  Parrot       24.0
3  Parrot       26.0
df.groupby(['Animal']).mean()
Copy
        Max Speed
Animal
Falcon      375.0
Parrot       25.0

有关更多信息,请参阅 GroupBy

透视

df = pd.DataFrame({"A": ["foo", "foo", "foo", "foo", "foo",
                        "bar", "bar", "bar", "bar"],
                "B": ["one", "one", "one", "two", "two",
                        "one", "one", "two", "two"],
                "C": ["small", "large", "large", "small",
                        "small", "large", "small", "small",
                        "large"],
                "D": [1, 2, 2, 3, 3, 4, 5, 6, 7],
                "E": [2, 4, 5, 5, 6, 6, 8, 9, 9]})
df
Copy
     A    B      C  D  E
0  foo  one  small  1  2
1  foo  one  large  2  4
2  foo  one  large  2  5
3  foo  two  small  3  5
4  foo  two  small  3  6
5  bar  one  large  4  6
6  bar  one  small  5  8
7  bar  two  small  6  9
8  bar  two  large  7  9
pd.pivot_table(df, values='D', index=['A', 'B'],
                   columns=['C'], aggfunc="sum")
Copy
    C    large  small
A   B
bar one    4.0      5
    two    7.0      6
foo one    4.0      1
    two    NaN      6
df = pd.DataFrame({'foo': ['one', 'one', 'one', 'two', 'two', 'two'],
                'bar': ['A', 'B', 'C', 'A', 'B', 'C'],
                'baz': [1, 2, 3, 4, 5, 6],
                'zoo': ['x', 'y', 'z', 'q', 'w', 't']})
df
Copy
   foo bar  baz zoo
0  one   A    1   x
1  one   B    2   y
2  one   C    3   z
3  two   A    4   q
4  two   B    5   w
5  two   C    6   t

资源

  • Snowpark pandas API

  • 快速入门:Pandas on Snowflake 入门 (https://quickstarts.snowflake.com/guide/getting_started_with_pandas_on_snowflake/index.html)

  • 快速入门:使用 Snowpark Python 的数据工程管道 (https://quickstarts.snowflake.com/guide/data_engineering_pipelines_with_snowpark_pandas/#0)

语言: 中文