使用 Python Connector
本主题提供一系列示例,说明如何使用 Snowflake Connector 执行标准的 Snowflake 操作,例如用户登录、数据库和表创建、仓库创建、数据插入/加载和查询。
本主题末尾的示例代码将这些示例合并为一个可运行的 Python 程序。
备注
Snowflake 现在提供一流的 Python APIs 来管理核心 Snowflake 资源,包括数据库、架构、表、任务和仓库,而无需使用 SQL。有关更多信息,请参阅 Snowflake Python APIs:使用 Python 管理 Snowflake 对象。
创建数据库、架构和仓库
在登录后,如果数据库、架构和仓库尚不存在,请使用 CREATE DATABASE、CREATE SCHEMA 和 CREATE WAREHOUSE 命令创建。
以下示例显示如何创建名为 tiny_warehouse 的仓库、名为 testdb 的数据库和名为 testschema 的架构。请注意,在创建架构时,您必须指定要在其中创建架构的数据库的名称,或者您必须已经连接到要在其中创建架构的数据库。以下示例在 CREATE SCHEMA 命令之前执行 USE DATABASE 命令,以确保在正确的数据库中创建架构。
conn.cursor().execute("CREATE WAREHOUSE IF NOT EXISTS tiny_warehouse_mg") conn.cursor().execute("CREATE DATABASE IF NOT EXISTS testdb_mg") conn.cursor().execute("USE DATABASE testdb_mg") conn.cursor().execute("CREATE SCHEMA IF NOT EXISTS testschema_mg")
使用数据库、架构和仓库
指定要在其中创建表的数据库和架构。此外,还要指定仓库,用于提供执行 DML 语句和查询所需的资源。
例如,要使用数据库 testdb、架构 testschema 和仓库 :code:`tiny_warehouse`(之前创建),请执行以下操作:
conn.cursor().execute("USE WAREHOUSE tiny_warehouse_mg") conn.cursor().execute("USE DATABASE testdb_mg") conn.cursor().execute("USE SCHEMA testdb_mg.testschema_mg")
创建表并插入数据
使用 CREATE TABLE 命令创建表,并使用 INSERT 命令在表中填充数据。
例如,创建名为 testtable 的表并在表中插入两行:
conn.cursor().execute( "CREATE OR REPLACE TABLE " "test_table(col1 integer, col2 string)") conn.cursor().execute( "INSERT INTO test_table(col1, col2) VALUES " + " (123, 'test string1'), " + " (456, 'test string2')")
加载数据
您可以批量加载在内部或外部位置暂存的文件中的数据,而不必使用单个 INSERT 命令将数据插入表中。
从内部位置复制数据
要将主机上文件中的数据加载到表中,请先使用 PUT 命令将文件暂存在内部位置,然后使用 COPY INTO <table> 命令将文件中的数据复制到表中。
例如:
# Putting Data con.cursor().execute("PUT file:///tmp/data/file* @%testtable") con.cursor().execute("COPY INTO testtable")其中,CSV 数据存储在 Linux 或 macOS 环境中名为
/tmp/data的本地目录中,并且该目录包含以下名称的文件:file0、file1...:code:file100。
从外部位置复制数据
要将在外部位置(即 S3 桶)暂存的文件中的数据加载到表中,请使用 COPY INTO <table> 命令。
例如:
# Copying Data con.cursor().execute(""" COPY INTO testtable FROM s3://<s3_bucket>/data/ STORAGE_INTEGRATION = myint FILE_FORMAT=(field_delimiter=',') """.format( aws_access_key_id=AWS_ACCESS_KEY_ID, aws_secret_access_key=AWS_SECRET_ACCESS_KEY))其中:
s3://<s3_bucket>/data/指定 S3 桶的名称桶中的文件具有前缀
data。桶使用存储集成访问,该集成由账户管理员(即具有 ACCOUNTADMIN 角色的用户)或具有全局 CREATE INTEGRATION 权限的角色使用 CREATE STORAGE INTEGRATION 创建。通过存储集成,用户不必提供凭据即可访问私有存储位置。
备注
此示例使用 format() 函数来编写语句。如果您的环境存在 SQL 注入攻击的风险,您可能最好绑定值而不是使用 format()。
查询数据
借助 Snowflake Connector for Python,您可以提交:
在查询完成后,您可以使用 Cursor 对象来 提取结果中的值。默认情况下,Snowflake Connector for Python 将值从 Snowflake 数据类型 转换为原生 Python 数据类型。(请注意,您可以选择将值作为字符串返回,并在应用程序中执行类型转换。请参阅 通过绕过数据转换来提高查询性能。)
备注
默认情况下,NUMBER 列中的值以双精度浮点值 (float64) 的形式返回。要在 fetch_pandas_all() 和 fetch_pandas_batches() 方法中以十进制值 (decimal.Decimal) 形式返回这些值,请将 connect() 方法中的 arrow_number_to_decimal 参数设置为 True。
执行同步查询
要执行同步查询,请在 Cursor 对象中调用 execute() 方法。例如:
conn = snowflake.connector.connect( ... )
cur = conn.cursor()
cur.execute('select * from products')
使用 Cursor 对象提取结果中的值,如 使用 cursor 提取值 中所述。
执行异步查询
Snowflake Connector for Python 支持异步查询(即,在查询完成前将控制权交还给用户的查询)。您可以提交异步查询,并使用轮询来确定查询何时完成。查询完成后,您可以获得结果。
备注
要执行异步查询,您必须确保 ABORT_DETACHED_QUERY 配置参数为 ``FALSE``(默认值)。
如果客户端连接断开:
对于同步查询,无论参数值如何,所有正在进行的同步查询都会立即中止。
对于异步查询:
如果 ABORT_DETACHED_QUERY 设置为
FALSE,正在进行的异步查询将继续运行,直到它们正常结束。如果 ABORT_DETACHED_QUERY 设置为
TRUE,则 Snowflake 会在 5 分钟后客户端未重新建立连接的情况下,自动中止所有正在进行的异步查询。您可以通过调用
cursor.query_result(queryId)来防止异步查询在 5 分钟标记处中止。由于查询仍在运行,因此此调用不会检索实际查询结果,但可以防止查询被取消。调用query_result是同步操作,它可能适合您的特定使用案例,也可能不适合。
借助此功能,您可以并行提交多个查询,而无需等待每个查询完成。您还可以在同一会话中同时运行同步查询和异步查询。
备注
在单个查询中执行多个语句要求会话中有一个可用的有效仓库。
最后,您可以从一个连接提交异步查询,然后从另一个连接检查结果。例如,用户可以从应用程序启动长时间运行的查询,然后退出应用程序,稍后重新启动应用程序以检查结果。
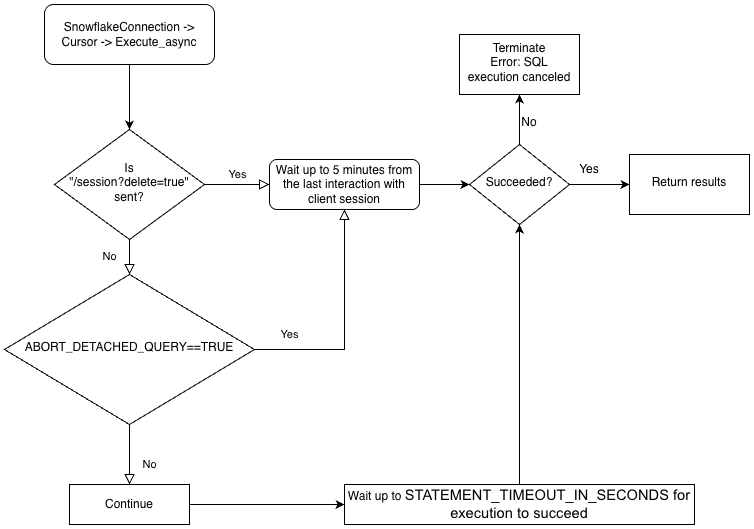
为了更好地理解驱动程序业务逻辑的层级结构以及 ABORT_DETACHED_QUERY 参数的交互,请参阅以下流程图:
提交异步查询
备注
异步查询不支持 PUT/GET 语句。
当使用 cursor.execute_async(query) 时,Snowflake Python 驱动程序会自动跟踪异步提交的查询。当使用 connection.close() 显式关闭连接,或使用上下文管理器 connect()... 时,系统会检查异步查询列表;如果其中仍有查询在运行,Snowflake 端会话不会被删除。
如果同一连接中没有异步查询在运行,则在调用 connection.close() 时,属于该连接的 Snowflake 会话将注销,并隐式取消同一会话中运行的所有其他查询。
此行为还取决于 SQL ABORT_DETACHED_QUERY 参数。
最佳实践是将所有长时间运行的异步任务(尤其是那些计划在连接关闭后继续运行的任务)隔离到单独的连接中。
您可以使用 server_session_keep_alive`(默认值为 :codenowrap:`False)连接参数来覆盖此自动行为。默认情况下,仅当 没有异步查询正在运行时,调用 connection.close() 才会注销 Snowflake 会话。默认行为不考虑或跟踪同步查询。
当 server_session_keep_alive=True 时,无论任何查询的状态如何,connection.close() 都不会注销 Snowflake 会话。对于旨在发出长时间运行的异步查询的连接,启用此设置可以减少 CPU 开销并加速连接关闭过程。
重要
启用此参数可能会产生意外的计费影响(例如,它可能会使查询一直运行到达到配置的 STATEMENT_TIMEOUT_IN_SECONDS 值)。Snowflake 强烈建议您仔细衡量是否需要更改 server_session_keep_alive 的默认值,并尽可能在生产环境实施之前在非生产环境中对更改进行彻底测试。
要提交异步查询,请在 Cursor 对象中调用 execute_async() 方法。例如:
conn = snowflake.connector.connect( ... )
cur = conn.cursor()
# Submit an asynchronous query for execution.
cur.execute_async('select count(*) from table(generator(timeLimit => 25))')
提交查询后:
要确定查询是否仍在运行,请参阅 检查查询的状态。
要检索查询结果,请参阅 使用查询 ID 检索查询结果。
有关执行异步查询的示例,请参阅 异步查询示例。
异步查询的最佳实践
在提交异步查询时,请遵循以下最佳实践:
在并行运行任何查询之前,请确保知道哪些查询依赖于其他查询。有些查询相互依赖且对顺序敏感,因此不适合并行化。例如,很显然,INSERT 语句应该在相应的 CREATE TABLE 语句完成后开始。
确保运行的查询数量不要超过可用内存承受能力。并行运行多个查询通常会消耗更多内存,尤其是当多组结果同时存储在内存中时。
轮询时,处理查询不成功的罕见情况。
确保事务控制语句(BEGIN、COMMIT 和 ROLLBACK)不与其他语句并行执行。
请注意,即使 SQL 本身有 ORDER BY 子句,也不能保证异步查询会返回有序的结果。因此,
result_scan函数不能保证有序的结果。
检索 Snowflake 查询 ID
查询 ID 用于标识 Snowflake 执行的每个查询。当您使用 Snowflake Connector for Python 执行查询时,您可以通过 Cursor 对象中的 sfqid 属性访问查询 ID:
# Retrieving a Snowflake Query ID cur = con.cursor() cur.execute("SELECT * FROM testtable") print(cur.sfqid)
您可以使用查询 ID 来执行以下操作:
在 Web 界面中检查查询的状态。
In the Snowsight, query IDs are displayed in the Query History page. See 使用 Query History 监控查询活动.
以编程方式检查查询的状态(例如,确定异步查询是否已完成)。
请参阅 检查查询的状态。
检索异步查询或之前提交的同步查询的结果。
请参阅 使用查询 ID 检索查询结果。
取消正在运行的查询。
请参阅 按查询 ID 取消查询。
检查查询的状态
要检查查询的状态,请执行以下操作:
从
Cursor对象中的sfqid字段获取查询 ID。将查询 ID 传递到
Connection对象的get_query_status()方法,以返回代表查询状态的QueryStatus枚举常量。默认情况下,如果查询导致错误,则
get_query_status()不会引发错误。如果您想引发错误,请改为调用get_query_status_throw_if_error()。使用
QueryStatus枚举常量检查查询的状态。要确定查询是否仍在运行(例如,如果此查询是异步查询),请将常量传递到
Connection对象的is_still_running()方法。要确定是否发生了错误,请将该常量传递到
is_an_error()方法。
有关枚举常量的完整列表,请参阅
QueryStatus。
以下示例执行异步查询并检查查询的状态:
import time
...
# Execute a long-running query asynchronously.
cur.execute_async('select count(*) from table(generator(timeLimit => 25))')
...
# Wait for the query to finish running.
query_id = cur.sfqid
while conn.is_still_running(conn.get_query_status(query_id)):
time.sleep(1)
如果查询导致错误,则以下示例会引发错误:
from snowflake.connector import ProgrammingError
import time
...
# Wait for the query to finish running and raise an error
# if a problem occurred with the execution of the query.
try:
query_id = cur.sfqid
while conn.is_still_running(conn.get_query_status_throw_if_error(query_id)):
time.sleep(1)
except ProgrammingError as err:
print('Programming Error: {0}'.format(err))
使用查询 ID 检索查询结果
备注
如果您通过调用 Cursor 对象上的 execute() 方法来 执行同步查询,您无需使用查询 ID 即可检索结果。您可以只从结果中提取值,如 使用 cursor 提取值 中所述。
如果您要检索异步查询或之前提交的同步查询的结果,请执行以下步骤:
获取查询的查询 ID。请参阅 检索 Snowflake 查询 ID。
调用
Cursor对象中的get_results_from_sfqid()方法以检索结果。使用
Cursor对象提取结果中的值,如 使用 cursor 提取值 中所述。
请注意,如果查询仍在运行,则提取方法(fetchone()、fetchmany()、fetchall() 等)将等待查询完成。
例如:
# Get the results from a query.
cur.get_results_from_sfqid(query_id)
results = cur.fetchall()
print(f'{results[0]}')
使用 cursor 提取值
使用游标对象迭代器方法从表中提取值。
例如,要从之前(在 创建表并插入数据 中)创建的名为 testtable 的表中,提取名为“col1”和“col2”的列,请使用如下所示的代码:
cur = conn.cursor() try: cur.execute("SELECT col1, col2 FROM test_table ORDER BY col1") for (col1, col2) in cur: print('{0}, {1}'.format(col1, col2)) finally: cur.close()
或者,使用 Snowflake Connector for Python 提供的便捷快捷方式:
for (col1, col2) in con.cursor().execute("SELECT col1, col2 FROM testtable"): print('{0}, {1}'.format(col1, col2))
如果您需要获取单个结果(即单行),请使用 fetchone 方法:
col1, col2 = con.cursor().execute("SELECT col1, col2 FROM testtable").fetchone() print('{0}, {1}'.format(col1, col2))
如果您需要一次获取指定的行数,请使用具有行数的 fetchmany 方法:
cur = con.cursor().execute("SELECT col1, col2 FROM testtable") ret = cur.fetchmany(3) print(ret) while len(ret) > 0: ret = cur.fetchmany(3) print(ret)备注
如果结果集太大而无法放入内存,请使用
fetchone或fetchmany。
如果您需要一次获得所有结果,请执行:
results = con.cursor().execute("SELECT col1, col2 FROM testtable").fetchall() for rec in results: print('%s, %s' % (rec[0], rec[1]))
要为查询设置超时,请执行“begin”命令并在查询中加入超时参数。如果查询超过参数值的长度,则会产生错误并进行回滚。
在以下代码中,错误 604 表示查询已取消。如果查询未在指定时间内完成,则超时参数将启动 Timer() 并取消。
conn.cursor().execute("create or replace table testtbl(a int, b string)") conn.cursor().execute("begin") try: conn.cursor().execute("insert into testtbl(a,b) values(3, 'test3'), (4,'test4')", timeout=10) # long query except ProgrammingError as e: if e.errno == 604: print("timeout") conn.cursor().execute("rollback") else: raise e else: conn.cursor().execute("commit")
使用 DictCursor 按列名提取值
如果您要按列名提取值,请创建类型为 DictCursor 的 cursor 对象。
例如:
# Querying data by DictCursor from snowflake.connector import DictCursor cur = con.cursor(DictCursor) try: cur.execute("SELECT col1, col2 FROM testtable") for rec in cur: print('{0}, {1}'.format(rec['COL1'], rec['COL2'])) finally: cur.close()
异步查询示例
以下是异步查询的简单示例:
from snowflake.connector import ProgrammingError
import time
conn = snowflake.connector.connect( ... )
cur = conn.cursor()
# Submit an asynchronous query for execution.
cur.execute_async('select count(*) from table(generator(timeLimit => 25))')
# Retrieve the results.
cur.get_results_from_sfqid(query_id)
results = cur.fetchall()
print(f'{results[0]}')
下一个示例从一个连接提交异步查询,并从另一个连接检索结果:
from snowflake.connector import ProgrammingError
import time
conn = snowflake.connector.connect( ... )
cur = conn.cursor()
# Submit an asynchronous query for execution.
cur.execute_async('select count(*) from table(generator(timeLimit => 25))')
# Get the query ID for the asynchronous query.
query_id = cur.sfqid
# Close the cursor and the connection.
cur.close()
conn.close()
# Open a new connection.
new_conn = snowflake.connector.connect( ... )
# Create a new cursor.
new_cur = new_conn.cursor()
# Retrieve the results.
new_cur.get_results_from_sfqid(query_id)
results = new_cur.fetchall()
print(f'{results[0]}')
按查询 ID 取消查询
按 查询 ID 取消查询:
cur = cn.cursor() try: cur.execute(r"SELECT SYSTEM$CANCEL_QUERY('queryID')") result = cur.fetchall() print(len(result)) print(result[0]) finally: cur.close()
将字符串“queryID”替换为实际查询 ID。要获取查询 ID,请参阅 检索 Snowflake 查询 ID。
通过绕过数据转换来提高查询性能
为提高查询性能,请使用 snowflake.connector.converter_null 模块中的 SnowflakeNoConverterToPython 类,绕过从 Snowflake 内部数据类型到原生 Python 数据类型的数据转换,例如:
from snowflake.connector.converter_null import SnowflakeNoConverterToPython con = snowflake.connector.connect( ... converter_class=SnowflakeNoConverterToPython ) for rec in con.cursor().execute("SELECT * FROM large_table"): # rec includes raw Snowflake data
因此,所有数据都以字符串形式表示,以至于应用程序负责将其转换为原生 Python 数据类型。例如,TIMESTAMP_NTZ 和 TIMESTAMP_LTZ 数据是以字符串形式表示的纪元时间,而 TIMESTAMP_TZ 数据是纪元时间,后跟一个空格,然后是以字符串形式表示的以分钟为单位的 UTC 偏移。
对绑定数据没有影响;仍然可以绑定 Python 原生数据以进行更新。
下载数据
Snowflake Connector for Python 3.14.0 版引入了 unsafe_file_write connection 参数,该参数指定了在使用 GET 命令下载 Snowflake 暂存区的文件时,连接器应如何设置文件权限。这些文件始终归运行 Python 进程的同一用户所有。
默认情况下,unsafe_file_write 参数为 False,以提供更安全、更严格的 600 文件权限,这意味着只有所有者对下载的文件具有读写权限。其他组和用户对使用 GET 命令下载的文件没有权限。
如果您的组织对文件的文件权限要求较少,则可以将 unsafe_file_write 参数设置为 True。启用此参数会将从暂存区下载的文件的文件权限设置为 644,它允许所有者读取和写入文件,但只允许其他人读取它们。例如,对于某些在不同系统用户下运行的 ETL 工具,这些用户需要能够读取和处理下载的文件,此设置可能是必要的。
如果您不确定使用哪个值,请咨询负责您组织适用的安全策略的团队。
绑定数据
要指定在 SQL 语句中使用的值,您可以在语句中包含字面量,也可以 绑定变量。绑定变量时,在 SQL 语句文本中放置一个或多个占位符,然后为每个占位符指定变量(要使用的值)。
以下示例对比了字面量和绑定的使用:
字面量:
con.cursor().execute("INSERT INTO testtable(col1, col2) VALUES(789, 'test string3')")绑定:
con.cursor().execute( "INSERT INTO testtable(col1, col2) " "VALUES(%s, %s)", ( 789, 'test string3' ))
备注
可以绑定的数据大小或可以批量合并的数据大小存在上限。有关详细信息,请参阅 查询文本大小的限制。
Snowflake 支持以下类型的绑定:
下文将逐一解释。
pyformat 或 format 绑定
pyformat 绑定和 format 绑定都在客户端绑定数据,而不是在服务器端绑定数据。
默认情况下,Snowflake Connector for Python 支持 pyformat 和 format,因此您可以使用 %(name)s 或 %s 作为占位符。例如:
使用
%(name)s作为占位符:conn.cursor().execute( "INSERT INTO test_table(col1, col2) " "VALUES(%(col1)s, %(col2)s)", { 'col1': 789, 'col2': 'test string3', })
使用
%s作为占位符:con.cursor().execute( "INSERT INTO testtable(col1, col2) " "VALUES(%s, %s)", ( 789, 'test string3' ))
借助 pyformat 和 format,您还可以使用列表对象为 IN 运算符绑定数据:
# Binding data for IN operator con.cursor().execute( "SELECT col1, col2 FROM testtable" " WHERE col2 IN (%s)", ( ['test string1', 'test string3'], ))
百分号字符(“%”)既是 SQL LIKE 的通配符,也是 Python 的格式绑定字符。如果您使用格式绑定,并且 SQL 命令包含百分号字符,您可能需要对百分号字符进行转义。例如,如果 SQL 语句是:
SELECT col1, col2 FROM test_table WHERE col2 ILIKE '%York' LIMIT 1; -- Find York, New York, etc.
那么 Python 代码应该如下所示(注意额外的百分号,对原始百分号进行转义):
sql_command = "select col1, col2 from test_table " sql_command += " where col2 like '%%York' limit %(lim)s" parameter_dictionary = {'lim': 1 } cur.execute(sql_command, parameter_dictionary)
qmark 或 numeric 绑定
qmark 绑定和 numeric 绑定都在服务器端绑定数据,而不是在客户端绑定数据:
要进行
qmark绑定,请使用问号字符 (?),表示您要将变量值插入字符串的哪个位置。要进行
numeric绑定,请使用冒号 (:) 后跟数字,表示要在该位置替换的变量的位置。例如,:2指定第二个变量。使用 numeric 绑定,可在同一个查询中多次绑定相同的值。例如,如果您要多次使用长 VARCHAR 或 BINARY 或者 半结构化 值,则
numeric绑定允许您将该值发送到服务器一次,然后多次使用。
下一部分说明如何使用 qmark 和 numeric 绑定:
使用 qmark 或 numeric 绑定
要使用 qmark 或 numeric 样式绑定,可以执行以下操作之一,或在调用 connect() 时将 paramstyle 设置为连接参数的一部分。
snowflake.connector.paramstyle='qmark'snowflake.connector.paramstyle='numeric'
如果您将 paramstyle 设置为 qmark 或 numeric,您必须分别使用 ? 或 :N`(其中 ``N` 被替换为数字)作为占位符。
例如:
使用
?作为占位符:from snowflake.connector import connect connection_parameters = { 'account': 'xxxxx', 'user': 'xxxx', 'password': 'xxxxxx', "host": "xxxxxx", "port": 443, 'protocol': 'https', 'warehouse': 'xxx', 'database': 'xxx', 'schema': 'xxx', 'paramstyle': 'qmark' # note paramstyle setting here at connection level } con = connect(**connection_parameters) con.cursor().execute( "INSERT INTO testtable2(col1,col2,col3) " "VALUES(?,?,?)", ( 987, 'test string4', ("TIMESTAMP_LTZ", datetime.now()) ) )
使用
:N作为占位符:import snowflake.connector snowflake.connector.paramstyle='numeric' con = snowflake.connector.connect(...) con.cursor().execute( "INSERT INTO testtable(col1, col2) " "VALUES(:1, :2)", ( 789, 'test string3' ))
以下查询显示如何使用
numeric绑定来重用变量:con.cursor().execute( "INSERT INTO testtable(complete_video, short_sample_of_video) " "VALUES(:1, SUBSTRING(:1, :2, :3))", ( binary_value_that_stores_video, # variable :1 starting_offset_in_bytes_of_video_clip, # variable :2 length_in_bytes_of_video_clip # variable :3 ))
将 qmark 或 numeric 绑定与 datetime 对象结合使用
使用 qmark 或 numeric 绑定将数据绑定到 Snowflake TIMESTAMP 数据类型时,请将绑定变量设置为元组,指定 Snowflake 时间戳数据类型(TIMESTAMP_LTZ 或 TIMESTAMP_TZ)和值。例如:
import snowflake.connector snowflake.connector.paramstyle='qmark' con = snowflake.connector.connect(...) con.cursor().execute( "CREATE OR REPLACE TABLE testtable2 (" " col1 int, " " col2 string, " " col3 timestamp_ltz" ")" ) con.cursor().execute( "INSERT INTO testtable2(col1,col2,col3) " "VALUES(?,?,?)", ( 987, 'test string4', ("TIMESTAMP_LTZ", datetime.now()) ) )
与客户端绑定不同,服务器端绑定要求列使用 Snowflake 数据类型。最常见的 Python 数据类型已经隐式映射到 Snowflake 数据类型(例如,int 映射到 FIXED)。但是,由于 Python datetime 数据可以绑定到多种 Snowflake 数据类型(TIMESTAMP_NTZ、TIMESTAMP_LTZ 或 TIMESTAMP_TZ)中的一种,并且默认映射为 TIMESTAMP_NTZ,因此您必须指定要使用的 Snowflake 数据类型。
将绑定变量与 IN 运算符结合使用
qmark 和 ``numeric``(服务器端绑定)不支持将绑定变量与 IN 运算符结合使用。
如果您需要将绑定变量与 IN 运算符结合使用,请使用 :ref:` 客户端绑定 <label-python_connector_binding_data_client>` (pyformat 或 format)。
将参数绑定到变量以进行批量插入
在应用程序代码中,您可以单批次插入多行。为此,请在 INSERT 语句中为值使用参数。例如,以下语句使用占位符在 INSERT 语句中进行 qmark 绑定:
insert into grocery (item, quantity) values (?, ?)
然后,要指定应插入的数据,请定义表示序列顺序的变量(例如,元组列表):
rows_to_insert = [('milk', 2), ('apple', 3), ('egg', 2)]
如上例所示,列表中的每个项目都是元组,其中包含要插入的行的列值。
要执行绑定,请调用 executemany() 方法,将变量作为第二个实参传递。例如:
conn = snowflake.connector.connect( ... ) rows_to_insert = [('milk', 2), ('apple', 3), ('egg', 2)] conn.cursor().executemany( "insert into grocery (item, quantity) values (?, ?)", rows_to_insert)
如果您 :ref:` 在服务器上绑定数据 <label-python_connector_binding_data_server>`(即使用 qmark 或 numeric 绑定),则连接器可以通过绑定来优化批量插入的性能。
使用此技术插入大量值时,驱动程序可以通过将数据流传输(而无需在本地计算机上创建文件)到临时暂存区进行引入来提高性能。当值数超过阈值时,驱动程序会自动执行此操作。
此外,您必须设置会话的当前数据库和架构。如果未设置这些值,则驱动程序执行的 CREATE TEMPORARY STAGE 命令可能会失败,并出现以下错误:
CREATE TEMPORARY STAGE SYSTEM$BIND file_format=(type=csv field_optionally_enclosed_by='"')
Cannot perform CREATE STAGE. This session does not have a current schema. Call 'USE SCHEMA', or use a qualified name.
备注
有关将数据加载到 Snowflake 数据库的其他方法(包括使用 COPY 命令进行批量加载),请参阅 将数据载入 Snowflake。
避免 SQL 注入攻击
避免使用 Python 的格式化函数绑定数据,因为这样存在 SQL 注入风险。例如:
# Binding data (UNSAFE EXAMPLE) con.cursor().execute( "INSERT INTO testtable(col1, col2) " "VALUES(%(col1)d, '%(col2)s')" % { 'col1': 789, 'col2': 'test string3' })# Binding data (UNSAFE EXAMPLE) con.cursor().execute( "INSERT INTO testtable(col1, col2) " "VALUES(%d, '%s')" % ( 789, 'test string3' ))# Binding data (UNSAFE EXAMPLE) con.cursor().execute( "INSERT INTO testtable(col1, col2) " "VALUES({col1}, '{col2}')".format( col1=789, col2='test string3') )
改为以变量存储值,然后使用 qmark 或 numeric 绑定样式来绑定这些变量。
检索列元数据
要检索结果集中每列的元数据(例如每列的名称、类型、精度、标度等),请使用以下其中一种方法:
要在调用
execute()方法以执行查询之后访问元数据,请使用Cursor对象的description属性。要在 无需 执行查询的情况下访问元数据,请调用
describe()方法。describe方法适用于 Snowflake Connector for Python 2.4.6 和最近的版本。
description 属性设置为以下值:
版本 2.4.5 及更早版本: 元组列表。
版本 2.4.6 及更高版本: ResultMetadata 对象列表。(
describe方法也会返回此列表。)
每个元组和 ResultMetadata 对象都包含列的元数据(列名、数据类型等)。您可以 按索引访问元数据,或者在 2.4.6 及更高版本中,按 ResultMetadata 属性访问元数据。
以下示例演示如何访问返回元组和 ResultMetadata 对象中的元数据。
示例:按索引获取列名元数据(版本 2.4.5 及更早版本):
以下示例在执行查询后使用 description 属性检索列名列表。该属性是一个元组列表,该示例从每个元组的第一个值访问列名。
cur = conn.cursor() cur.execute("SELECT * FROM test_table") print(','.join([col[0] for col in cur.description]))
示例:按属性获取列名元数据(版本 2.4.6 及更高版本):
以下示例在执行查询后使用 description 属性检索列名列表。该属性是一个 ResultMetaData 对象列表,该示例从每个 ResultMetadata 对象的 name 属性中访问列名。
cur = conn.cursor() cur.execute("SELECT * FROM test_table") print(','.join([col.name for col in cur.description]))
示例:在不执行查询的情况下获取列名元数据(版本 2.4.6 及更高版本):
以下示例使用 describe 方法检索列名列表,无需执行查询。describe() 方法返回 ResultMetaData 对象列表,该示例从每个 ResultMetadata 对象的 name 属性中访问列名。
cur = conn.cursor() result_metadata_list = cur.describe("SELECT * FROM test_table") print(','.join([col.name for col in result_metadata_list]))
处理错误
应用程序必须正确处理由 Snowflake Connector 引发的异常,并决定继续或停止运行代码。
# Catching the syntax error cur = con.cursor() try: cur.execute("SELECT * FROM testtable") except snowflake.connector.errors.ProgrammingError as e: # default error message print(e) # customer error message print('Error {0} ({1}): {2} ({3})'.format(e.errno, e.sqlstate, e.msg, e.sfqid)) finally: cur.close()
使用 execute_stream 来执行 SQL 脚本
execute_stream 函数支持您在一个流中运行一个或多个 SQL 脚本:
from codecs import open with open(sqlfile, 'r', encoding='utf-8') as f: for cur in con.execute_stream(f): for ret in cur: print(ret)
备注
如果 sql_stream 包含注释,可能需要其他配置。请参阅 使用 execute_stream 执行 SQL 脚本。
关闭连接
最佳实践是通过调用 close 方法来关闭连接:
connection.close()
这样可以确保将收集的客户端指标提交到服务器并删除会话。此外,即使中间出现异常,try-finally 块也有助于确保连接关闭:
# Connecting to Snowflake con = snowflake.connector.connect(...) try: # Running queries con.cursor().execute(...) ... finally: # Closing the connection con.close()
小心
多个非封闭连接可能会耗尽您的系统资源,最终导致应用程序崩溃。
使用上下文管理器来连接和控制事务
Snowflake Connector for Python 支持上下文管理器,可根据需要分配和释放资源。禁用 autocommit 时,上下文管理器有助于根据语句状态提交或回滚事务。
# Connecting to Snowflake using the context manager with snowflake.connector.connect( user=USER, password=PASSWORD, account=ACCOUNT, autocommit=False, ) as con: con.cursor().execute("INSERT INTO a VALUES(1, 'test1')") con.cursor().execute("INSERT INTO a VALUES(2, 'test2')") con.cursor().execute("INSERT INTO a VALUES(not numeric value, 'test3')") # fail
在上面的示例中,当第三条语句失败时,上下文管理器会回滚事务中的变更并关闭连接。如果所有语句都成功,则上下文管理器将提交变更并关闭连接。
使用 try 和 except 块的等效代码如下所示:
# Connecting to Snowflake using try and except blocks con = snowflake.connector.connect( user=USER, password=PASSWORD, account=ACCOUNT, autocommit=False) try: con.cursor().execute("INSERT INTO a VALUES(1, 'test1')") con.cursor().execute("INSERT INTO a VALUES(2, 'test2')") con.cursor().execute("INSERT INTO a VALUES(not numeric value, 'test3')") # fail con.commit() except Exception as e: con.rollback() raise e finally: con.close()
使用 VECTOR 数据类型
Snowflake Python Connector 3.6.0 版本推出了对 VECTOR 数据类型 的支持。您可以将 VECTOR 数据类型与 向量相似性函数 结合使用来实现基于向量搜索或检索增强生成 (RAG) 的应用程序。
下面的代码示例展示了如何使用 Python Connector 创建具有 VECTOR 列的表,并调用 VECTOR_INNER_PRODUCT 函数:
import snowflake.connector
conn = ... # Set up connection
cur = conn.cursor()
# Create a table and insert some vectors
cur.execute("CREATE OR REPLACE TABLE vectors (a VECTOR(FLOAT, 3), b VECTOR(FLOAT, 3))")
values = [([1.1, 2.2, 3], [1, 1, 1]), ([1, 2.2, 3], [4, 6, 8])]
for row in values:
cur.execute(f"""
INSERT INTO vectors(a, b)
SELECT {row[0]}::VECTOR(FLOAT,3), {row[1]}::VECTOR(FLOAT,3)
""")
# Compute the pairwise inner product between columns a and b
cur.execute("SELECT VECTOR_INNER_PRODUCT(a, b) FROM vectors")
print(cur.fetchall())
[(6.30...,), (41.2...,)]
以下代码示例展示了如何使用 Python Connector 调用 VECTOR_COSINE_SIMILARITY,以查找最接近 [1,2,3] 的向量:
cur.execute(f"""
SELECT a, VECTOR_COSINE_SIMILARITY(a, {[1,2,3]}::VECTOR(FLOAT, 3))
AS similarity
FROM vectors
ORDER BY similarity DESC
LIMIT 1;
""")
print(cur.fetchall())
[([1.0, 2.2..., 3.0], 0.9990...)]
备注
VECTOR 数据类型不支持变量绑定。
日志记录
Snowflake Connector for Python 利用标准 Python logging 模块定期记录状态,以便应用程序可以跟踪其在幕后工作的活动。要启用日志记录,最简单方法是在应用程序的开头调用 logging.basicConfig()。
例如,将日志记录级别设置为 INFO,并将日志存储在名为 /tmp/snowflake_python_connector.log 的文件中:
logging.basicConfig( filename=file_name, level=logging.INFO)
将日志记录级别设置为 DEBUG,可以启用更全面的日志记录,如下所示:
# Logging including the timestamp, thread and the source code location import logging for logger_name in ['snowflake.connector', 'botocore', 'boto3']: logger = logging.getLogger(logger_name) logger.setLevel(logging.DEBUG) ch = logging.FileHandler('/tmp/python_connector.log') ch.setLevel(logging.DEBUG) ch.setFormatter(logging.Formatter('%(asctime)s - %(threadName)s %(filename)s:%(lineno)d - %(funcName)s() - %(levelname)s - %(message)s')) logger.addHandler(ch)SecretDetector 格式化程序类虽为可选,但推荐使用,可确保特定的一组已知敏感信息在写入 Snowflake Python Connector 日志文件之前经过掩码处理。要使用 SecretDetector,请使用类似如下的代码:
# Logging including the timestamp, thread and the source code location import logging from snowflake.connector.secret_detector import SecretDetector for logger_name in ['snowflake.connector', 'botocore', 'boto3']: logger = logging.getLogger(logger_name) logger.setLevel(logging.DEBUG) ch = logging.FileHandler('/tmp/python_connector.log') ch.setLevel(logging.DEBUG) ch.setFormatter(SecretDetector('%(asctime)s - %(threadName)s %(filename)s:%(lineno)d - %(funcName)s() - %(levelname)s - %(message)s')) logger.addHandler(ch)备注
botocore和boto3适用于 AWS (Amazon Web Services) SDK for Python。
日志记录配置文件
或者,您也可以在 config.toml 配置文件中轻松指定日志级别和保存日志文件的目录。有关此文件的详细信息,请参阅 使用 connections.toml 文件进行连接。
备注
此日志记录配置功能支持 Python 日志记录文档中定义的日志级别。
此日志记录配置文件使用 toml 定义 save_logs、level 和 path 日志记录参数,如下所示:
[log]
save_logs = true
level = "INFO"
path = "<directory to store logs>"
其中:
save_logs决定是否保存日志。level指定日志记录级别。如果未定义,驱动程序默认为INFO。path用于标识保存日志文件的目录。如果未定义,驱动程序会将日志保存在默认$SNOWFLAKE_HOME/logs/目录中。
备注
如果您的 config.toml 文件不包含 [log] 部分,则不会保存日志消息。
一天的日志消息将追加到 python-connector.log 文件中,该文件后续重命名为 python-connector.log.YYYY-MM-DD。
示例程序
以下示例代码将前面各部分中描述的许多示例合并到一个有效的 Python 程序中。此示例包含两部分:
父类(“python_veritas_base”)包含许多常见操作(例如连接到服务器)的代码。
子类(“python_connector_example”)代表特定客户端的自定义部分,例如查询表。
此示例代码直接从我们的一项测试中导入,以帮助确保它已在产品的最新内部版本上执行。
由于此代码是从测试中提取,因此它包含用于设置某些测试中使用的备用端口和协议的少量代码。用户 不应 设置协议或端口号;而是省略这些协议或端口号并使用默认值。
此代码还包含一些部分标记(有时称为“片段标签”),用于识别可独立导入到文档中的代码。部分标记通常看起来类似如下:
# -- (> ---------------------- SECTION=import_connector ---------------------
...
# -- <) ---------------------------- END_SECTION ----------------------------
用户代码中不需要这些部分标记。
代码示例的第一部分包含以下常用子程序:
读取包含连接信息的命令行实参(例如,“--warehouse MyWarehouse”)。
连接到服务器。
创建并使用仓库、数据库和架构。
使用完架构、数据库和仓库后,将其删除。
import logging
import os
import sys
# -- (> ---------------------- SECTION=import_connector ---------------------
import snowflake.connector
# -- <) ---------------------------- END_SECTION ----------------------------
class python_veritas_base:
"""
PURPOSE:
This is the Base/Parent class for programs that use the Snowflake
Connector for Python.
This class is intended primarily for:
* Sample programs, e.g. in the documentation.
* Tests.
"""
def __init__(self, p_log_file_name = None):
"""
PURPOSE:
This does any required initialization steps, which in this class is
basically just turning on logging.
"""
file_name = p_log_file_name
if file_name is None:
file_name = '/tmp/snowflake_python_connector.log'
# -- (> ---------- SECTION=begin_logging -----------------------------
logging.basicConfig(
filename=file_name,
level=logging.INFO)
# -- <) ---------- END_SECTION ---------------------------------------
# -- (> ---------------------------- SECTION=main ------------------------
def main(self, argv):
"""
PURPOSE:
Most tests follow the same basic pattern in this main() method:
* Create a connection.
* Set up, e.g. use (or create and use) the warehouse, database,
and schema.
* Run the queries (or do the other tasks, e.g. load data).
* Clean up. In this test/demo, we drop the warehouse, database,
and schema. In a customer scenario, you'd typically clean up
temporary tables, etc., but wouldn't drop your database.
* Close the connection.
"""
# Read the connection parameters (e.g. user ID) from the command line
# and environment variables, then connect to Snowflake.
connection = self.create_connection(argv)
# Set up anything we need (e.g. a separate schema for the test/demo).
self.set_up(connection)
# Do the "real work", for example, create a table, insert rows, SELECT
# from the table, etc.
self.do_the_real_work(connection)
# Clean up. In this case, we drop the temporary warehouse, database, and
# schema.
self.clean_up(connection)
print("\nClosing connection...")
# -- (> ------------------- SECTION=close_connection -----------------
connection.close()
# -- <) ---------------------------- END_SECTION ---------------------
# -- <) ---------------------------- END_SECTION=main --------------------
def args_to_properties(self, args):
"""
PURPOSE:
Read the command-line arguments and store them in a dictionary.
Command-line arguments should come in pairs, e.g.:
"--user MyUser"
INPUTS:
The command line arguments (sys.argv).
RETURNS:
Returns the dictionary.
DESIRABLE ENHANCEMENTS:
Improve error detection and handling.
"""
connection_parameters = {}
i = 1
while i < len(args) - 1:
property_name = args[i]
# Strip off the leading "--" from the tag, e.g. from "--user".
property_name = property_name[2:]
property_value = args[i + 1]
connection_parameters[property_name] = property_value
i += 2
return connection_parameters
def create_connection(self, argv):
"""
PURPOSE:
This gets account identifier and login information from the
environment variables and command-line parameters, connects to the
server, and returns the connection object.
INPUTS:
argv: This is usually sys.argv, which contains the command-line
parameters. It could be an equivalent substitute if you get
the parameter information from another source.
RETURNS:
A connection.
"""
# Get account identifier and login information from environment variables and command-line parameters.
# For information about account identifiers, see
# https://docs.snowflake.com/en/user-guide/admin-account-identifier.html .
# -- (> ----------------------- SECTION=set_login_info ---------------
# Get the password from an appropriate environment variable, if
# available.
PASSWORD = os.getenv('SNOWSQL_PWD')
# Get the other login info etc. from the command line.
if len(argv) < 11:
msg = "ERROR: Please pass the following command-line parameters:\n"
msg += "--warehouse <warehouse> --database <db> --schema <schema> "
msg += "--user <user> --account <account_identifier> "
print(msg)
sys.exit(-1)
else:
connection_parameters = self.args_to_properties(argv)
USER = connection_parameters["user"]
ACCOUNT = connection_parameters["account"]
WAREHOUSE = connection_parameters["warehouse"]
DATABASE = connection_parameters["database"]
SCHEMA = connection_parameters["schema"]
# Optional: for internal testing only.
try:
PORT = connection_parameters["port"]
except:
PORT = ""
try:
PROTOCOL = connection_parameters["protocol"]
except:
PROTOCOL = ""
# If the password is set by both command line and env var, the
# command-line value takes precedence over (is written over) the
# env var value.
# If the password wasn't set either in the environment var or on
# the command line...
if PASSWORD is None or PASSWORD == '':
print("ERROR: Set password, e.g. with SNOWSQL_PWD environment variable")
sys.exit(-2)
# -- <) ---------------------------- END_SECTION ---------------------
# Optional diagnostic:
#print("USER:", USER)
#print("ACCOUNT:", ACCOUNT)
#print("WAREHOUSE:", WAREHOUSE)
#print("DATABASE:", DATABASE)
#print("SCHEMA:", SCHEMA)
#print("PASSWORD:", PASSWORD)
#print("PROTOCOL:" "'" + PROTOCOL + "'")
#print("PORT:" + "'" + PORT + "'")
print("Connecting...")
# If the PORT is set but the protocol is not, we ignore the PORT (bug!!).
if PROTOCOL is None or PROTOCOL == "" or PORT is None or PORT == "":
# -- (> ------------------- SECTION=connect_to_snowflake ---------
conn = snowflake.connector.connect(
user=USER,
password=PASSWORD,
account=ACCOUNT,
warehouse=WAREHOUSE,
database=DATABASE,
schema=SCHEMA
)
# -- <) ---------------------------- END_SECTION -----------------
else:
conn = snowflake.connector.connect(
user=USER,
password=PASSWORD,
account=ACCOUNT,
warehouse=WAREHOUSE,
database=DATABASE,
schema=SCHEMA,
# Optional: for internal testing only.
protocol=PROTOCOL,
port=PORT
)
return conn
def set_up(self, connection):
"""
PURPOSE:
Set up to run a test. You can override this method with one
appropriate to your test/demo.
"""
# Create a temporary warehouse, database, and schema.
self.create_warehouse_database_and_schema(connection)
def do_the_real_work(self, conn):
"""
PURPOSE:
Your sub-class should override this to include the code required for
your documentation sample or your test case.
This default method does a very simple self-test that shows that the
connection was successful.
"""
# Create a cursor for this connection.
cursor1 = conn.cursor()
# This is an example of an SQL statement we might want to run.
command = "SELECT PI()"
# Run the statement.
cursor1.execute(command)
# Get the results (should be only one):
for row in cursor1:
print(row[0])
# Close this cursor.
cursor1.close()
def clean_up(self, connection):
"""
PURPOSE:
Clean up after a test. You can override this method with one
appropriate to your test/demo.
"""
# Create a temporary warehouse, database, and schema.
self.drop_warehouse_database_and_schema(connection)
def create_warehouse_database_and_schema(self, conn):
"""
PURPOSE:
Create the temporary schema, database, and warehouse that we use
for most tests/demos.
"""
# Create a database, schema, and warehouse if they don't already exist.
print("\nCreating warehouse, database, schema...")
# -- (> ------------- SECTION=create_warehouse_database_schema -------
conn.cursor().execute("CREATE WAREHOUSE IF NOT EXISTS tiny_warehouse_mg")
conn.cursor().execute("CREATE DATABASE IF NOT EXISTS testdb_mg")
conn.cursor().execute("USE DATABASE testdb_mg")
conn.cursor().execute("CREATE SCHEMA IF NOT EXISTS testschema_mg")
# -- <) ---------------------------- END_SECTION ---------------------
# -- (> --------------- SECTION=use_warehouse_database_schema --------
conn.cursor().execute("USE WAREHOUSE tiny_warehouse_mg")
conn.cursor().execute("USE DATABASE testdb_mg")
conn.cursor().execute("USE SCHEMA testdb_mg.testschema_mg")
# -- <) ---------------------------- END_SECTION ---------------------
def drop_warehouse_database_and_schema(self, conn):
"""
PURPOSE:
Drop the temporary schema, database, and warehouse that we create
for most tests/demos.
"""
# -- (> ------------- SECTION=drop_warehouse_database_schema ---------
conn.cursor().execute("DROP SCHEMA IF EXISTS testschema_mg")
conn.cursor().execute("DROP DATABASE IF EXISTS testdb_mg")
conn.cursor().execute("DROP WAREHOUSE IF EXISTS tiny_warehouse_mg")
# -- <) ---------------------------- END_SECTION ---------------------
# ----------------------------------------------------------------------------
if __name__ == '__main__':
pvb = python_veritas_base()
pvb.main(sys.argv)
代码示例的第二部分会创建一个表,在其中插入行等:
import sys
# -- (> ---------------------- SECTION=import_connector ---------------------
import snowflake.connector
# -- <) ---------------------------- END_SECTION ----------------------------
# Import the base class that contains methods used in many tests and code
# examples.
from python_veritas_base import python_veritas_base
class python_connector_example (python_veritas_base):
"""
PURPOSE:
This is a simple example program that shows how to use the Snowflake
Python Connector to create and query a table.
"""
def __init__(self):
pass
def do_the_real_work(self, conn):
"""
INPUTS:
conn is a Connection object returned from snowflake.connector.connect().
"""
print("\nCreating table test_table...")
# -- (> ----------------------- SECTION=create_table ---------------------
conn.cursor().execute(
"CREATE OR REPLACE TABLE "
"test_table(col1 integer, col2 string)")
conn.cursor().execute(
"INSERT INTO test_table(col1, col2) VALUES " +
" (123, 'test string1'), " +
" (456, 'test string2')")
# -- <) ---------------------------- END_SECTION -------------------------
print("\nSelecting from test_table...")
# -- (> ----------------------- SECTION=querying_data --------------------
cur = conn.cursor()
try:
cur.execute("SELECT col1, col2 FROM test_table ORDER BY col1")
for (col1, col2) in cur:
print('{0}, {1}'.format(col1, col2))
finally:
cur.close()
# -- <) ---------------------------- END_SECTION -------------------------
# ============================================================================
if __name__ == '__main__':
test_case = python_connector_example()
test_case.main(sys.argv)
要运行此示例,请执行以下操作:
将第一段代码复制到名为“python_veritas_base.py”的文件中。
将第二段代码复制到名为“python_connector_example.py”的文件中。
将 SNOWSQL_PWD 环境变量设置为您的密码,例如:
export SNOWSQL_PWD='MyPassword'使用类似如下的命令行执行程序(当然,将用户和账户信息替换为您自己的用户和账户信息)。
警告
这样会在程序结束时删除仓库、数据库和架构!不要 使用现有数据库的名称,以免丢失!
python3 python_connector_example.py --warehouse <unique_warehouse_name> --database <new_warehouse_zzz_test> --schema <new_schema_zzz_test> --account myorganization-myaccount --user MyUserName
以下是输出:
Connecting...
Creating warehouse, database, schema...
Creating table test_table...
Selecting from test_table...
123, test string1
456, test string2
Closing connection...
此处是更长的示例:
备注
在设置账户和登录信息的部分中,确保根据需要替换变量,以匹配您的 Snowflake 登录信息(名称、密码等)。
此示例使用 format() 函数来编写语句。如果您的环境存在 SQL 注入攻击的风险,您可能最好绑定值而不是使用 format()。
#!/usr/bin/env python
#
# Snowflake Connector for Python Sample Program
#
# Logging
import logging
logging.basicConfig(
filename='/tmp/snowflake_python_connector.log',
level=logging.INFO)
import snowflake.connector
# Set ACCOUNT to your account identifier.
# See https://docs.snowflake.com/en/user-guide/gen-conn-config.
ACCOUNT = '<my_organization>-<my_account>'
# Set your login information.
USER = '<login_name>'
PASSWORD = '<password>'
import os
# Only required if you copy data from your S3 bucket
AWS_ACCESS_KEY_ID = os.getenv('AWS_ACCESS_KEY_ID')
AWS_SECRET_ACCESS_KEY = os.getenv('AWS_SECRET_ACCESS_KEY')
# Connecting to Snowflake
con = snowflake.connector.connect(
user=USER,
password=PASSWORD,
account=ACCOUNT,
)
# Creating a database, schema, and warehouse if none exists
con.cursor().execute("CREATE WAREHOUSE IF NOT EXISTS tiny_warehouse")
con.cursor().execute("CREATE DATABASE IF NOT EXISTS testdb")
con.cursor().execute("USE DATABASE testdb")
con.cursor().execute("CREATE SCHEMA IF NOT EXISTS testschema")
# Using the database, schema and warehouse
con.cursor().execute("USE WAREHOUSE tiny_warehouse")
con.cursor().execute("USE SCHEMA testdb.testschema")
# Creating a table and inserting data
con.cursor().execute(
"CREATE OR REPLACE TABLE "
"testtable(col1 integer, col2 string)")
con.cursor().execute(
"INSERT INTO testtable(col1, col2) "
"VALUES(123, 'test string1'),(456, 'test string2')")
# Copying data from internal stage (for testtable table)
con.cursor().execute("PUT file:///tmp/data0/file* @%testtable")
con.cursor().execute("COPY INTO testtable")
# Copying data from external stage (S3 bucket -
# replace <s3_bucket> with the name of your bucket)
con.cursor().execute("""
COPY INTO testtable FROM s3://<s3_bucket>/data/
STORAGE_INTEGRATION = myint
FILE_FORMAT=(field_delimiter=',')
""".format(
aws_access_key_id=AWS_ACCESS_KEY_ID,
aws_secret_access_key=AWS_SECRET_ACCESS_KEY))
# Querying data
cur = con.cursor()
try:
cur.execute("SELECT col1, col2 FROM testtable")
for (col1, col2) in cur:
print('{0}, {1}'.format(col1, col2))
finally:
cur.close()
# Binding data
con.cursor().execute(
"INSERT INTO testtable(col1, col2) "
"VALUES(%(col1)s, %(col2)s)", {
'col1': 789,
'col2': 'test string3',
})
# Retrieving column names
cur = con.cursor()
cur.execute("SELECT * FROM testtable")
print(','.join([col[0] for col in cur.description]))
# Catching syntax errors
cur = con.cursor()
try:
cur.execute("SELECT * FROM testtable")
except snowflake.connector.errors.ProgrammingError as e:
# default error message
print(e)
# user error message
print('Error {0} ({1}): {2} ({3})'.format(e.errno, e.sqlstate, e.msg, e.sfqid))
finally:
cur.close()
# Retrieving the Snowflake query ID
cur = con.cursor()
cur.execute("SELECT * FROM testtable")
print(cur.sfqid)
# Closing the connection
con.close()