Snowflake Postgres networking
By default, Snowflake Postgres will provision each new instance inside a new private network in the cloud region you have selected. Each network is separate and private from other networks in the same cloud region.
By default, Snowflake Postgres instances do not allow incoming connections. Traffic to/from your Snowflake Postgres instances can be enabled in any of these ways:
- Attach a network policy containing Postgres ingress and/or egress network rules. This option is available for all accounts.
- Configure Private Link connections to/from cloud vendor private networks. This option is available for Business Critical edition or above accounts.
- Configure virtual network peering with a VPC you own on AWS. This option is available for AWS accounts.
Snowflake Postgres network policies and rules
Network policies and network rules for Snowflake Postgres instances function much the same as they do for other Snowflake resources with a few key differences:
- Network policies do not need to be activated to be used with Snowflake Postgres instances in the same way they are for Snowflake accounts, users, and other security integrations. Network policies for Snowflake Postgres instances are instead attached to the instances directly at instance creation time. Existing instances can also have their network policies changed.
- Snowflake Postgres instances only use the ALLOWED_NETWORK_RULE_LIST and BLOCKED_NETWORK_RULE_LIST properties of network policies. The BLOCKED_IP_LIST and ALLOWED_IP_LIST properties are ignored.
- Network rules for Snowflake Postgres instances should use either the Postgres Ingress or Postgres Egress modes. Rules using these modes are currently limited to type IPv4.
- Network rules using modes other than Postgres Ingress or Postgres Egress in a network policy are ignored by Snowflake Postgres instances that use them.
Warning
Snowflake recommends making your network policies as restrictive as is practical. Applying a policy with a 0.0.0.0/0 networking rule will make the server open to connections from anywhere on the internet. For this reason, Snowflake recommends against using policies with 0.0.0.0/0 rules for your Snowflake Postgres instances.
Privileges
- To create new network policies, Snowflake users must have the CREATE NETWORK POLICY privilege on the account.
- To create new network rules, Snowflake users must have the CREATE NETWORK RULE privilege on the schema in which they want to create the rules.
- To attach an existing network policy to a Snowflake Postgres instance, Snowflake users must both:
- Own the network policy or the policy’s owner must GRANT usage on it.
- Own the instance or use a role that has been granted the MODIFY privilege on it.
Snowflake Postgres network policy and rules example
Let’s say that:
- You want to allow incoming traffic to a new Postgres instance from your office, and your office network router’s public IP address is
23.206.171.35. - You also want to allow outgoing traffic from the new Postgres instance to your office Postgres server via a Postgres Foreign Data Wrapper connection.
For this we’ll create a new policy with both a Postgres Ingress network rule and a Postgres Egress network rule.
- Create two new network rules. Use
23.206.171.35/32as the sole network identifier for both, and use “Postgres Ingress” as the Mode for one and “Postgres Egress” for Mode of the other. - Create a new network policy with both new rules included in its Allowed list.
- In the navigation menu, select Postgres.
- Select + Create.
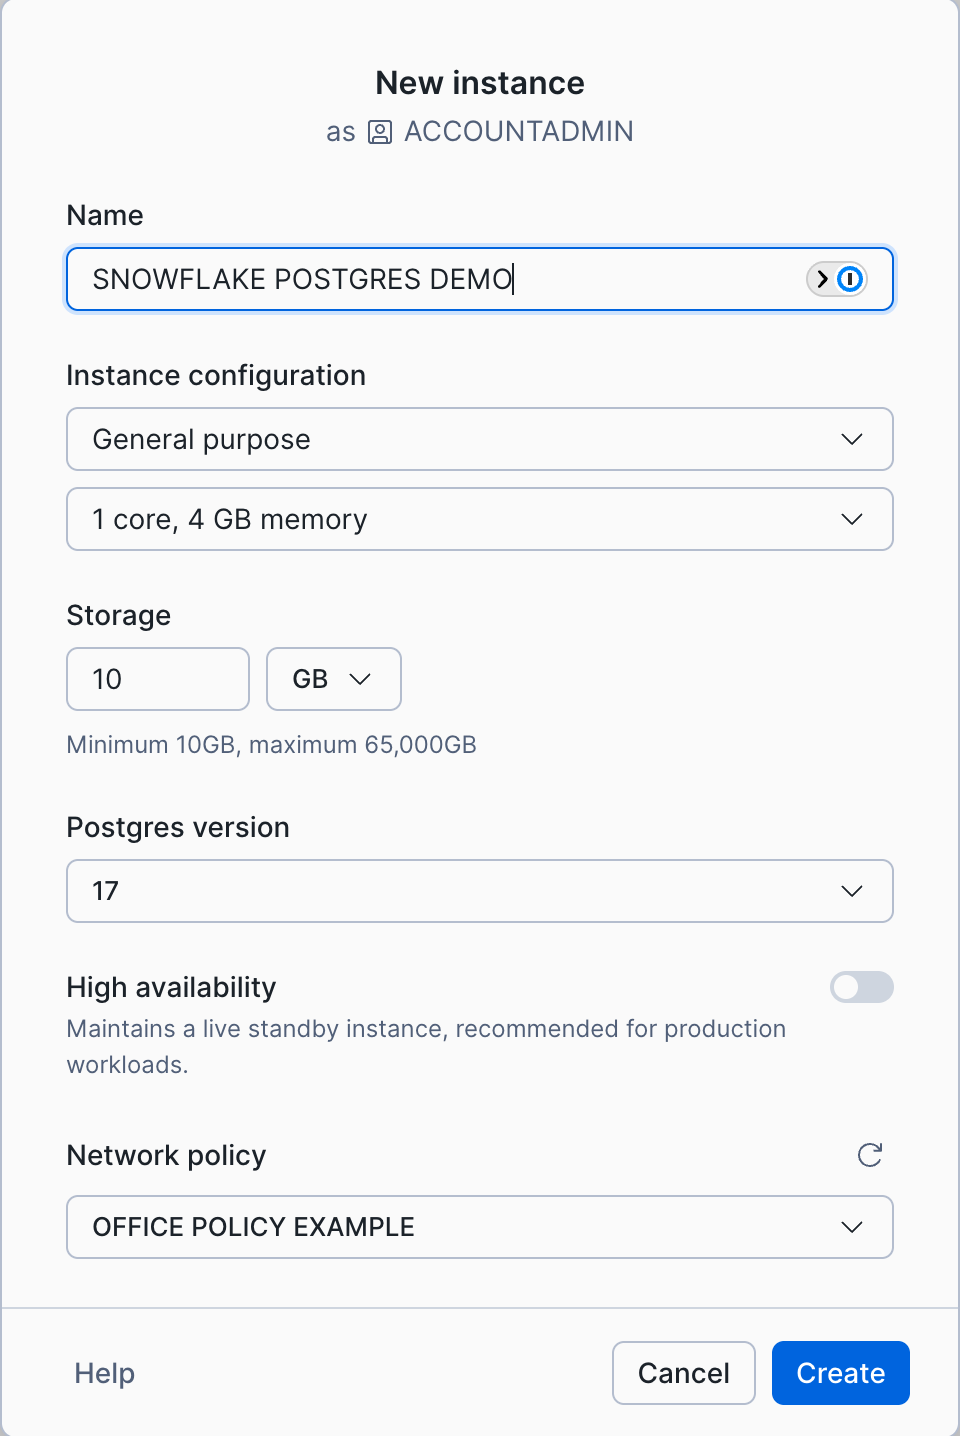
- When selecting your desired instance configuration details make sure to select your new policy under the Network policy select box. In the image below we have selected the policy that we named
OFFICE POLICY EXAMPLE.
Creating ingress rules at instance creation time
Instead of creating your network policy and rules before creating your Snowflake Postgres instance, you can create a policy with Postgres ingress rules when creating Snowflake Postgres instances via Snowsight.
- In the navigation menu, select Postgres.
- In the Postgres Instances page, select the Create button at the top right.
- Choose your instance configuration but leave the Network policy choice blank.
- After you select Create, a new dialog displays the
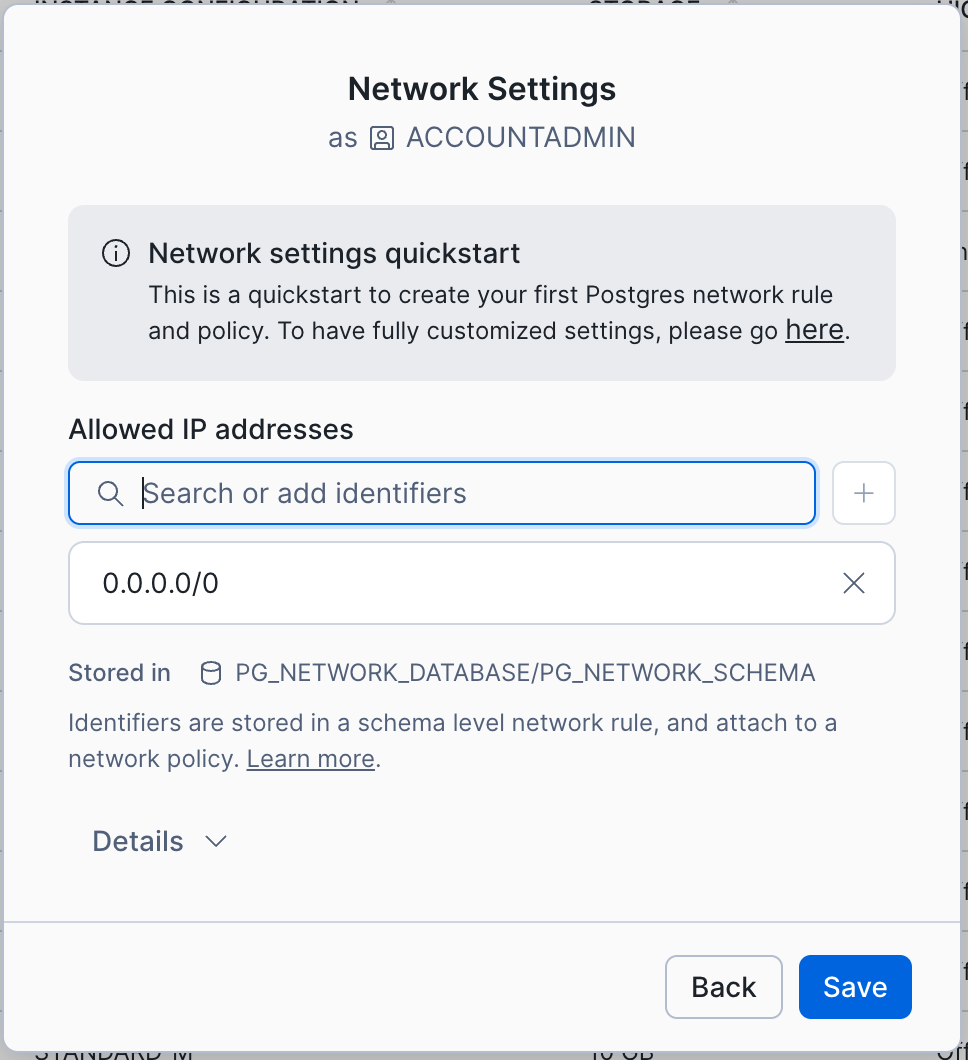
snowflake_adminPostgres user’s connection credentials. After saving those credentials in a secure location, select Continue to network settings. - In the Network Settings dialog (shown below) enter the IP address and/or CIDR values you wish to create Postgres ingress rules for, pressing enter to add each one to the list.
- Expand the Details section to edit your new network rule and/or policy names if needed.
- Select Save to create your new Postgres ingress network policy and have it automatically attached to your instance once it is active.
Snowflake Postgres Private Link
Private Link for Snowflake Postgres instances is available for Business Critical edition accounts and above.
To enable Private Link for a Snowflake Postgres instance, start by following the instructions to enable Private Link between your cloud vendor account and your Snowflake account:
Privileges
To enable Private Link for Snowflake Postgres instances, Snowflake users must have the following privileges.
- MANAGE POSTGRES PRIVATE CONNECTIVITY ON ACCOUNT
- OWNERSHIP or MANAGE for each given Snowflake Postgres instance
Setting up Private Link for Snowflake Postgres instances
Once you have Private Link enabled between your cloud vendor and Snowflake accounts and the required privileges, you can enable Private Link for Snowflake Postgres instances on a per-instance basis as follows.
If you do not intend to set up any network policy rules for your instance in addition to your Private Link connection, select Private Link for the Network Security option in the New instance dialog. If you do want to set up or use a network policy select Network policy instead and follow the previous instructions on network policies.
Once an instance is active you can enable Private Link for it:
- In the navigation menu, select Postgres and select your instance.
- In the instance’s Instance details pane, select the edit icon in the Private Link section.
- A confirmation dialog is shown asking you to confirm setting up Private Link for your cloud service provider. Select Enable. Note that this step can take up to 10 minutes to complete.
Once Private Link is active for your Snowflake Postgres instance you can establish new Private Link connections for it:
- In the navigation menu, select Postgres and select your instance to see its details page.
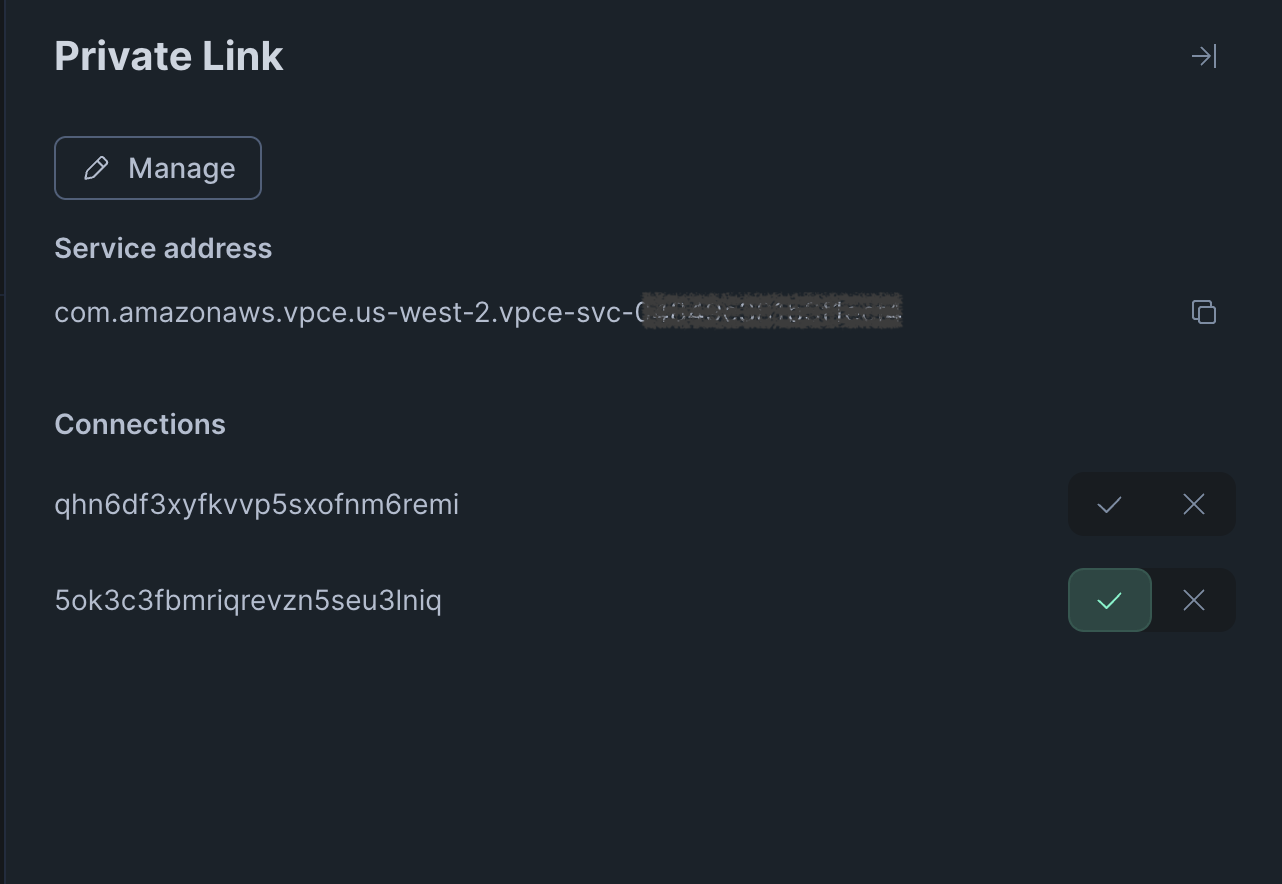
- Select the edit icon in the Private Link section to the right to expand the Private Link pane (shown below).
- Use the displayed Service address to make a Private Link connection request from the private network on your cloud vendor account.
- Refresh your Snowflake Postgres instance’s details page. The Private Link pane will now have a new connection entry for your request with neither the check mark (accept) nor x mark (reject) selected. Select the check mark to accept.
- You can now connect to your Snowflake Postgres instance from hosts in the cloud service provider’s private network.
You can enable Private Link for an active instance with Snowflake SQL as follows:
That asynchronous operation can take up to 10 minutes. To track its status, check the value of the privatelink_service_identifier
returned by DESCRIBE POSTGRES INSTANCE:
The same privatelink_service_identifier is shown for the instance’s entry in the output of SHOW POSTGRES INSTANCES:
When that privatelink_service_identifier column shows a non-NULL value you can use that identifier to make a Private Link connection
request from the private network on your cloud service provider account you have enabled for Private Link connections to your Snowflake
account.
After making that connection request from your cloud vendor account’s private network find the request for the Snowflake Postgres instance:
This command returns the following columns:
endpointconnection_idstatus
Your connection request will be an entry with your cloud vendor private network’s Private Link endpoint value and a status value
of pending.
You can accept one or more pending Private Link connection requests by running an ALTER POSTGRES INSTANCE command:
You can revoke one or more pending or previously approved Private Link connection requests by running this command:
Connecting to Snowflake Postgres instances over Private Links
Instead of using the Snowflake Postgres instance’s hostname, connections to Snowflake Postgres instances via Private Link setups should
be made using the DNS hostname configured on your cloud service provider’s private network for the Private Link.
Snowflake Postgres virtual network peering
Virtual network peering connects the private VPC of a Snowflake Postgres instance to a VPC you own on AWS, enabling private network connectivity between the two without exposing traffic to the internet. This feature is supported only on Snowflake Postgres instances hosted on AWS.
Note
Virtual network peering for Azure private networks is not currently supported.
Privileges
To add or remove virtual network peers for Snowflake Postgres instances, Snowflake users must have the following privileges:
- MANAGE POSTGRES PRIVATE CONNECTIVITY ON ACCOUNT
- OWNERSHIP or MANAGE for each given Snowflake Postgres instance
Set up a virtual network peer
-
In the navigation menu, select Postgres and select your instance.
-
In the instance’s Instance details pane, open VPC peering as follows:
-
If you have not yet set up or requested any VPC peerings, the VPC peering section shows an edit icon. Select it to open the Add VPC peer dialog for your first peer.
-
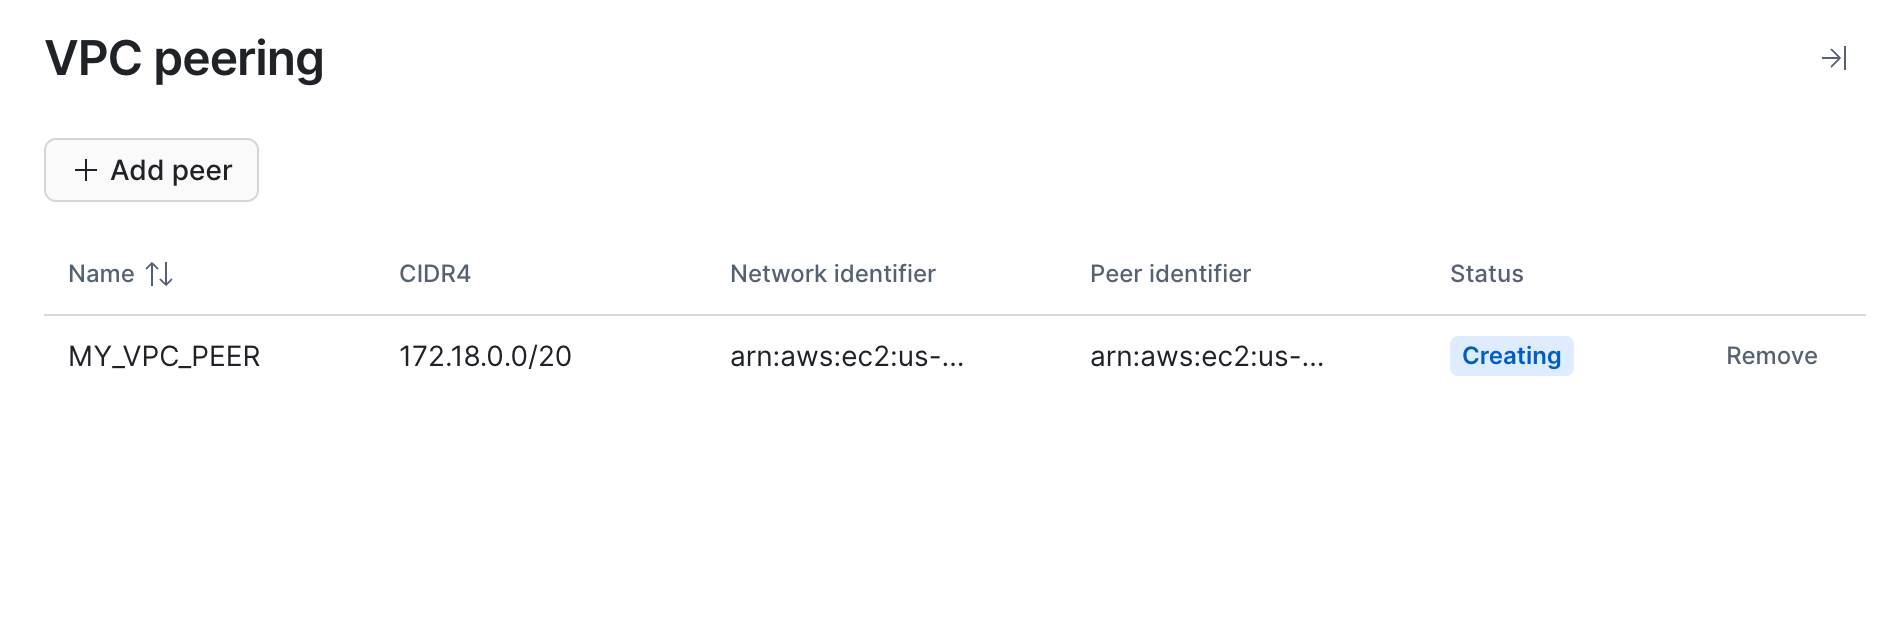
If there are existing peerings in any status, the VPC peering section shows a View details link instead. Select it to open the VPC peering pane, which lists each peering and includes an Add peer button. Select Add peer to open the Add VPC peer dialog.
-
-
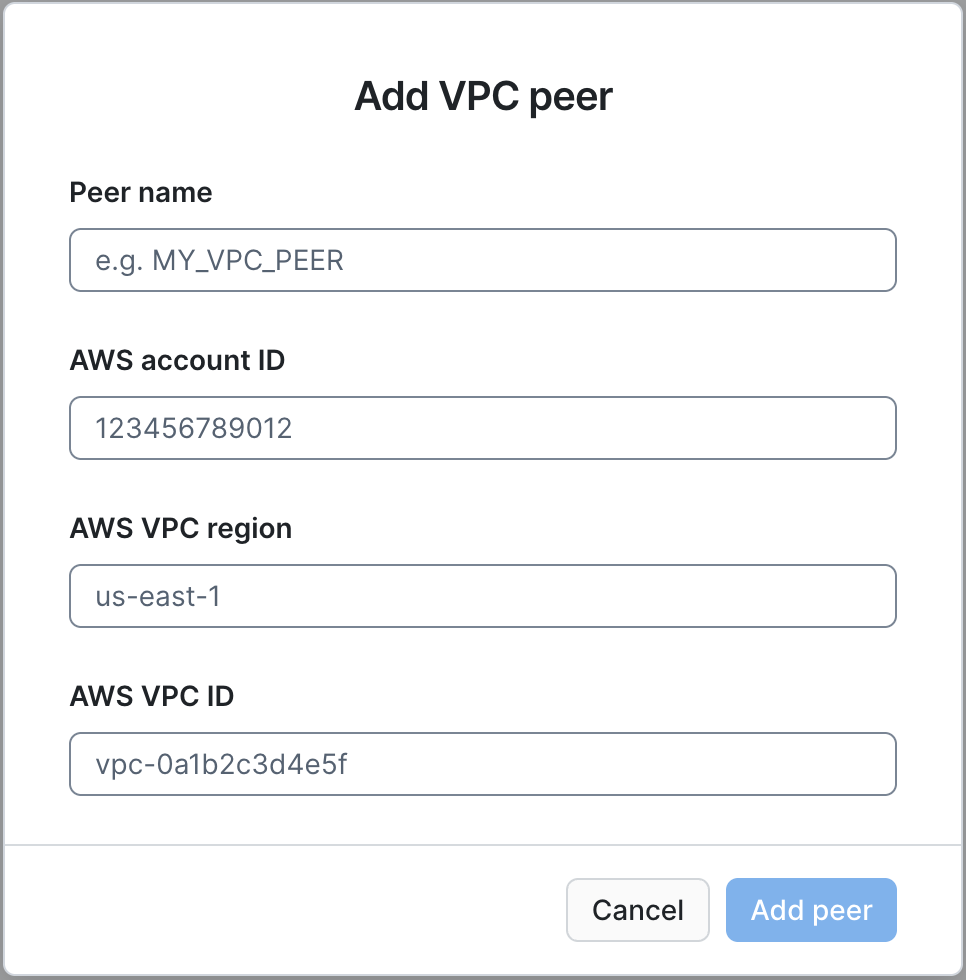
In the Add VPC peer dialog, enter the Peer name, AWS account ID, AWS VPC region, and AWS VPC ID for the VPC you own on AWS, then select Add peer.
-
Accept the peering connection request from within the peer VPC’s AWS account. This step is performed in the AWS console, outside of Snowflake.
-
In the Instance details pane, wait until the new peer shows an active status. Refresh the page if you do not see an update yet.
-
Note the CIDR range Snowflake shows for the Snowflake side of the peering connection; you’ll use it in the next step.
-
In your peer VPC’s AWS route table, add a route to that CIDR through the peering connection.
-
Create a Postgres Ingress network rule using the private IP CIDR of your peer VPC and add that rule to the Allowed list of the network policy attached to the Postgres instance. Do the same for a Postgres Egress network rule, if needed. See Snowflake Postgres network policies and rules earlier on this page for instructions on creating and attaching network policies and rules.
-
Initiate a peering connection request to the peer VPC:
-
Accept the peering connection request from within the peer VPC’s AWS account. This step is performed in the AWS console, outside of Snowflake.
-
Check the peering status and wait until the
statuscolumn showsACTIVE:This command returns the following columns:
name: the name you gave the peer when adding itcidr4: the CIDR range of the Snowflake Postgres VPCnetwork_identifier: the ARN of the Snowflake Postgres VPCpeer_identifier: the ARN of the peer VPCstatus: the status of the peering connection
Note the
cidr4value; you’ll use it in the next step. -
In your peer VPC’s AWS route table, add a route to the
cidr4CIDR through the peering connection. -
Create a Postgres Ingress network rule using the private IP CIDR of your peer VPC:
-
Add that rule to the
ALLOWED_NETWORK_RULE_LISTof the network policy attached to the Postgres instance. See Snowflake Postgres network policies and rules earlier on this page for instructions on creating and attaching network policies.
Remove a virtual network peer
- In the navigation menu, select Postgres and select your instance.
- In the instance’s Instance details pane, select View details in the VPC peering section to open the VPC peering pane.
- In the peering list, select Remove for the peer you want to remove.
Connecting to Snowflake Postgres instances over a virtual network peer
Instead of using the Snowflake Postgres instance’s public hostname, connections from a peered VPC should use the internal DNS
hostname. The internal hostname is the same as the public hostname, but with i prepended.