SnowConvert AI: Power BI Repointing
This guide provides comprehensive instructions on utilizing Snowconvert AI for Power BI repointing to Snowflake. It details the process of migrating your existing Power BI reports and dashboards to leverage Snowflake as their underlying data source. You will learn how to prepare your Power BI reports, execute the Snowconvert AI tool, and validate the repointed reports to ensure seamless integration with Snowflake.
SnowConvert AI provides a new option to redefine their Power BI connections to the migrated databases in Snowflake. This redefinition of connections is called repointing. Repointing is executed inside the SnowConvert AI migration logic and uses the migration context to identify and migrate correctly embedded SQL queries.
How To Use The Tool
Note
Notice that this feature only supports Power BI reports with the extension .pbit. Before starting, please save your reports to .pbit extension.
Prerequisites
Before you begin, ensure you have the following: SnowConvert AI: You need to have the tool installed. You can access it here. Power BI reports: You need to download your reports and save them with the .pbit format.
How To Save A .Pbit Correctly
Open your report (.pbix) file and allow it to load.
Click on “File”.

Then click on “Save as”.

Then click on “Browse this device”.

Select the location to be saved and the extension as .pbit.

Click on “Save”.

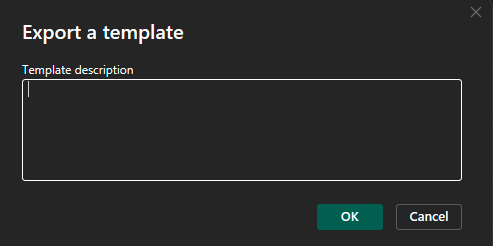
Optionally, add a description and click on “Ok”.

Migration steps
Locate all Power BI reports with .pbit extension in a folder.
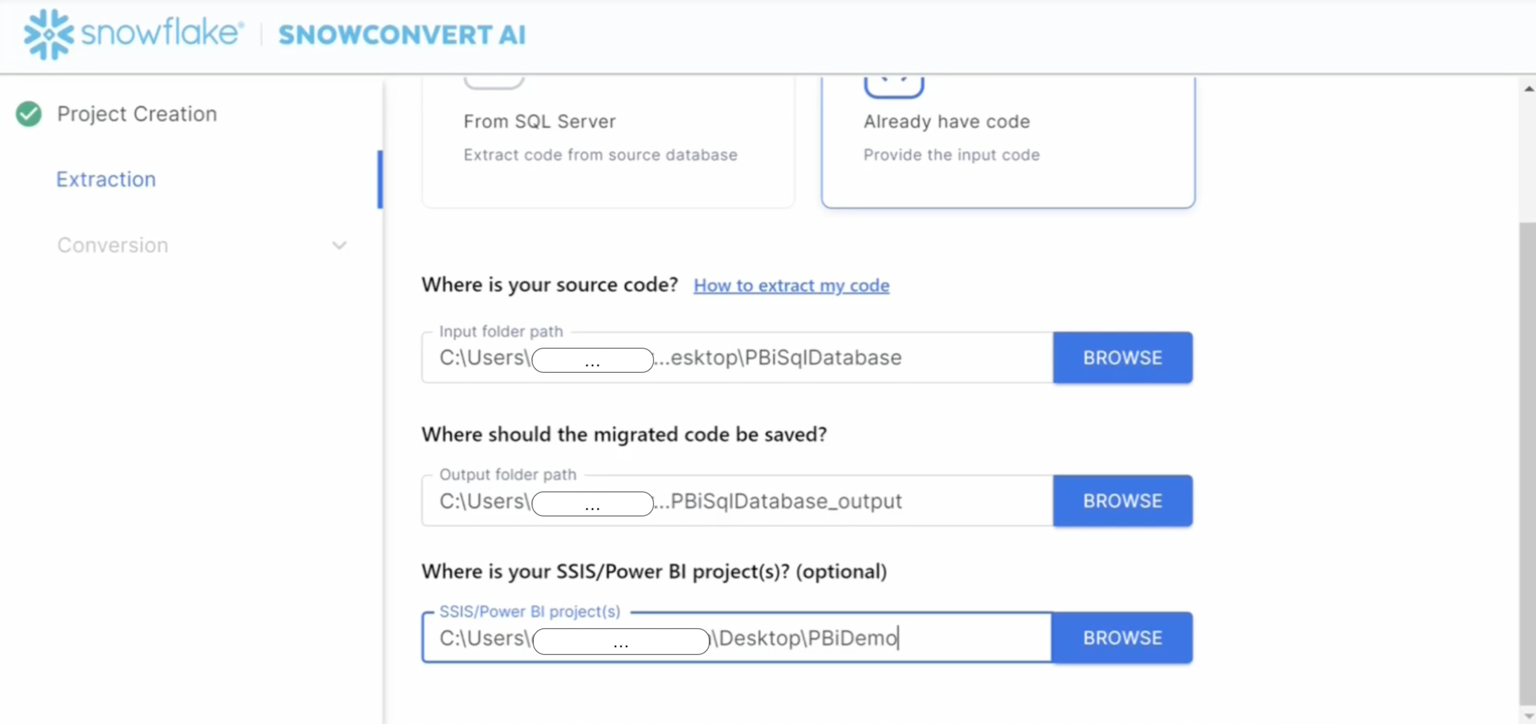
In the SnowConvert AI app, add the path of the Power BI projects in the “Where is your SSIS/Power BI project(s)?” section.
Continue the migration steps as normally.

Reports: In the output folder, you can review the report named ETLAndBiRepointing about the repointing transformation.
Access: In the output folder, you can review the “repointing_output” to access the Power BI repointing reports.
Execution: Before opening your reports, it is important to run all your migrated DDLs in your Snowflake account. Otherwise, the object will not be retrieved because they do not exist in the Snowflake account. So, follow the next steps:
Run your migrated queries.
Open your Power BI report.
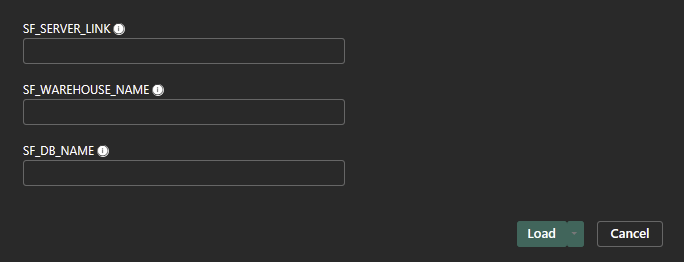
Fill in the Power BI parameters required: SF_SERVER_LINK, SF_DB_NAME, and SF_WAREHOUSE_NAME. For more information, please review the following Power BI parameters documentation (https://learn.microsoft.com/en-us/power-query/power-query-query-parameters).

Click on load and wait until the report loads the information.
Provide your account credentials to the Power BI app. Additionally, if you have two-factor authentication, you may be asked to accept every connection request from Power BI. Be aware that there may be several pop-ups for authorization.
Review the ETLAndBiRepointing report and resolve every data entity with issues.
Double-check functionality.
Refresh the data and save your report in the format of your preference. It is now ready to be shared.
Project structure
SnowConvert AI provides a new option to redefine their Power BI connections to the migrated databases in Snowflake. This redefinition of connections is referred to as repointing. Repointing is executed within the SnowConvert AI migration logic and utilizes the migration context to identify and migrate embedded SQL queries correctly.
Please refer to the specific source language Snowflake documentation that your are repointing:
Output structure overview
The output structure will resemble this and will include the repointed reports. The repointing output folder named repointing_output will contain the repointed reports.
Additionally, a dedicated folder containing the extracted queries will be provided, named power_bi_sql_queries. This folder serves a crucial purpose: to allow for a thorough double-check of all embedded SQL statements. These SQL statements will have been meticulously extracted from the applicable connectors within the Power BI environment.
Output/
├── repointing_output/
│   ├── report1.pbit
│   ├── report2.pbit
│   └── reportN.pbit
└── power_bi_sql_queries/
    ├── query1.sql
    ├── query2.sql
    └── queryN.sql
On the other hand, in the input folder will remain the non-migrated SQL files from every single connector. If there is a need review of these.
 Input/
└── power_bi_sql_queries/
    ├── query1.sql
    ├── query2.sql
    └── queryN.sql
Support Capabilities
The current version supports
Repointing of tables, views, and embedded SQL queries.
Maintain the remaining logic steps after the connection steps in the M Language (multiple lines).
Provides parameters inside Power BI to handle information correctly for Snowflake server link, warehouse and database name.
Convert queries saved as expressions (when the “Enable load” property has been disabled).
Renaming of columns based on related DDLs on the migration or by Power BI report references if DDLs are not provided.
Identification of views, if related DDLs are provided in the migration.
Multiple databases and schema repointing if these are using the selected platform connector in SnowConvert AI.
Considerations
The schema name of the source connections is being used as the schema in the repointed connection. It is assumed that the Snowflake database objects were created under the same schema.
The database objects must be deployed in Snowflake before trying to open the repointed report.
If the column renaming step in the M Language is empty, it means that no information was found in the migration context or Power BI project references to create it.
Functions and procedures are not supported in connectors different from SQL Server and Azure Synapse, so these cases are not supported.
All found database connections related to the source language in the migration settings will be repointed, and parameters (https://learn.microsoft.com/en-us/power-query/power-query-query-parameters) will be added.
Notice that other connections from other sources rather than the selected in the migration settings, are not being edited.
Migration Reports
The ETLAndBiRepointing contains information about the repointing process. There are connectors that are not applicable for repointing, such as CSV files, JSON files, and SharePoint connections. These non-applicable connectors are unlikely to be edited, but it is recommended to double-check. It looks like the following sample:

Troubleshooting
If the user does not enter the requested global parameters after repointing, the load of objects is not triggered by Power BI; therefore, ensure that the parameter information is added. If
If the user clicks Cancel and the reports do not load, it is recommended to close and reopen the report.
If a visualization does not load, it may be because a column definition does not match the text case. Notice that the Snowflake connector from Power BI retrieves the entities and columns always in uppercase.
If you experience issues with the credential cache, you can navigate to the settings in Power BI and clear the connection to enter new credentials.
There may be problems with complex SQL queries after migration. These cases may require extra work to solve warning messages from the migration process (EWI - PRF - FDM).
Limitations
Dynamic SQL embedded in connectors.
Column renaming is crucial for visualization loading. This renaming is not guaranteed to be precise due to limitations in the processed information. If no columns are found during the repointing, the default is to rename the columns based on a predefined case sensitivity. The default is uppercase because the native Snowflake connector retrieves all information in uppercase.