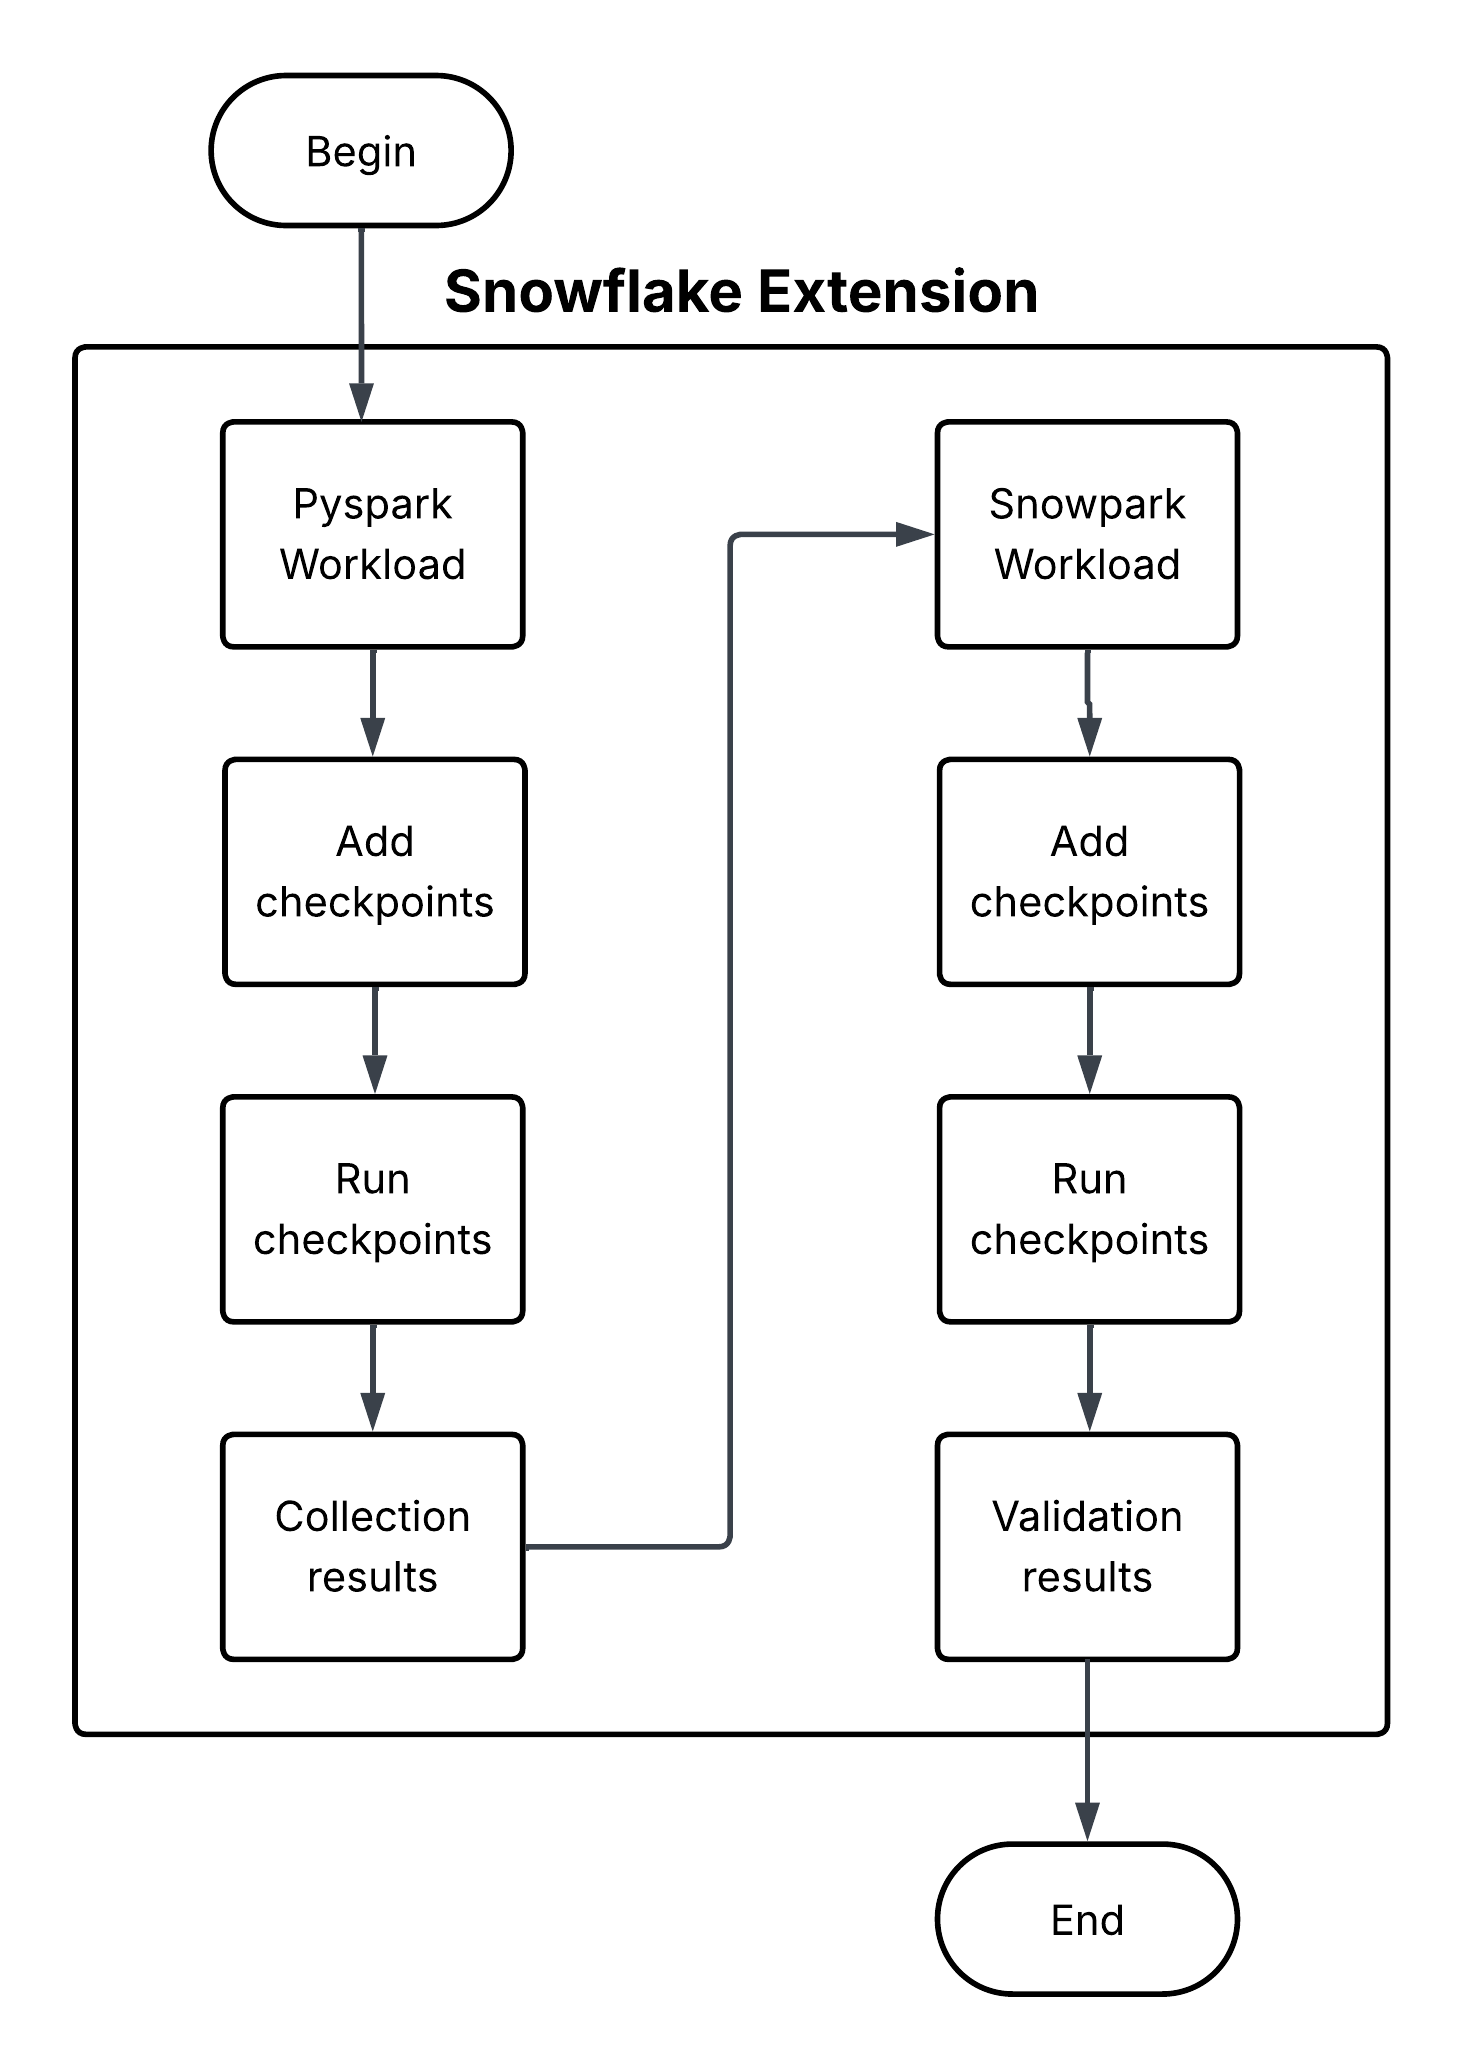
Snowpark Checkpoints library

Snowpark Checkpoints is a testing library that validates code migrated from Apache PySpark (https://spark.apache.org/) to Snowpark Python.

Prerequisites

To use Snowpark Checkpoints, set up a Python development environment. The supported versions of Python are:

  • 3.9

  • 3.10

  • 3.11

Note

Python 3.9 depends on Snowpark client version 1.5.0. Python 3.10 depends on Snowpark client version 1.5.1. Python 3.11 depends on Snowpark client version 1.9.0.

You can create a Python virtual environment for a particular Python version using tools like Anaconda (https://www.anaconda.com/), Miniconda (https://docs.conda.io/en/latest/miniconda.html), or virtualenv (https://docs.python.org/3/tutorial/venv.html).

Install Snowpark Checkpoints

Install the Snowpark Checkpoints package into a Python virtual environment by using conda (https://anaconda.org/anaconda/conda) or pip (https://pypi.org/project/pip/).

  • Using conda:

    conda install snowpark-checkpoints
    
    Copy
  • Using pip:

    pip install snowpark-checkpoints
    
    Copy

If you prefer, you can also install the packages individually:

  • snowpark-checkpoints-collectors - Use this package to collect information about PySpark DataFrames.

    • Using conda:

    conda install snowpark-checkpoints-collectors
    
    Copy
    • Using pip:

    pip install snowpark-checkpoints-collectors
    
    Copy
  • snowpark-checkpoints-hypothesis - Use this package to create unit tests for your Snowpark code based on synthetic data automatically generated, following the DataFrame schemas collected from the original PySpark code.

    • Using conda:

      conda install snowpark-checkpoints-hypothesis
      
      Copy
    • Using pip:

      pip install snowpark-checkpoints-hypothesis
      
      Copy
  • snowpark-checkpoints-validators - Use this package to validate your converted Snowpark DataFrames against the collected schemas or exported DataFrames generated by the collector functionality.

    • Using conda:

      conda install snowpark-checkpoints-validators
      
      Copy
    • Using pip:

      pip install snowpark-checkpoints-validators
      
      Copy
  • snowpark-checkpoints-configuration - Use this package to allow snowpark-checkpoints-collectors and snowpark-checkpoints-validators to automatically load the configuration of the checkpoints.

    • Using conda:

    conda install snowpark-checkpoints-configuration
    
    Copy
    • Using pip:

    pip install snowpark-checkpoints-configuration
    
    Copy

Using the framework

Collect information on your PySpark Code

The snowpark-checkpoints-collectors package offers a function for extracting information from the PySpark DataFrames. We can then use that data to validate against the converted Snowpark DataFrames to ensure behavioral equivalence.

Use the following function to insert a new checkpoint collection point:

Function signature:

def collect_dataframe_checkpoint(df: SparkDataFrame,
  checkpoint_name: str,
  sample: Optional[float],
  mode: Optional[CheckpointMode],
  output_path: Optional[str]) -> None:
Copy

Function parameters:

  • df: The PySpark DataFrame.

  • checkpoint_name: The name of the checkpoint. Starts with a letter (A-Z, a-z) or an underscore (_) and contains only letters, underscores and decimal digits (0-9).

  • sample: (optional) The sample size. The default value is 1.0 (entire PySpark DataFrame) in a range from 0 to 1.0.

  • mode: (optional) The execution mode. Options are SCHEMA and DATAFRAME. The default value is SCHEMA.

  • output_path: (optional) The output path to save the checkpoint. The default value is the current working directory.

The collection process generates an output file, called checkpoint_collection_result.json, with the information about the result for each collection point. It is a JSON file and contains the following information:

  • A timestamp when the collection point started.

  • The relative path of the file where the collection point is.

  • The line of code of the file where the collection point is.

  • The name of the collection point checkpoint.

  • The result of the collection point (fail or pass).

Schema inference collected data mode (Schema)

This is the default mode, which leverages Pandera schema inference to obtain the metadata and checks that will be evaluated for the specified DataFrame. This mode also collects custom data from columns of the DataFrame based on the PySpark type.

The column data and checks are collected based on the PySpark type of the column (see the tables below). For any column, no matter its type, custom data collected will include the name of the column, the type of the column, nullable, the count of rows, the count of not null rows, and the count of null rows.

Custom data is collected based on the PySpark type of the column

Column type

Custom data collected

Numeric (byte, short, integer, long, float and double)

The minimum value. The maximum value. The mean value. The decimal precision (in case of integer type, the value is zero). The standard deviation.

Date

The minimum value. The maximum value. The format of the date: %Y-%m-%d

DayTimeIntervalType and YearMonthIntervalType

The minimum value. The maximum value.

Timestamp

The minimum value. The maximum value. The format of the date: %Y-%m-%dH:%M:%S

Timestamp ntz

The minimum value. The maximum value. The format of the date: %Y-%m-%dT%H:%M:%S%z

String

The minimum length value. The maximum length value.

Char

PySpark handles any literal as a string type, therefore char is not a valid type.

Varchar

PySpark handles any literal as a string type, therefore Varchar is not a valid type.

Decimal

The minimum value. The maximum value. The mean value. The decimal precision.

Array

The type of the value. If allowed, null as an element. The proportion of null values. The maximum array size. The minimum array size. The mean size of arrays. If all arrays have the same size.

Binary

The maximum size. The minimum size. The mean size. If all elements have the same size.

Map

The type of the key. The type of the value. If allowed, null as a value. The proportion of null values. The maximum map size. The minimum map size. The mean map size. If all maps have the same size.

Null

NullType represents None, because the type data can not be determined; therefore it is not possible to get information from this type.

Struct

The metadata of the struct, it is for each structField: name, type, nullable, rows count, rows not null count and rows null count. It is an array.

It also defines a set of predefined validations checks for each data type detailed in the following table:

Checks are collected based on the type of the column

Type

Pandera Checks

Additional Checks

Boolean

Each value is True or False.

The count of True and False values.

Numeric (byte, short, integer, long, float and double)

Each value is in the range of min value and max value.

The decimal precision. The mean value. The standard deviation.

Date

N/A

Minimum and maximum values

Timestamp

Each value is in the range of min value and max value.

The format of the value.

Timestamp ntz

Each value is in the range of min value and max value.

The format of the value.

String

Each value length is in the range of min and max length.

None

Char

PySpark handles any literal as a string type, therefore char is not a valid type.

Varchar

PySpark handles any literal as a string type, therefore Varchar is not a valid type.

Decimal

N/A

N/A

Array

N/A

None

Binary

N/A

None

Map

N/A

None

Null

N/A

N/A

Struct

N/A

None

This mode allows the user to define a sample of a DataFrame to collect, but it is optional. By default, the collection works with the entire DataFrame. The size of the sample must represent the population statistically.

Pandera can only infer the schema of a Pandas DataFrame, which implies that the PySpark DataFrame must be converted into a Pandas DataFrame, which can affect the columns’ type resolutions. In particular, Pandera infers the following PySpark types as object types: string, array, map, null, struct, and binary.

The output of this mode is a JSON file for each collected DataFrame, where the name of the file is the same as the checkpoint. This file contains information related to the schema and has two sections:

  1. The Pandera schema section contains the data inferred by Pandera such as name, type (Pandas), if the column allows null values or not, and other information for each column, and checks of the columns based on the PySpark type. It is a DataFrameSchema object of Pandera.

  2. The custom data section is an array of the custom data collected by each column based on the PySpark type.

Note

The collection package might have memory issues when processing large PySpark DataFrames. To address this, you can set the sample parameter in the collection function to a value between 0.0 and 1.0, in order to work with a subset of the data instead of the entire PySpark DataFrame.

DataFrame collected data mode (DataFrame)

This mode collects the data of the PySpark DataFrame. In this case, the mechanism saves all data of the given DataFrame in parquet format. Using the default user Snowflake connection, it tries to upload the parquet files into the Snowflake temporal stage and create a table based on the information in the stage. The name of the file and the table are the same as the checkpoint.

The output of this mode is a parquet file result of the DataFrame saved and a table with the DataFrame data in the default Snowflake configuration connection.

Validate Snowpark Converted Code

The Snowpark Checkpoints package offers a set of validations that can be applied to the Snowpark code to ensure behavioral equivalence against the PySpark code.

Functions provided by the Framework

  • check_with_spark: A decorator that will convert any Snowpark DataFrame arguments to a function or sample and then to PySpark DataFrames. The check will then execute a provided spark function that mirrors the functionality of the new Snowpark function and compare the outputs between the two implementations. Assuming the spark function and Snowpark functions are semantically identical this allows for verification of those functions on real, sampled data.

    Parameters:
    • job_context (SnowparkJobContext): The job context containing configuration and details for the validation.

    • spark_function (fn): The equivalent PySpark function to compare against the Snowpark implementation.

    • checkpoint_name (str): A name for the checkpoint. Defaults to None.

    • sample_number (Optional[int], optional): The number of rows for validation. Defaults to 100.

    • sampling_strategy (Optional[SamplingStrategy], optional): The strategy used for sampling data. Defaults to SamplingStrategy.RANDOM_SAMPLE.

    • output_path (Optional[str], optional): The path to store the validation results. Defaults to None.

    Following is an example:

     def original_spark_code_I_dont_understand(df):
     from pyspark.sql.functions import col, when
    
     ret = df.withColumn(
         "life_stage",
         when(col("byte") < 4, "child")
         .when(col("byte").between(4, 10), "teenager")
         .otherwise("adult"),
     )
     return ret
    
    
    @check_with_spark(
     job_context=job_context, spark_function=original_spark_code_I_dont_understand
    )
    def new_snowpark_code_I_do_understand(df):
      from snowflake.snowpark.functions import col, lit, when
    
      ref = df.with_column(
          "life_stage",
          when(col("byte") < 4, lit("child"))
          .when(col("byte").between(4, 10), lit("teenager"))
          .otherwise(lit("adult")),
     )
     return ref
    
    
     df1 = new_snowpark_code_I_do_understand(df)
    
    Copy
  • validate_dataframe_checkpoint: This function validates a Snowpark Dataframe against a specific checkpoint schema file or imported Dataframe according to the argument mode. It ensures that the information collected for that DataFrame and the DataFrame that is passed to the function are equivalent.

    Parameters:
    • df (SnowparkDataFrame): The DataFrame to validate.

    • checkpoint_name (str): The name of the checkpoint to validate against.

    • job_context (SnowparkJobContext, optional) (str): The job context for the validation. Required for PARQUET mode.

    • mode (CheckpointMode): The mode of validation (e.g., SCHEMA, PARQUET). Defaults to SCHEMA.

    • custom_checks (Optional[dict[Any, Any]], optional): Custom checks to apply during validation.

    • skip_checks (Optional[dict[Any, Any]], optional): Checks to skip during validation.

    • sample_frac (Optional[float], optional): Fraction of the DataFrame to sample for validation. Defaults to 0.1.

    • sample_number (Optional[int], optional): Number of rows to sample for validation.

    • sampling_strategy (Optional[SamplingStrategy], optional): Strategy to use for sampling.

    • output_path (Optional[str], optional): The output path for the validation results.

    Following is an example:

    # Check a schema/stats here!
    validate_dataframe_checkpoint(
       df1,
    "demo_add_a_column_dataframe",
    job_context=job_context,
    mode=CheckpointMode.DATAFRAME, # CheckpointMode.Schema)
    )
    
    Copy

    Depending on the mode selected the validation will use either the collected schema file or a Parquet-loaded Dataframe in Snowflake to verify the equivalence against the PySpark version.

  • check-ouput_schema: This decorator validates the schema of a Snowpark function’s output and ensures that the output DataFrame conforms to a specified Pandera schema. It is particularly useful for enforcing data integrity and consistency in Snowpark pipelines. This decorator takes several parameters, including the Pandera schema to validate against, the checkpoint name, sampling parameters, and an optional job context. It wraps the Snowpark function and performs schema validation on the output DataFrame before returning the result.

    Following is an example:

    from pandas import DataFrame as PandasDataFrame
    from pandera import DataFrameSchema, Column, Check
    from snowflake.snowpark import Session
    from snowflake.snowpark import DataFrame as SnowparkDataFrame
    from snowflake.snowpark_checkpoints.checkpoint import check_output_schema
    from numpy import int8
    
    # Define the Pandera schema
    out_schema = DataFrameSchema(
    {
         "COLUMN1": Column(int8, Check.between(0, 10, include_max=True, include_min=True)),
         "COLUMN2": Column(float, Check.less_than_or_equal_to(-1.2)),
         "COLUMN3": Column(float, Check.less_than(10)),
    }
    )
    
    # Define the Snowpark function and apply the decorator
    @check_output_schema(out_schema, "output_schema_checkpoint")
    def preprocessor(dataframe: SnowparkDataFrame):
      return dataframe.with_column(
         "COLUMN3", dataframe["COLUMN1"] + dataframe["COLUMN2"]
    )
    
    # Create a Snowpark session and DataFrame
    session = Session.builder.getOrCreate()
    df = PandasDataFrame(
    {
         "COLUMN1": [1, 4, 0, 10, 9],
         "COLUMN2": [-1.3, -1.4, -2.9, -10.1, -20.4],
    }
    )
    
    sp_dataframe = session.create_dataframe(df)
    
    # Apply the preprocessor function
    preprocessed_dataframe = preprocessor(sp_dataframe)
    
    Copy
  • check_input_schema: This decorator validates the schema of a Snowpark function’s input arguments. This decorator ensures that the input DataFrame conforms to a specified Pandera schema before the function is executed. It is particularly useful for enforcing data integrity and consistency in Snowpark pipelines. This decorator takes several parameters, including the Pandera schema to validate against, the checkpoint name, sampling parameters, and an optional job context. It wraps the Snowpark function and performs schema validation on the input DataFrame before executing the function.

    Following is an example:

    from pandas import DataFrame as PandasDataFrame
    from pandera import DataFrameSchema, Column, Check
    from snowflake.snowpark import Session
    from snowflake.snowpark import DataFrame as SnowparkDataFrame
    from snowflake.snowpark_checkpoints.checkpoint import check_input_schema
    from numpy import int8
    
    # Define the Pandera schema
    input_schema = DataFrameSchema(
    {
         "COLUMN1": Column(int8, Check.between(0, 10, include_max=True, include_min=True)),
         "COLUMN2": Column(float, Check.less_than_or_equal_to(-1.2)),
    }
    )
    
    # Define the Snowpark function and apply the decorator
    @check_input_schema(input_schema, "input_schema_checkpoint")
    def process_dataframe(dataframe: SnowparkDataFrame):
     return dataframe.with_column(
         "COLUMN3", dataframe["COLUMN1"] + dataframe["COLUMN2"]
    )
    
    # Create a Snowpark session and DataFrame
    session = Session.builder.getOrCreate()
    df = PandasDataFrame(
    {
         "COLUMN1": [1, 4, 0, 10, 9],
         "COLUMN2": [-1.3, -1.4, -2.9, -10.1, -20.4],
    }
    )
    sp_dataframe = session.create_dataframe(df)
    
    # Apply the process_dataframe function
    processed_dataframe = process_dataframe(sp_dataframe)
    
    Copy

Statistic checks

Statistics validations are applied to the specific column type by default when the validation is run in Schema mode; these checks can be skipped with skip_checks.

Column Type

Default Check

Numeric: byte, short, integer, long, float, and double

between: If the value is between the min or the max, including the min and max.

decimal_precision: If the value is decimal, this will check the decimal precision.

mean: Validate if the mean of the columns falls within a specific range.

Boolean

isin: Validate if the value is True or False.

True_proportion: Validate if the proportion of the True values falls within a specific range.

False_proportion: Validation if the proportion of the False values falls within a specific range.

Date: date, timestamp, and timestamp_ntz

between: If the value is between the min or the max, including the min and max.

Nullable: All supported types

Null_proportion: Validate the null proportion accordingly.

Skip checks

There is a granular control for checks, which allows you to skip column validation or specific checks for a column. With the parameter skip_checks, you can specify the particular column and which validation type you want to skip. The name of the check used to skip is the one associated with the check.

  • str_contains

  • str_endswith

  • str_length

  • str_matches

  • str_startswith

  • in_range

  • ​​equal_to

  • greater_than_or_equal_to

  • greater_than

  • less_than_or_equal_to

  • less_than

  • not_equal_to

  • notin

  • isin

df = pd.DataFrame(
{
       "COLUMN1": [1, 4, 0, 10, 9],
       "COLUMN2": [-1.3, -1.4, -2.9, -10.1, -20.4],
}
)

schema = DataFrameSchema(
{
       "COLUMN1": Column(int8, Check.between(0, 10, element_wise=True)),
       "COLUMN2": Column(
           float,
           [
               Check.greater_than(-20.5),
               Check.less_than(-1.0),
               Check(lambda x: x < -1.2),
           ],
       ),
}
)

session = Session.builder.getOrCreate()
sp_df = session.create_dataframe(df)
check_dataframe_schema(
   sp_df,
   schema,
   skip_checks={"COLUMN1": [SKIP_ALL], "COLUMN2": ["greater_than", "less_than"]},
)
Copy

Custom checks

You can add additional checks to the schema generated from the JSON file with the custom_checks property. This will add the check to the pandera schema:

df = pd.DataFrame(
 {
       "COLUMN1": [1, 4, 0, 10, 9],
       "COLUMN2": [-1.3, -1.4, -2.9, -10.1, -20.4],
 }
)

session = Session.builder.getOrCreate()
sp_df = session.create_dataframe(df)

# Those check will be added to the schema generate from the JSON file
result = validate_dataframe_checkpoint(
  sp_df,
  "checkpoint-name",
  custom_checks={
       "COLUMN1": [
           Check(lambda x: x.shape[0] == 5),
           Check(lambda x: x.shape[1] == 2),
  ],
  "COLUMN2": [Check(lambda x: x.shape[0] == 5)],
 },
)
Copy

Sampling strategies

The provided code’s sampling process is designed to efficiently validate large DataFrames by taking a representative sample of the data. This approach helps perform schema validation without the need to process the entire dataset, which can be computationally expensive and time-consuming.

Parameters:
  • sample_frac: This parameter specifies the fraction of the DataFrame to sample. For example, if sample_frac is set to 0.1, then 10 percent of the DataFrame rows will be sampled. This is useful when you want to validate a subset of the data to save on computational resources.

  • sample_number: This parameter specifies the exact number of rows to sample from the DataFrame. For example, if sample_number is set to 100, then 100 rows will be sampled from the DataFrame. This is useful when you want to validate a fixed number of rows regardless of the DataFrame size.

Validation result

After any type of validation is executed, the result, whether it passes or fails, will be saved into checkpoint_validation_results.json. This file is mostly used for the functionalities of the VSCode extension. It will contain information about the status of the validation, timestamp, checkpoint name, number of line where the execution of the function occurs, and the file.

It will also log the result into the default Snowflake account in a table called SNOWPARK_CHECKPOINTS_REPORT, which will contain information about the validation result.

  • DATE: Execute timestamp of the validation.

  • JOB: Name of the SnowparkJobContext.

  • STATUS: Status of the validation.

  • CHECKPOINT: Name of the checkpoint validated.

  • MESSAGE: Error message.

  • DATA: Data from the validation execution.

  • EXECUTION_MODE: Validation mode executed.

Checkpoint environment variable

The default behavior of the framework to find the checkpoints.json file is to look for an environment variable called SNOWFLAKE_CHECKPOINT_CONTRACT_FILE_PATH_ENV_VAR. This variable will contain the relative path of the checkpoint.json. It is assigned by the VSCode extension when you run the checkpoint with the code lenses in the code. If the environment variable is not assigned, the framework will try to look for the file in the current working directory.

Hypothesis Unit Testing

Hypothesis is a powerful testing library for Python that is designed to enhance traditional unit testing by generating a wide range of input data automatically. It uses property-based testing, where instead of specifying individual test cases, you can describe the expected behavior of your code with properties or conditions and Hypothesis generates examples to test those properties thoroughly. This approach helps uncover edge cases and unexpected behaviors, making it especially effective for complex functions. For more information, see Hypothesis (https://hypothesis.readthedocs.io/en/latest/).

The snowpark-checkpoints-hypothesis package extends the Hypothesis library to generate synthetic Snowpark DataFrames for testing purposes. By leveraging Hypothesis’ ability to generate diverse and randomized test data, you can create Snowpark DataFrames with varying schemas and values to simulate real-world scenarios and uncover edge cases, ensuring robust code and verifying the correctness of complex transformations.

The Hypothesis strategy for Snowpark relies on Pandera for generating synthetic data. The dataframe_strategy function uses the specified schema to generate a Pandas DataFrame that conforms to it and then converts it into a Snowpark DataFrame.

Function signature:

def dataframe_strategy(
  schema: Union[str, DataFrameSchema],
  session: Session,
  size: Optional[int] = None
) -> SearchStrategy[DataFrame]
Copy

Function parameters:

  • schema: The schema that defines the columns, data types and checks that the generated Snowpark dataframe should match. The schema can be:

    • A path to a JSON schema file generated by the collect_dataframe_checkpoint function of the snowpark-checkpoints-collectors package.

    • An instance of pandera.api.pandas.container.DataFrameSchema (https://pandera.readthedocs.io/en/stable/reference/generated/pandera.api.pandas.container.DataFrameSchema.html).

  • session: An instance of snowflake.snowpark.Session that will be used for creating the Snowpark DataFrames.

  • size: The number of rows to generate for each Snowpark DataFrame. If this parameter is not provided, the strategy will generate DataFrames of different sizes.

Function output:

Returns a Hypothesis SearchStrategy (https://github.com/HypothesisWorks/hypothesis/blob/904bdd967ca9ff23475aa6abe860a30925149da7/hypothesis-python/src/hypothesis/strategies/_internal/strategies.py#L221) that generates Snowpark DataFrames.

Supported and unsupported data types

The dataframe_strategy function supports the generation of Snowpark DataFrames with different data types. Depending on the type of the schema argument passed to the function, the data types supported by the strategy will vary. Note that if the strategy finds an unsupported data type it will raise an exception.

The following table shows the supported and unsupported PySpark data types by the dataframe_strategy function when passing a JSON file as the schema argument.

PySpark data type

Supported

Array (https://spark.apache.org/docs/latest/api/python/reference/pyspark.sql/api/pyspark.sql.types.ArrayType.html)

Yes

Boolean (https://spark.apache.org/docs/latest/api/python/reference/pyspark.sql/api/pyspark.sql.types.BooleanType.html)

Yes

Char (https://spark.apache.org/docs/latest/api/python/reference/pyspark.sql/api/pyspark.sql.types.CharType.html)

No

Date (https://spark.apache.org/docs/latest/api/python/reference/pyspark.sql/api/pyspark.sql.types.DateType.html)

Yes

DayTimeIntervalType (https://spark.apache.org/docs/latest/api/python/reference/pyspark.sql/api/pyspark.sql.types.DayTimeIntervalType.html)

No

Decimal (https://spark.apache.org/docs/latest/api/python/reference/pyspark.sql/api/pyspark.sql.types.DecimalType.html)

No

Map (https://spark.apache.org/docs/latest/api/python/reference/pyspark.sql/api/pyspark.sql.types.MapType.html)

No

Null (https://spark.apache.org/docs/latest/api/python/reference/pyspark.sql/api/pyspark.sql.types.NullType.html)

No

Byte (https://spark.apache.org/docs/latest/api/python/reference/pyspark.sql/api/pyspark.sql.types.ByteType.html), Short (https://spark.apache.org/docs/latest/api/python/reference/pyspark.sql/api/pyspark.sql.types.ShortType.html), Integer (https://spark.apache.org/docs/latest/api/python/reference/pyspark.sql/api/pyspark.sql.types.IntegerType.html), Long (https://spark.apache.org/docs/latest/api/python/reference/pyspark.sql/api/pyspark.sql.types.LongType.html), Float (https://spark.apache.org/docs/latest/api/python/reference/pyspark.sql/api/pyspark.sql.types.FloatType.html), Double (https://spark.apache.org/docs/latest/api/python/reference/pyspark.sql/api/pyspark.sql.types.DoubleType.html)

Yes

String (https://spark.apache.org/docs/latest/api/python/reference/pyspark.sql/api/pyspark.sql.types.StringType.html)

Yes

Struct (https://spark.apache.org/docs/latest/api/python/reference/pyspark.sql/api/pyspark.sql.types.StructType.html)

No

Timestamp (https://spark.apache.org/docs/latest/api/python/reference/pyspark.sql/api/pyspark.sql.types.TimestampType.html)

Yes

TimestampNTZ (https://spark.apache.org/docs/latest/api/python/reference/pyspark.sql/api/pyspark.sql.types.TimestampNTZType.html)

Yes

Varchar (https://spark.apache.org/docs/latest/api/python/reference/pyspark.sql/api/pyspark.sql.types.VarcharType.html)

No

YearMonthIntervalType (https://spark.apache.org/docs/latest/api/python/reference/pyspark.sql/api/pyspark.sql.types.YearMonthIntervalType.html)

No

The following table shows the Pandera data types supported by the dataframe_strategy function when passing a DataFrameSchema object as the schema argument and the Snowpark data types they are mapped to.

Pandera data type

Snowpark data type

int8

ByteType

int16

ShortType

int32

IntegerType

int64

LongType

float32

FloatType

float64

DoubleType

string

StringType

bool

BooleanType

datetime64[ns, tz]

TimestampType(TZ)

datetime64[ns]

TimestampType(NTZ)

date

DateType

Examples

The typical workflow for using the Hypothesis library to generate Snowpark DataFrames is as follows:

  1. Create a standard Python test function with the different assertions or conditions your code should satisfy for all inputs.

  2. Add the Hypothesis @given decorator to your test function and pass the dataframe_strategy function as an argument. For more information about the @given decorator, see hypothesis.given (https://hypothesis.readthedocs.io/en/latest/details.html#hypothesis.given).

  3. Run the test function. When the test is executed, Hypothesis will automatically provide the generated inputs as arguments to the test.

Example 1: Generate Snowpark DataFrames from a JSON file

Below is an example of how to generate Snowpark DataFrames from a JSON schema file generated by the collect_dataframe_checkpoint function of the snowpark-checkpoints-collectors package.

from hypothesis import given

from snowflake.hypothesis_snowpark import dataframe_strategy
from snowflake.snowpark import DataFrame, Session


@given(
    df=dataframe_strategy(
        schema="path/to/file.json",
        session=Session.builder.getOrCreate(),
        size=10,
    )
)
def test_my_function_from_json_file(df: DataFrame):
    # Test a particular function using the generated Snowpark DataFrame
    ...
Copy

Example 2: Generate a Snowpark DataFrame from a Pandera DataFrameSchema object

Below is an example of how to generate Snowpark DataFrames from an instance of a Pandera DataFrameSchema. For more information, see Pandera DataFrameSchema (https://pandera.readthedocs.io/en/latest/dataframe_schemas.html).

import pandera as pa

from hypothesis import given

from snowflake.hypothesis_snowpark import dataframe_strategy
from snowflake.snowpark import DataFrame, Session


@given(
    df=dataframe_strategy(
        schema=pa.DataFrameSchema(
            {
                "boolean_column": pa.Column(bool),
                "integer_column": pa.Column("int64", pa.Check.in_range(0, 9)),
                "float_column": pa.Column(pa.Float32, pa.Check.in_range(10.5, 20.5)),
            }
        ),
        session=Session.builder.getOrCreate(),
        size=10,
    )
)
def test_my_function_from_dataframeschema_object(df: DataFrame):
    # Test a particular function using the generated Snowpark DataFrame
    ...
Copy

Example 3: Customize the Hypothesis behavior

You can also customize the behavior of your test with the Hypothesis @settings decorator. This decorator allows you to customize various configuration parameters to tailor test behavior to your needs. By using the @settings decorator you can control aspects like the maximum number of test cases, the deadline for each test execution, verbosity levels and many others. For more information, see Hypothesis settings (https://hypothesis.readthedocs.io/en/latest/settings.html).

from datetime import timedelta

from hypothesis import given, settings
from snowflake.snowpark import DataFrame, Session

from snowflake.hypothesis_snowpark import dataframe_strategy


@given(
    df=dataframe_strategy(
        schema="path/to/file.json",
        session=Session.builder.getOrCreate(),
    )
)
@settings(
    deadline=timedelta(milliseconds=800),
    max_examples=25,
)
def test_my_function(df: DataFrame):
    # Test a particular function using the generated Snowpark DataFrame
    ...
Copy

Setting Up an IDE for Snowpark Checkpoints

The Snowflake Extension for Visual Studio Code offers support for the Snowpark Checkpoints library to enhance the experience of using the framework. It gives you fine-grained control over the collect and validate statements inserted into your code, as well as reviews the status of the behavioral-equivalence assertions of your converted code.

Enabling Snowpark Checkpoints

To enable Snowpark Checkpoints, go to Snowflake’s extension settings and check Snowpark Checkpoints: Enabled.

Enabled checkpoints

View

Setting the Snowpark Checkpoints property to Enabled, as explained previously, will open a new tab in the extension called SNOWPARK CHECKPOINTS. It displays all checkpoints in the workspace and enables multiple actions to be performed, such as enabling/disabling all or individually, clearing all from files, and by double-clicking each checkpoint, navigates to the file and line of code where it is defined.

Toggle all checkpoints

Located at the top right corner of the Snowpark Checkpoints tab, this option toggles the enabled property in all checkpoints.

Toggle checkpoints

Enabled checkpoints:

Toggle checkpoints

Disabling a checkpoint leads to it being skipped at runtime.

Disable checkpoints

Cleaning up all checkpoints

Located at the top right corner of the Snowpark Checkpoints tab. This removes checkpoints from all Python files, including Jupyter notebooks, in your workspace, but it does not delete them from the contract and panel. That means they can be restored using the command Snowflake: Restore All Checkpoints.

Remove checkpoints

Inserting checkpoints in a file

Right-clicking inside a file will display a context menu containing the Snowpark Checkpoints option, which allows adding Collection and Validation checkpoints.

Snowpark checkpoints option in context menu:

Add checkpoints

Collector/Validator added:

Collector and validator checkpoints

Running a single checkpoint

A single checkpoint can be run by clicking the code lens option shown above each checkpoint. Running it will bring up an output console showing the progress and once it finishes will pull up the results view. Even if the checkpoint is disabled in the contract file, it will be enabled just for its execution.

Running a single checkpoint

If an entry point is not declared in the contract file the error message: Entry point not found for the checkpoint. will be displayed.

Entry point not found

Running all enabled Snowpark Checkpoints in a file

In the top right corner of each file, the Run all checkpoints from the current file button will be present.

Running all checkpoints

Clicking on it will bring up an output channel displaying the progress of the execution.

Checkpoints progress

Timeline view

Displays a timeline of the checkpoints execution results.

Timeline view

Commands

The following commands are available for Snowpark Checkpoints. To use them enter Snowflake: [command name] into the command palette.

Snowpark Checkpoints commands

Command

Description

Snowflake: Toggle Checkpoints

Toggles the enabled property of all checkpoints.

Snowflake: Snowpark Checkpoints Project Initialization

Triggers project initialization, creating a contract file if it doesn’t exist. In case it exists, a pop-up displays, asking if you want to load the checkpoint into the contract file.

Snowflake: Clear All Checkpoints

Deletes all checkpoints from all files in the workspace.

Snowflake: Restore All Checkpoints

Restore checkpoints previously deleted from files that are still present in the contract file.

Snowflake: Add Validation/Collection Checkpoint

Adds a validator or collector with its mandatory parameters at the cursor position.

Snowflake: Focus on Snowpark Checkpoints View

Shifts focus to the panel SNOWPARK CHECKPOINTS.

Snowflake: Open Checkpoints Timeline

Displays a timeline of Checkpoints executions.

Snowflake: Run all Checkpoints from the current file

Runs all enabled checkpoints in the current file.

Snowflake: Run all Checkpoints in the workspace

Runs all enabled checkpoints from the workspace.

Snowflake: Show All Snowpark Checkpoints Result

Displays a tab with all checkpoints results.

Warnings

  • Duplicate: In a collection project, if two checkpoints are assigned with the same name, a warning : “Another checkpoint with an identical name has been detected and will be overwritten.” Validation projects can have multiple checkpoints sharing the same name, no warning will be shown.

  • Wrong type: Adding a checkpoint with a different type than the project type will underline it with the following error message: “Please make sure you are using the correct Snowpark-Checkpoints statement. This particular checkpoint statement is different from the others used in this project, statements that don’t match the project type will be ignored when executed.”

  • Invalid checkpoint name: There are invalid ways to add a checkpoint name parameter. If this happens, a warning message will be displayed: “Invalid checkpoint name. Checkpoint names must start with a letter and can only contain letters, numbers, hyphens, and underscores”.

Language: English