将 CI/CD 集成到 Snowflake CLI 中

Snowflake CLI 可与流行的 CI/CD(持续集成和持续交付)系统和框架集成,如 GitHub Actions (https://github.com/features/actions),从而高效地使 Snowflake 中的 SQL、Snowpark、原生应用程序或 Notebook 工作流程自动化。

下图展示了一个典型的 Snowflake CLI 中的 CI/CD 工作流程。
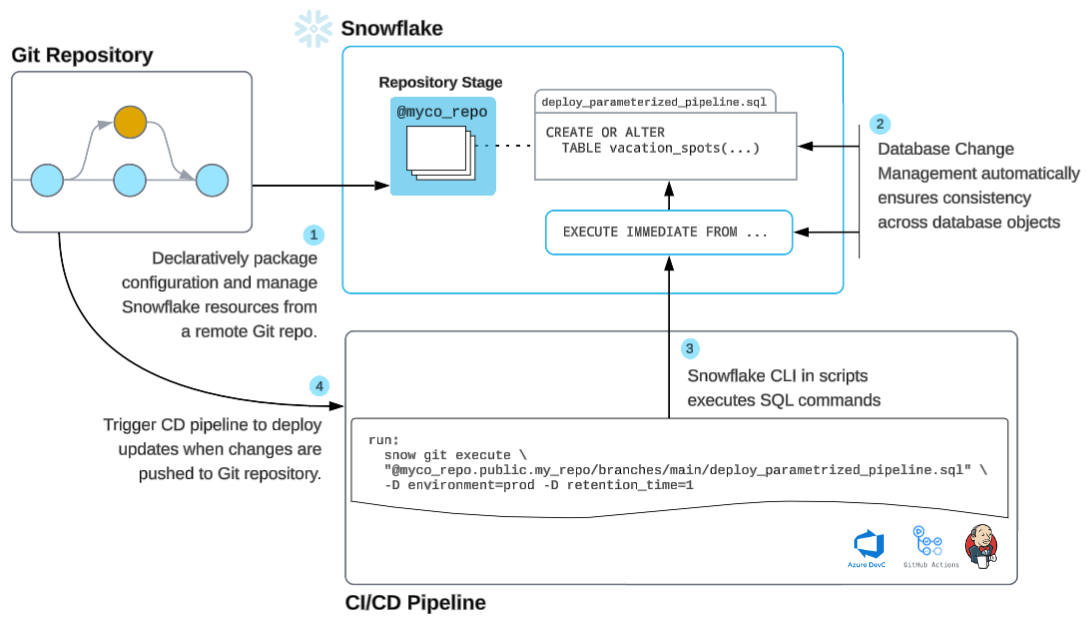
Snowflake CI/CD 工作流程

CI/CD 工作流程步骤

  1. 存储: 配置远程 Git 存储库以安全地管理 Snowflake 文件。

  2. 代码: 使用 IDE 或 Snowsight 开发 Snowflake 代码,可根据个人偏好进行定制。

  3. 安装: 安装 Snowflake CLI,并配置您偏好的 CI/CD 提供商,如 GitHub Actions。

  4. 部署: 将 Snowflake CLI 与您选择的 CI/CD 工具结合使用,实现自动化部署。

  5. 监控: 借助 Snowflake Trail,跟踪 Snowflake 中的代码和工作流程性能,以获得实时见解。

  6. 迭代: 对项目进行少量、频繁的更新以实现持续改进;如有必要,较小的更改可简化管理和回滚。

使用 GitHub Actions 实现 CI/CD

A Snowflake CLI action is a GitHub action designed to integrate Snowflake CLI into CI/CD pipelines. You can use it to automate execution of Snowflake CLI commands within your GitHub workflows. For more information, see the snowflake-cli-action (https://github.com/snowflakedb/snowflake-cli-action) repository.

使用 Snowflake CLI Actions

Github Actions streamlines the process of installing and using Snowflake CLI in your CI/CD workflows. The CLI is installed in an isolated way, ensuring that it won't conflict with the dependencies of your project. It automatically sets up the input configuration file within the ~/.snowflake/ directory.

The action enables automation of your Snowflake CLI tasks, such as deploying Snowflake Native Apps or running Snowpark scripts within your Snowflake environment.

输入参数

Snowflake CLI Action 在 Github 工作流程 YAML 文件中使用以下输入参数,例如 <repo-name>/.github/workflows/my-workflow.yaml

  • cli-version: The specified Snowflake CLI version, such as 3.11.0. If not provided, the latest version of the Snowflake CLI is used.

  • custom-github-ref: The branch, tag, or commit in the Github repository that you want to install Snowflake CLI directly from.

    备注

    You cannot use both cli-version and custom-github-ref together; specify only one of these parameters.

  • default-config-file-path: Path to the configuration file (config.toml) in your repository. The path must be relative to the root of the repository. The configuration file is not required when a temporary connection (-x option) is used. For more information, see 管理 Snowflake 连接.

  • use-oidc: Boolean flag to enable OIDC authentication. When set to true, the action configures the CLI to use GitHub's OIDC token for authentication with Snowflake, eliminating the need for storing private keys as secrets. Default is false.

Install Snowflake CLI from a GitHub branch or tag

  • To install Snowflake CLI from a specific branch, tag, or commit in the GitHub repository (for example, to test unreleased features or a fork), use the following configuration:

- uses: snowflakedb/snowflake-cli-action@v2.0
  with:
    custom-github-ref: "feature/my-branch" # or a tag/commit hash
Copy

You can also include other input parameters.

This feature is available in snowflake-cli-action version 1.6 or later.

在 CI/CD 工作流程中安全地配置该 Action

You can safely configure the action in your CI/CD workflow by using either of the following methods:

Use workload identity federation (WIF) OpenID Connect (OIDC) authentication

备注

WIF OIDC authentication requires Snowflake CLI version 3.11.0 or later.

WIF OIDC authentication provides a secure and modern way to authenticate with Snowflake without storing private keys as secrets. This approach uses GitHub's OIDC (OpenID Connect) token to authenticate with Snowflake.

To set up WIF OIDC authentication, follow these steps:

  1. Configure WIF OIDC by setting up a service user with the OIDC workload identity type:

    CREATE USER <username>
    TYPE = SERVICE
    WORKLOAD_IDENTITY = (
      TYPE = OIDC
      ISSUER = 'https://token.actions.githubusercontent.com'
      SUBJECT = '<your_subject>'
    )
    
    Copy

备注

By default, your subject should look like repo:<repository-owner/repository-name>:environment:<environment>.

  • To simplify generation of the subject, use gh command, where <environment_name> is the environment defined in your repository settings, as shown in the following example:

gh repo view <repository-owner/repository-name> --json nameWithOwner | jq -r '"repo:\(.nameWithOwner):environment:<environment_name>"'
Copy

For more information about customizing your subject, see the OpenID Connect (https://docs.github.com/en/actions/reference/security/oidc) reference on GitHub.

  1. Store your Snowflake account identifier in GitHub secrets. For more information, see GitHub Actions documentation (https://docs.github.com/en/actions/security-guides/using-secrets-in-github-actions#creating-secrets-for-a-repository).

  2. Configure the Snowflake CLI action in your GitHub workflow YAML file, as shown:

    name: Snowflake OIDC
    on: [push]
    
    permissions:
      id-token: write  # Required for OIDC token generation
      contents: read
    
    jobs:
      oidc-job:
        runs-on: ubuntu-latest
        environment: test-env # this should match the environment used in the subject
        steps:
          - uses: actions/checkout@v4
            with:
              persist-credentials: false
          - name: Set up Snowflake CLI
            uses: snowflakedb/snowflake-cli-action@v2.0
            with:
              use-oidc: true
              cli-version: "3.11"
          - name: test connection
            env:
              SNOWFLAKE_ACCOUNT: ${{ secrets.SNOWFLAKE_ACCOUNT }}
            run: snow connection test -x
    
    Copy

    For more information about setting up WIF OIDC authentication for your Snowflake account and configuring the GitHub OIDC provider, see Workload identity federation.

Use private key authentication

To use private key authentication, you need to store your Snowflake private key in GitHub secrets and configure the Snowflake CLI action to use it.

  1. Store your Snowflake private key in GitHub secrets.

For more information, see GitHub Actions documentation (https://docs.github.com/en/actions/security-guides/using-secrets-in-github-actions#creating-secrets-for-a-repository).

  1. Configure the Snowflake CLI action in your GitHub workflow YAML file, as shown:

    name: Snowflake Private Key
    on: [push]
    
    jobs:
      private-key-job:
        runs-on: ubuntu-latest
        steps:
          - uses: actions/checkout@v4
            with:
              persist-credentials: false
          - name: Set up Snowflake CLI
            uses: snowflakedb/snowflake-cli-action@v2.0
    
    Copy

定义连接

您可以定义一个 GitHub Action,以通过临时连接或配置文件中定义的连接来连接 Snowflake。有关管理连接的更多信息,请参阅 管理 Snowflake 连接

使用临时连接

有关临时连接的更多信息,请参阅 使用临时连接

要为临时连接设置 Snowflake 凭据,请按照以下步骤操作:

  1. 在 GitHub 工作流程中,将密钥映射为环境变量,格式为 SNOWFLAKE_<key>=<value>,示例如下:

    env:
      SNOWFLAKE_PRIVATE_KEY_RAW: ${{ secrets.SNOWFLAKE_PRIVATE_KEY_RAW }}
      SNOWFLAKE_ACCOUNT: ${{ secrets.SNOWFLAKE_ACCOUNT }}
    
    Copy
  2. 配置 Snowflake CLI Action。

    If you use the latest version of Snowflake CLI, you do not need to include the cli-version parameter. The following example instructs the action to use Snowflake CLI version 3.11.0 specifically:

    - uses: snowflakedb/snowflake-cli-action@v2.0
      with:
        cli-version: "3.11.0"
    
    Copy
  3. 可选:如果您的私钥已加密,要设置加密短语,请将 PRIVATE_KEY_PASSPHRASE 环境变量设置为私钥加密短语。Snowflake 使用此加密短语来解密私钥。例如:

    - name: Execute Snowflake CLI command
      env:
        PRIVATE_KEY_PASSPHRASE: ${{ secrets.PASSPHARSE }}
    
    Copy

    要使用密码而不是私钥,请取消设置 SNOWFLAKE_AUTHENTICATOR 环境变量,然后添加 SNOWFLAKE_PASSWORD 变量,如下所示:

    - name: Execute Snowflake CLI command
      env:
        SNOWFLAKE_USER: ${{ secrets.SNOWFLAKE_USER }}
        SNOWFLAKE_ACCOUNT: ${{ secrets.SNOWFLAKE_ACCOUNT }}
        SNOWFLAKE_PASSWORD: ${{ secrets.SNOWFLAKE_PASSWORD }}
    
    Copy

    备注

    为提升您在使用密码和 MFA 时的体验,Snowflake 建议您 配置 MFA 缓存

    有关如何在环境变量中设置 Snowflake 凭据的详细信息,请参阅 为 Snowflake 凭据使用环境变量;关于如何在 GitHub CI/CD 工作流程中定义环境变量的详细信息,请参阅 为单个工作流程定义环境变量 (https://docs.github.com/en/actions/learn-github-actions/variables#defining-environment-variables-for-a-single-workflow)。

  4. 通过临时连接,添加要执行的 snow 命令,如下所示:

    run: |
      snow --version
      snow connection test --temporary-connection
    
    Copy

以下示例显示了已完成的示例 <repo-name>/.github/workflows/my-workflow.yaml 文件:

name: deploy
on: [push]

jobs:
  version:
    name: "Check Snowflake CLI version"
    runs-on: ubuntu-latest
    steps:
      # Snowflake CLI installation
      - uses: snowflakedb/snowflake-cli-action@v2.0

        # Use the CLI
      - name: Execute Snowflake CLI command
        env:
          SNOWFLAKE_AUTHENTICATOR: SNOWFLAKE_JWT
          SNOWFLAKE_USER: ${{ secrets.SNOWFLAKE_USER }}
          SNOWFLAKE_ACCOUNT: ${{ secrets.SNOWFLAKE_ACCOUNT }}
          SNOWFLAKE_PRIVATE_KEY_RAW: ${{ secrets.SNOWFLAKE_PRIVATE_KEY_RAW }}
          PRIVATE_KEY_PASSPHRASE: ${{ secrets.PASSPHARSE }} # Passphrase is only necessary if private key is encrypted.
        run: |
          snow --help
          snow connection test -x
Copy

在验证 Action 可以成功连接到 Snowflake 之后,您可以添加更多 Snowflake CLI 命令,如 snow notebook createsnow git execute。有关支持的命令的信息,请参阅 Snowflake CLI 命令参考

使用配置文件

有关定义连接的更多信息,请参阅 定义连接

要为特定连接设置 Snowflake 凭据,请执行以下步骤:

  1. Create a config.toml file at the root of your Git repository with an empty configuration connection, as shown:

    default_connection_name = "myconnection"
    
    [connections.myconnection]
    
    Copy

    此文件用作模板,不应包含实际凭据。

  2. 在 GitHub 工作流程中,将密钥映射为环境变量,格式为 SNOWFLAKE_<key>=<value>,示例如下:

    env:
      SNOWFLAKE_CONNECTIONS_MYCONNECTION_PRIVATE_KEY_RAW: ${{ secrets.SNOWFLAKE_PRIVATE_KEY_RAW }}
      SNOWFLAKE_CONNECTIONS_MYCONNECTION_ACCOUNT: ${{ secrets.SNOWFLAKE_ACCOUNT }}
    
    Copy
  3. 配置 Snowflake CLI Action。

    如果您使用的是最新版本的 Snowflake CLI,则无需添加 cli-version 参数。以下示例指定了所需的版本和默认配置文件的名称:

    - uses: snowflakedb/snowflake-cli-action@v2.0
      with:
        cli-version: "3.11.0"
        default-config-file-path: "config.toml"
    
    Copy
  4. 可选:如果您的私钥已加密,要设置加密短语,请将 PRIVATE_KEY_PASSPHRASE 环境变量设置为私钥加密短语。Snowflake 使用此加密短语来解密私钥。例如:

    - name: Execute Snowflake CLI command
      env:
        PRIVATE_KEY_PASSPHRASE: ${{ secrets.PASSPHARSE }}
    
    Copy

    要使用密码而不是私钥,请取消设置 SNOWFLAKE_AUTHENTICATOR 环境变量,然后添加 SNOWFLAKE_PASSWORD 变量,如下所示:

    - name: Execute Snowflake CLI command
      env:
        SNOWFLAKE_CONNECTIONS_MYCONNECTION_USER: ${{ secrets.SNOWFLAKE_USER }}
        SNOWFLAKE_CONNECTIONS_MYCONNECTION_ACCOUNT: ${{ secrets.SNOWFLAKE_ACCOUNT }}
        SNOWFLAKE_CONNECTIONS_MYCONNECTION_PASSWORD: ${{ secrets.SNOWFLAKE_PASSWORD }}
    
    Copy

    备注

    为提升您在使用密码和 MFA 时的体验,Snowflake 建议您 配置 MFA 缓存

  5. 使用命名连接添加要执行的 snow 命令,如下所示:

    run: |
      snow --version
      snow connection test
    
    Copy

以下示例显示了 Git 存储库中的示例 config.toml 文件和已完成的示例 <repo-name>/.github/workflows/my-workflow.yaml 文件:

  • 示例 config.toml 文件:

    default_connection_name = "myconnection"
    
    [connections.myconnection]
    
    Copy
  • 示例 Git 工作流程文件:

    name: deploy
    on: [push]
    jobs:
      version:
        name: "Check Snowflake CLI version"
        runs-on: ubuntu-latest
        steps:
          # Checkout step is necessary if you want to use a config file from your repo
          - name: Checkout repo
            uses: actions/checkout@v4
            with:
              persist-credentials: false
    
            # Snowflake CLI installation
          - uses: snowflakedb/snowflake-cli-action@v2.0
            with:
              default-config-file-path: "config.toml"
    
            # Use the CLI
          - name: Execute Snowflake CLI command
            env:
              SNOWFLAKE_CONNECTIONS_MYCONNECTION_AUTHENTICATOR: SNOWFLAKE_JWT
              SNOWFLAKE_CONNECTIONS_MYCONNECTION_USER: ${{ secrets.SNOWFLAKE_USER }}
              SNOWFLAKE_CONNECTIONS_MYCONNECTION_ACCOUNT: ${{ secrets.SNOWFLAKE_ACCOUNT }}
              SNOWFLAKE_CONNECTIONS_MYCONNECTION_PRIVATE_KEY_RAW: ${{ secrets.SNOWFLAKE_PRIVATE_KEY_RAW }}
              PRIVATE_KEY_PASSPHRASE: ${{ secrets.PASSPHARSE }} #Passphrase is only necessary if private key is encrypted.
            run: |
              snow --help
              snow connection test
    
    Copy

在验证 Action 可以成功连接到 Snowflake 之后,您可以添加更多 Snowflake CLI 命令,如 snow notebook createsnow git execute。有关支持的命令的信息,请参阅 Snowflake CLI 命令参考

语言: 中文