Migrating legacy notebooks to Workspaces
The original Snowflake Notebooks have been renamed to Legacy Notebooks. Notebooks in Workspaces is the next generation of Snowflake Notebooks, providing Jupyter compatibility and full integration with Workspaces.
Snowflake will migrate all users to Notebooks in Workspaces over the next few quarters. A Behavior Change Request (BCR) will be issued before any mandatory migration is enforced. Snowflake will communicate the deprecation timeline and process in advance, before any action is required of your account.
New accounts created after April 2026 can’t create Legacy Notebooks.
Key differences between legacy and new notebooks
Note
Not all legacy notebook files will run successfully and may require updates to align with the new environment. The table below outlines the updates available in Notebooks in Workspaces.
| Area | Legacy notebooks | New notebooks in Workspaces |
|---|---|---|
| Compute | Users must choose between Warehouse and Container Runtime. | Notebooks only run on Container Runtime, which use a Snowpark Container Services compute pool. We provide a default compute pool in accounts. Each user creates a Notebook Service and can use that to run multiple notebook files.
|
| File system / IDE environment | Partially supported. | Full IDE environment with:
|
| Package management |
| More flexible package management options:
|
| Support for Streamlit | Supported. | Use libraries such as Use iPywidgets for interactive components. iPywidgets are available in Runtime 2.6 and above. |
| Jupyter compatibility | Some Jupyter magics are supported. | Full support. Use Jupyter magics such as |
| Notebook context | The notebook file is part of the Notebook Object, even during interactive development in the UI, and inherits the database and schema of that object. | The file is not part of a regular database or schema. You must specify USE DATABASE and USE SCHEMA, or fully qualify all table and object names. |
If you have questions about availability timelines for specific features, ask your account representative to contact the Notebooks product team.
Migration steps
Using Bulk Migration
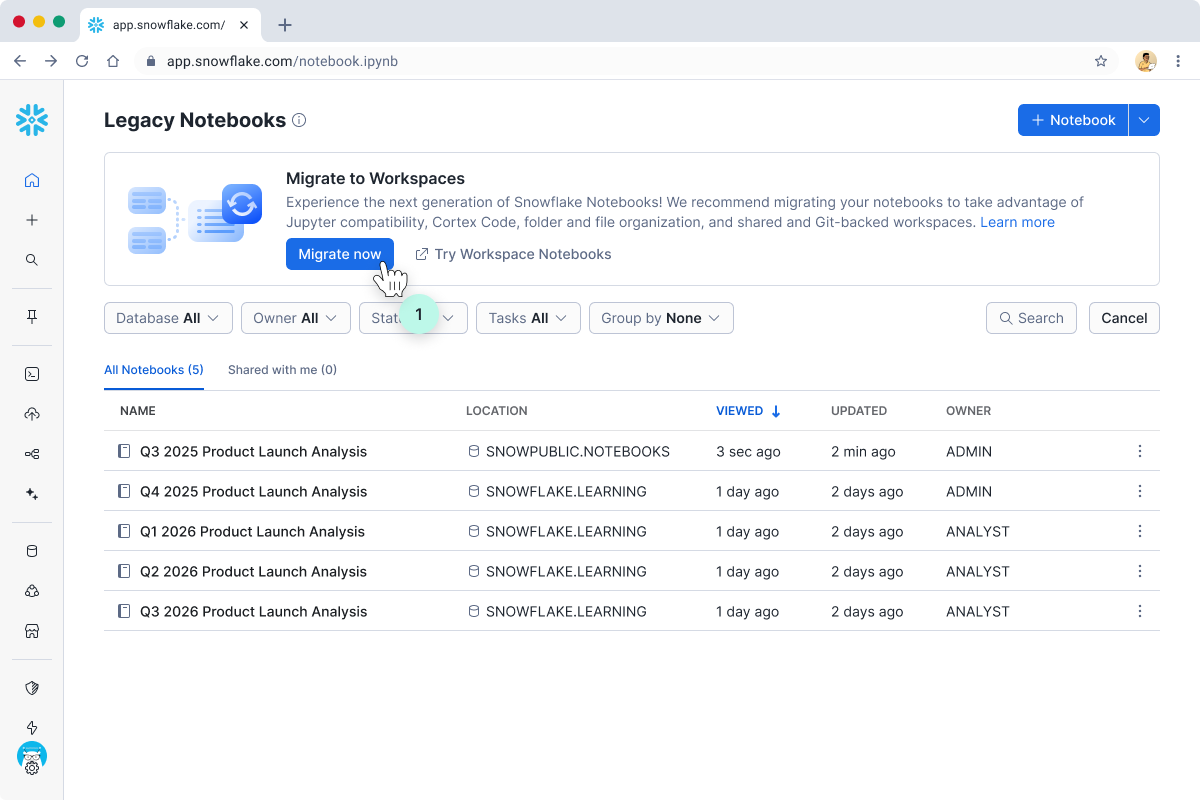
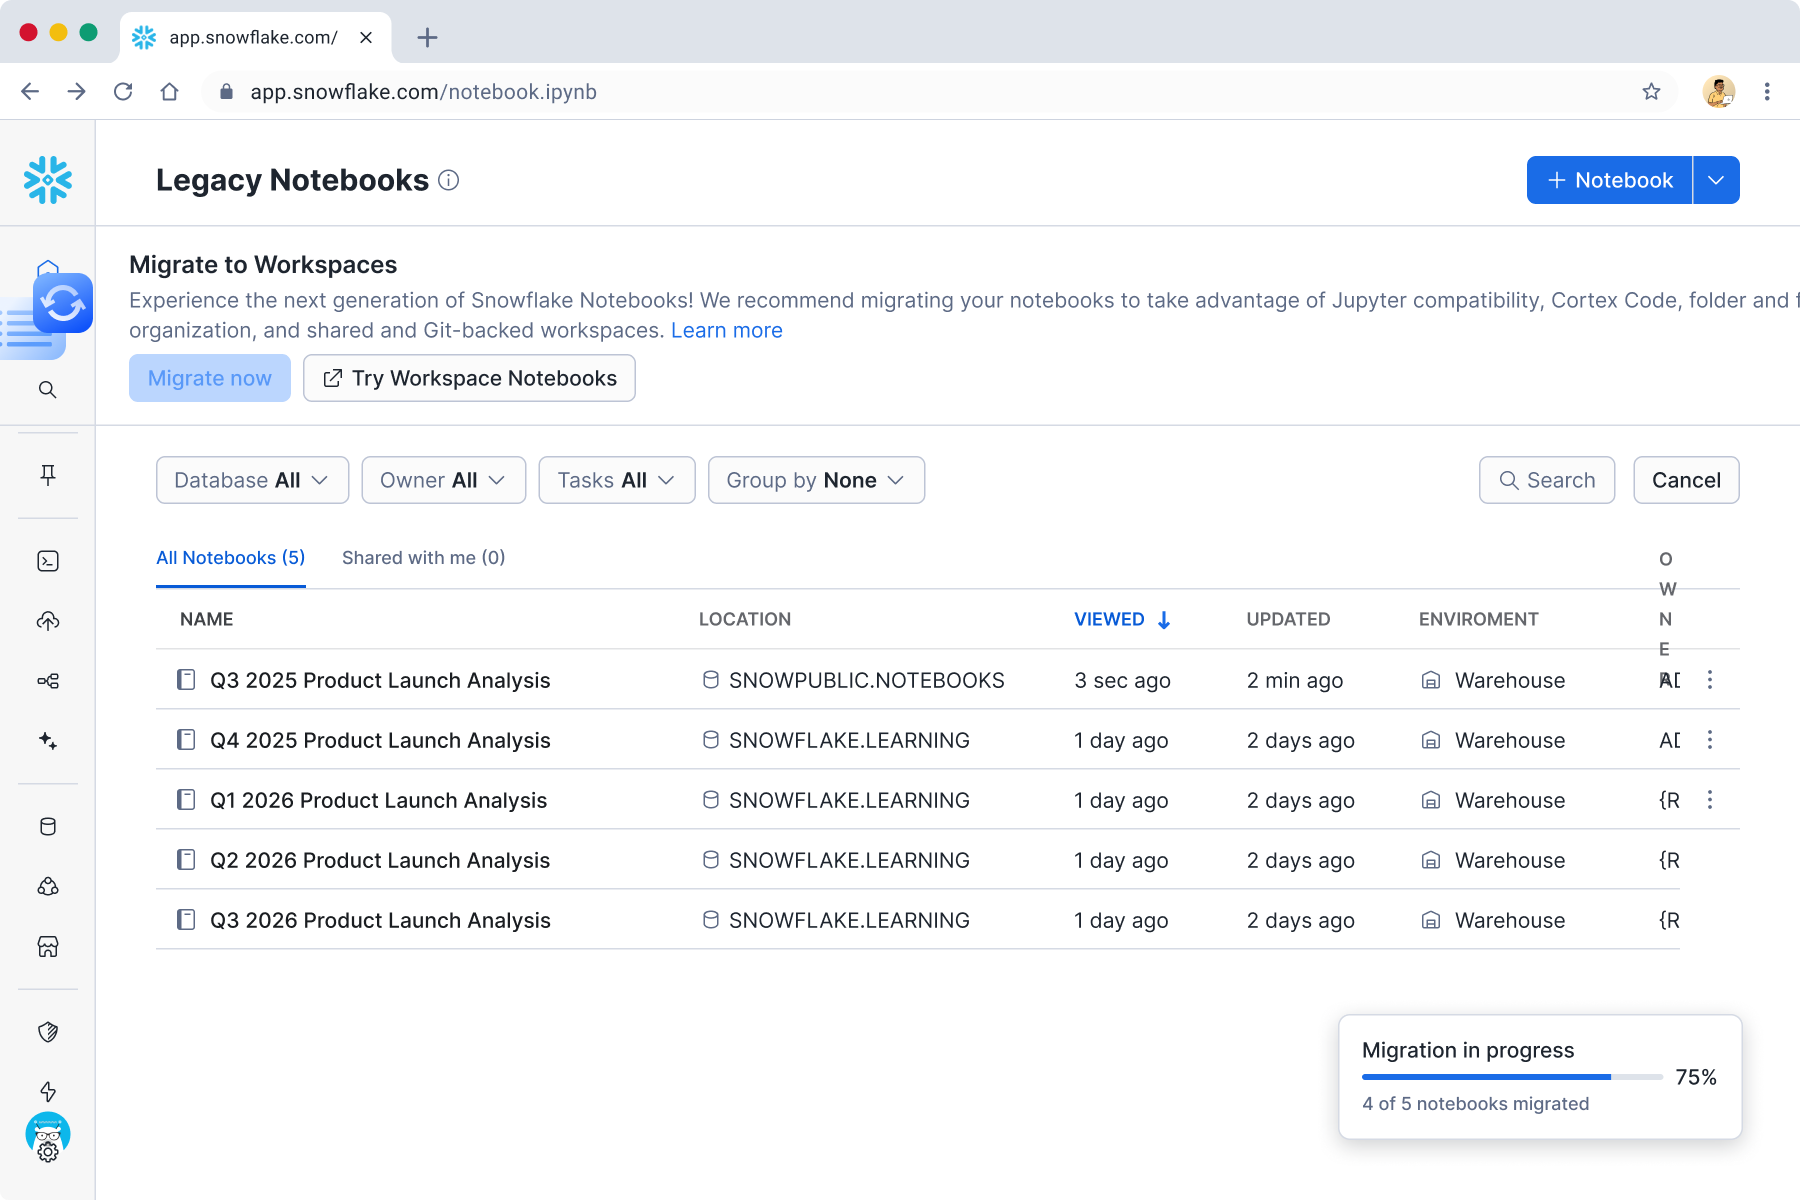
To move Legacy Notebooks to Workspaces in batches, use the Bulk Migration flow on the Legacy Notebooks page. Legacy Notebooks (including schedules) continue to function the same way unless they are altered or dropped explicitly.
-
Click Migrate now in the banner.
-
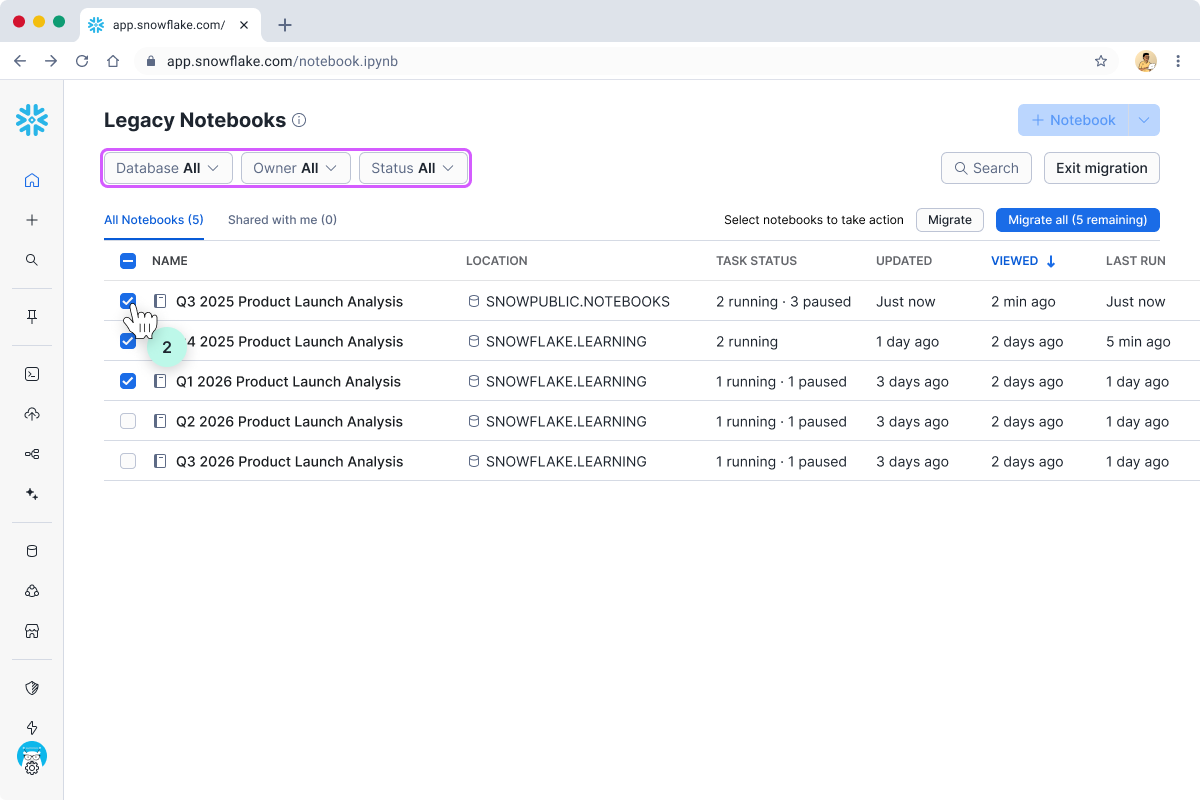
In the list of Legacy Notebooks, use the Database, Owner, and Status dropdowns to find the notebooks to be migrated. Or, select all notebooks.
-
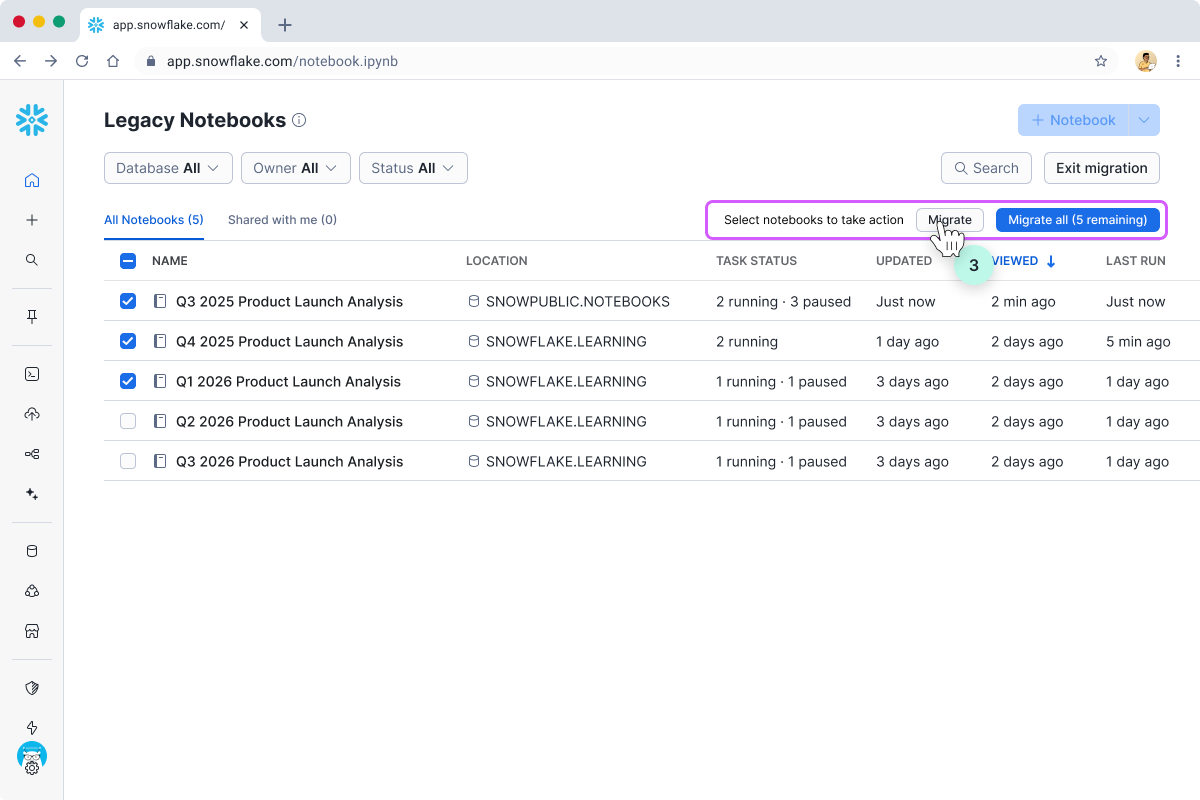
Click Migrate or Migrate all to open the migration dialog.
-
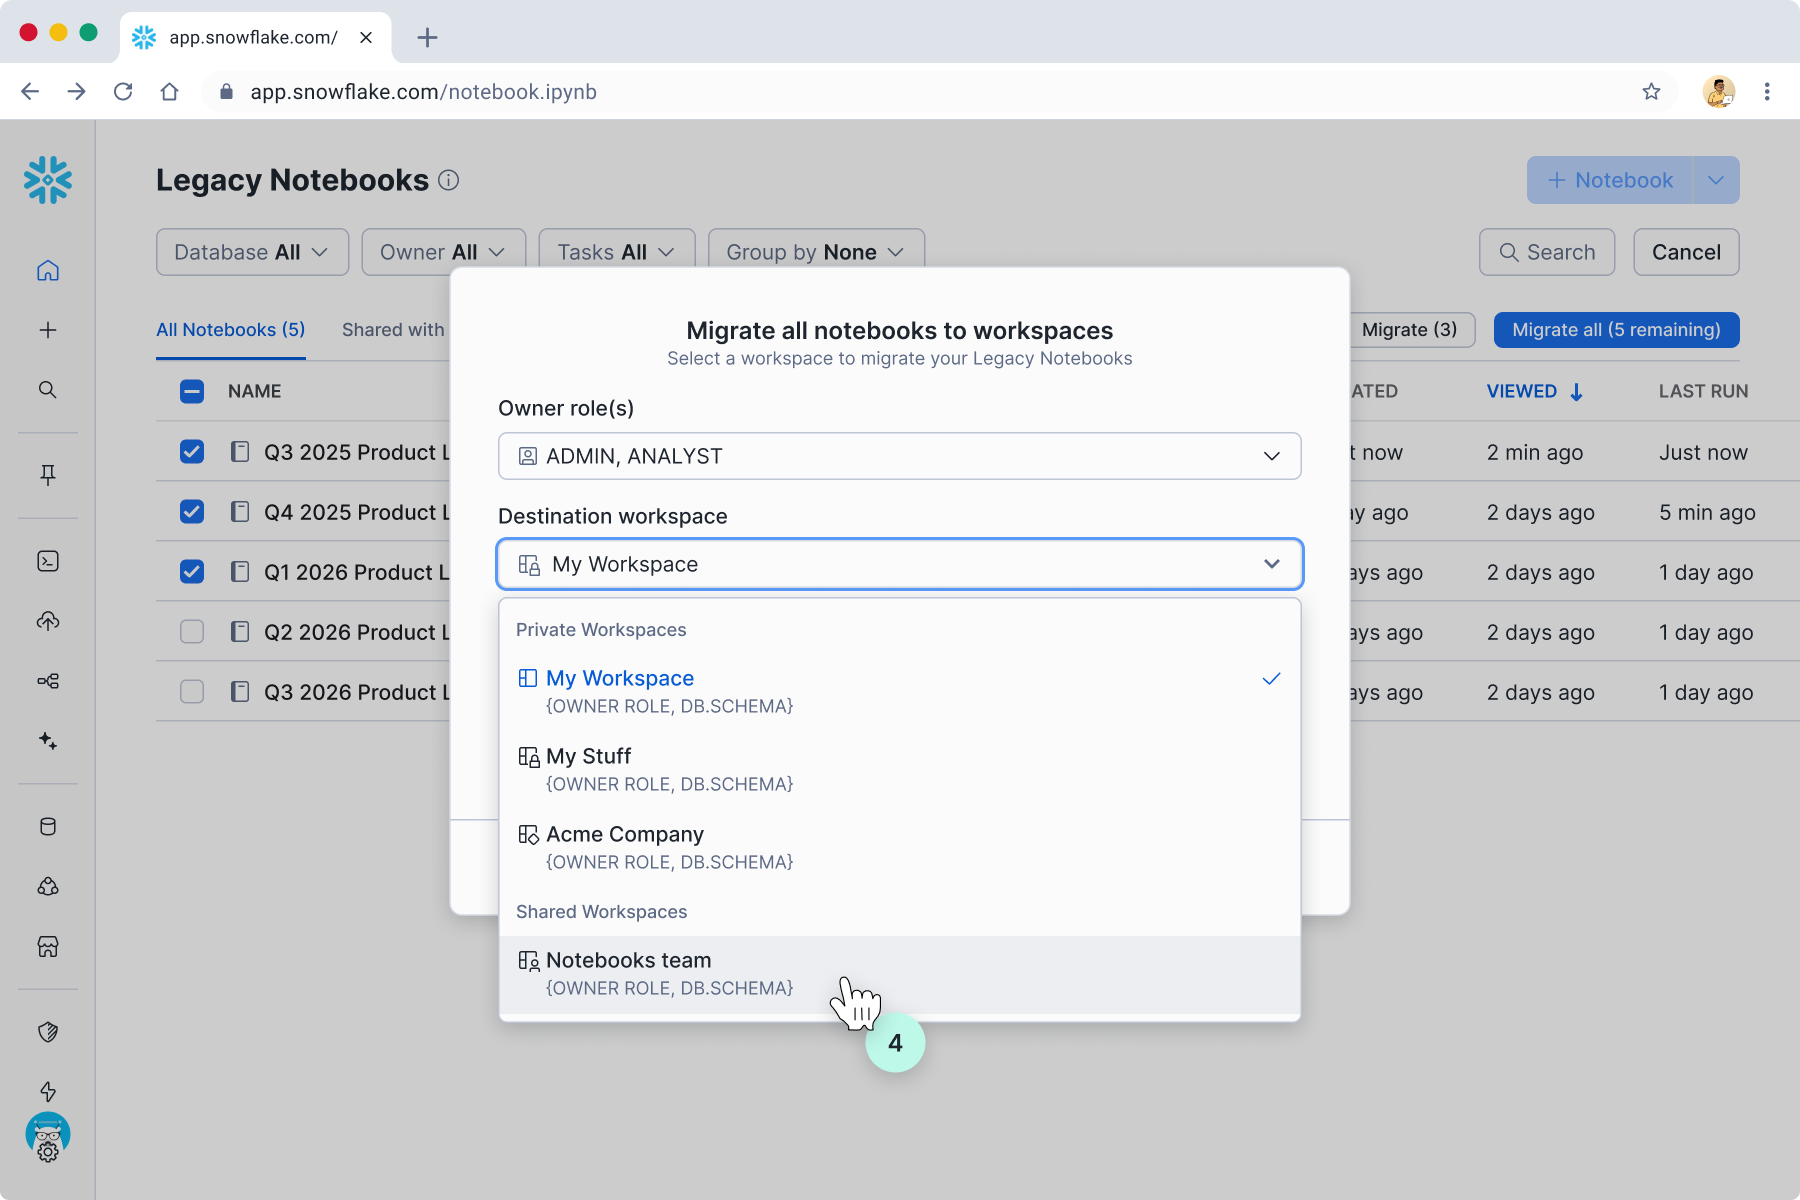
In the next dialog, select the destination Workspace you want to move the notebooks into. If you want the same set of users to continue using the notebooks, it’s best to select a Shared Workspace with the owner role that matches that of the Legacy Notebooks.
Monitor the migration’s progress and be notified once complete.
-
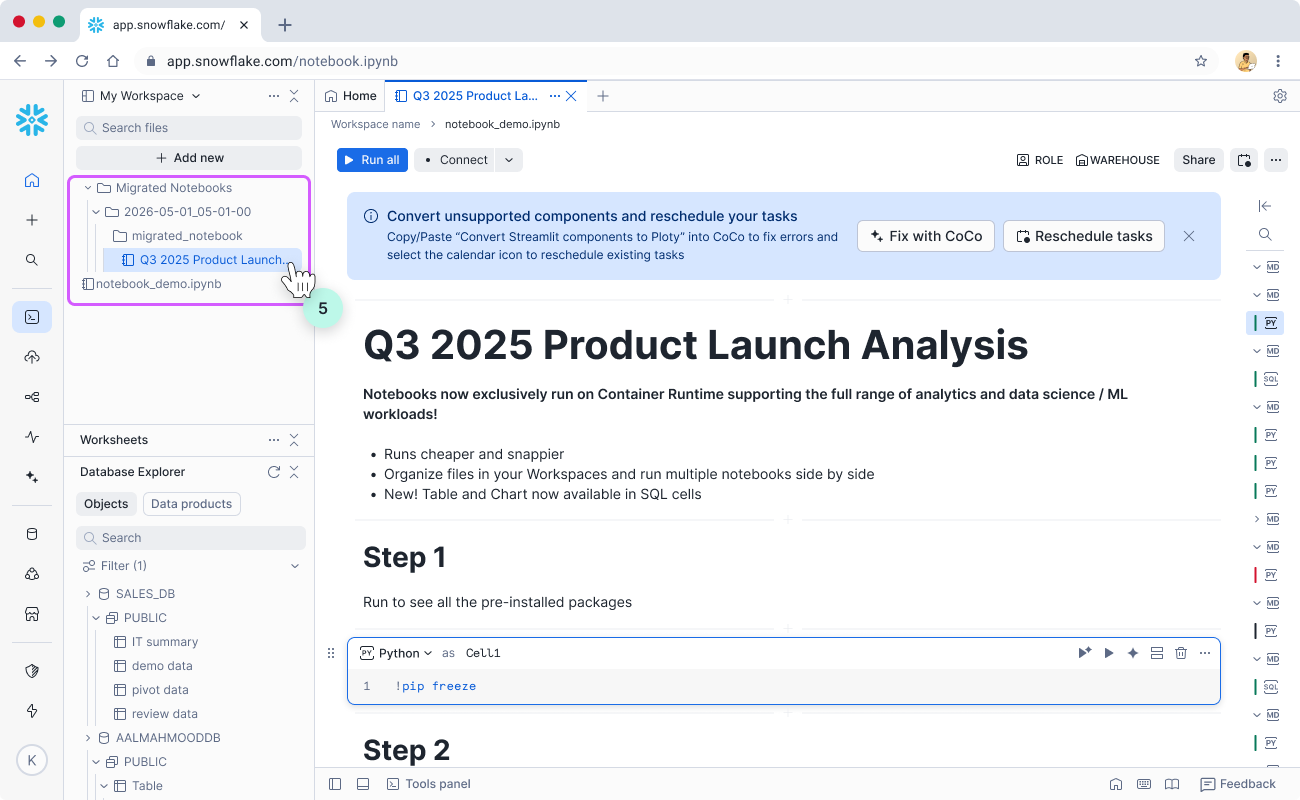
Once notebooks have been migrated to Workspaces, you’ll find them in the Migrated Notebooks folder.
-
Each batch is organized under a folder named with the date and timestamp of the migration.
-
Within that folder, each Legacy Notebook has its own folder where all previous associated files in the Legacy Notebook’s stage are copied over. This is to ensure file referencing (for example, reading data from a
.csvfile, importing from a.pyfile) continues to work. -
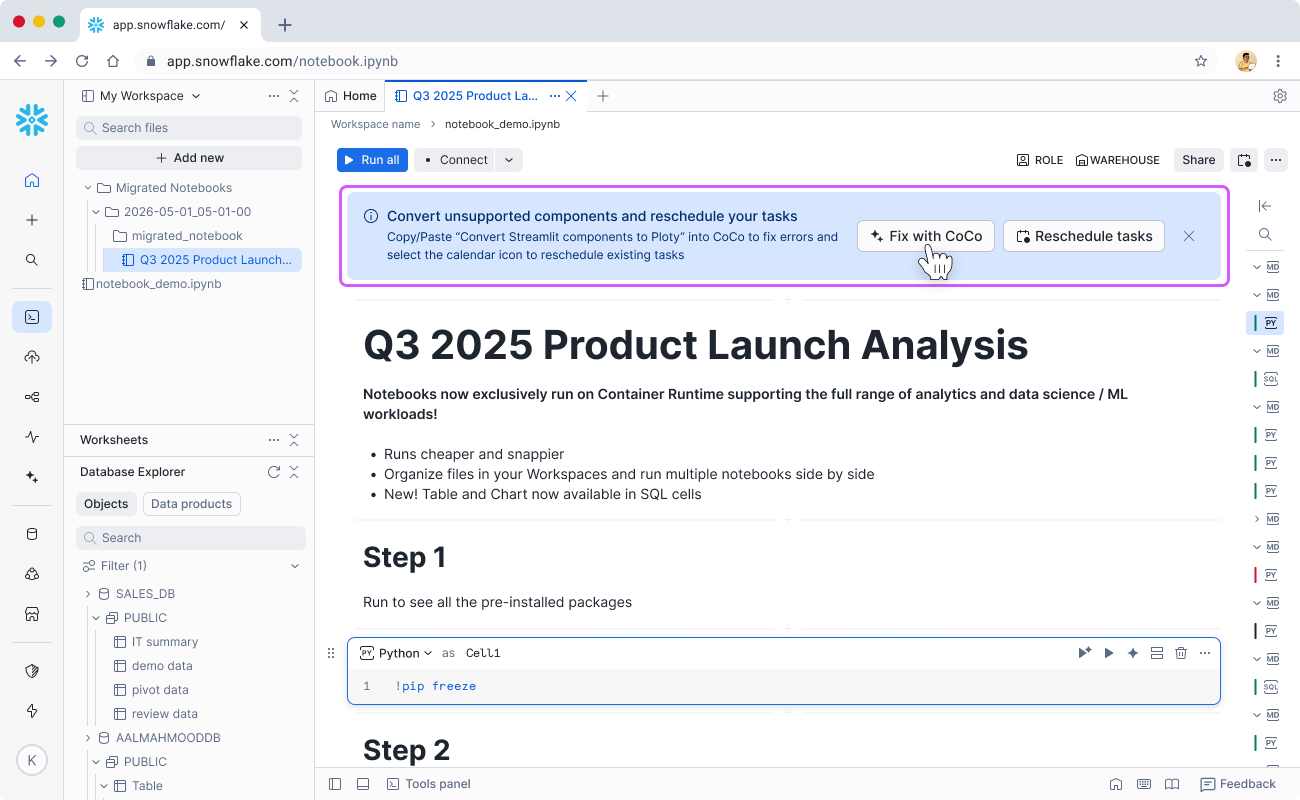
To address the differences between Legacy and vNext more easily, click Fix with Cortex Code in the top blue banner and CoCo automatically refactors code such as replacing Streamlit visualization components with pre-installed Python libraries in Workspaces.
-
You can drag and drop to reorganize the files as needed. Delete empty folders to keep things clean.
Rescheduling Notebooks
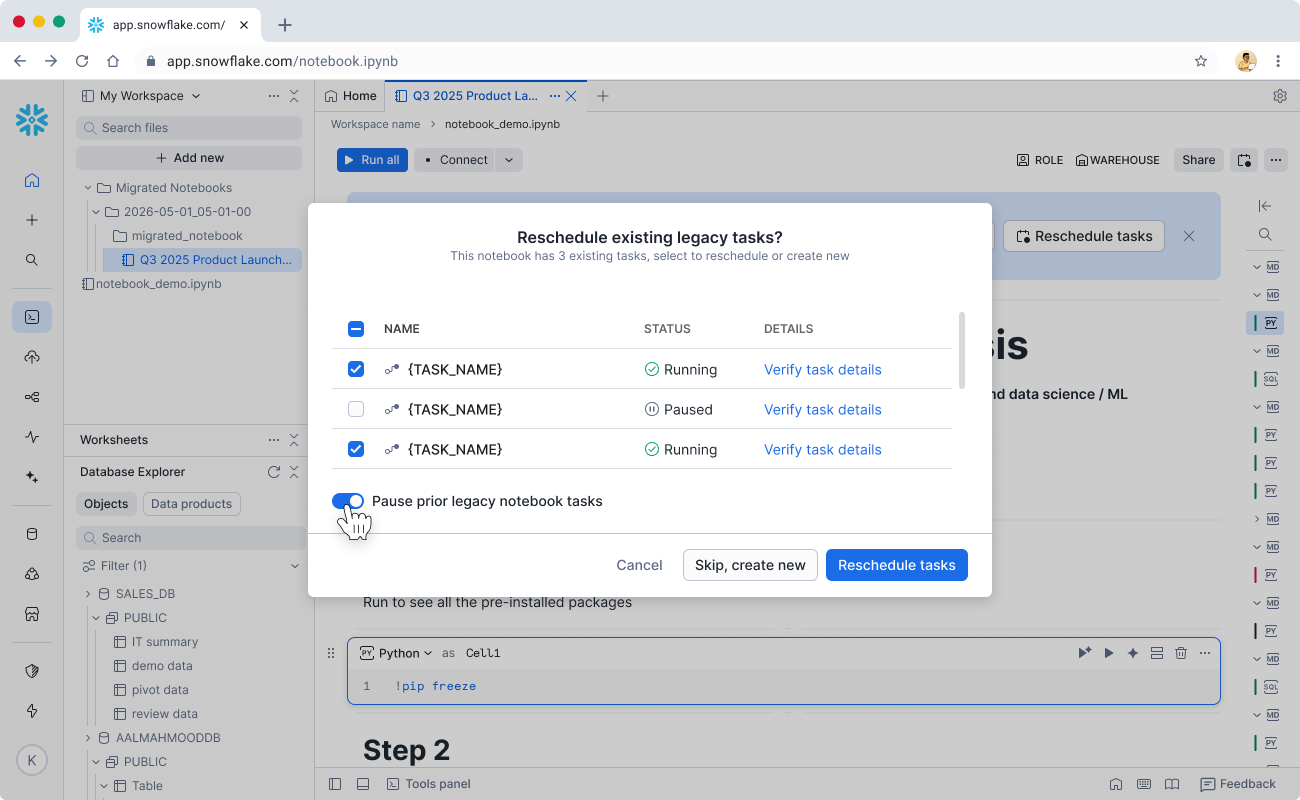
If any of the Legacy Notebooks have been scheduled, you’re prompted to reschedule them in Workspaces.
-
For each such Legacy Notebook, open it in the editor. A blue banner titled Convert unsupported components and reschedule your tasks appears at the top. To open the rescheduling flow, click Reschedule tasks in that banner, or click the Calendar icon in the notebook top bar (for example, near Share and your warehouse controls).
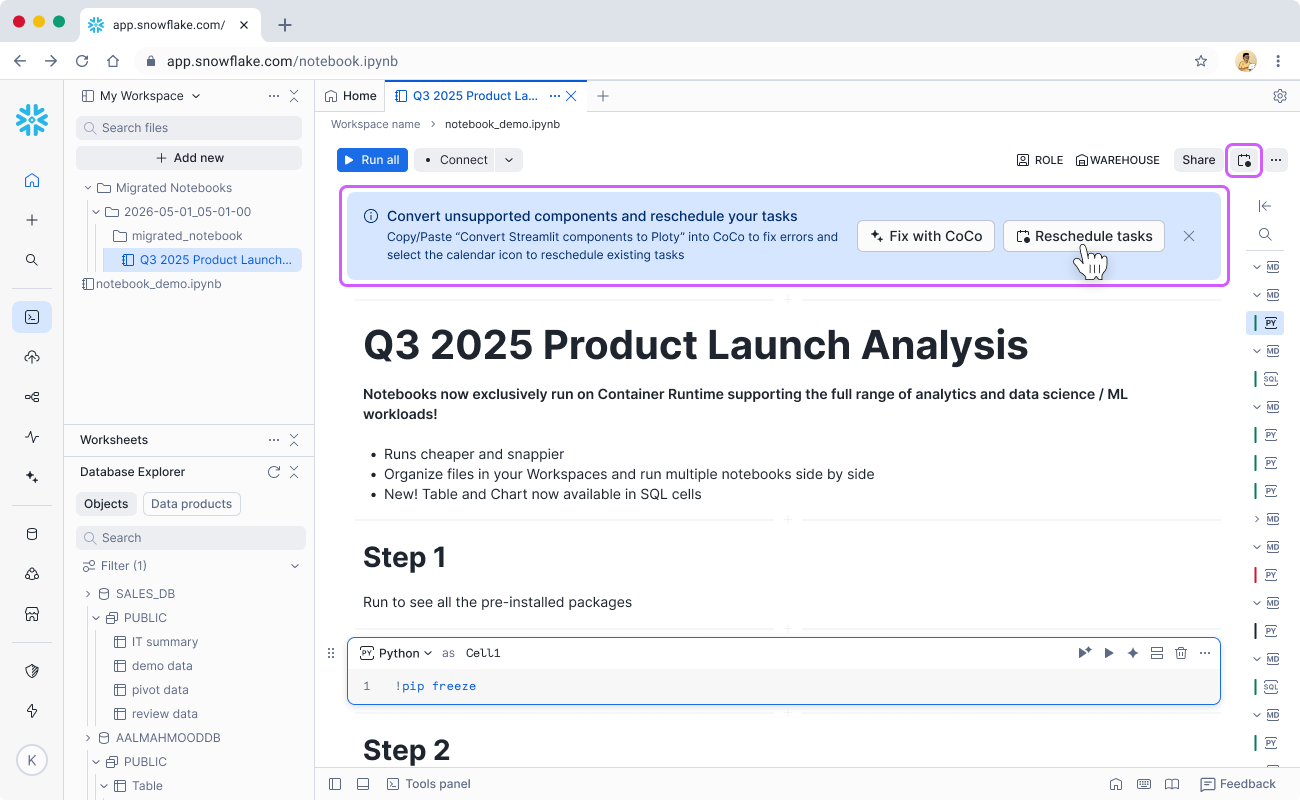
-
In the Reschedule existing legacy tasks? dialog, review the tasks listed for the notebook. The table shows each task’s name, status, and a Verify task details link. Select the checkboxes for the tasks you want to move onto the new scheduling model. Turn on Pause prior legacy notebook tasks if you want to pause the legacy notebook’s existing tasks as part of this step. When you’re ready, click Reschedule tasks to continue. Use Skip, create new if you prefer to define fresh schedules without mapping the listed tasks, or Cancel to close the dialog without changes.
Through the rescheduling flow, you create Notebook Project Objects (NPOs) to replace the Legacy Notebook objects. Correspondingly, EXECUTE NOTEBOOK PROJECT replaces EXECUTE NOTEBOOK. Alternatively, you can follow the documentation on using SQL for EXECUTE NOTEBOOK PROJECT.
-
To drop legacy tasks entirely instead of pausing them through the dialog, use the Tasks page in Snowsight or run the SQL command:
Best practices
Set up Shared Workspaces
Legacy Notebooks are each owned by a role. To ensure continued access, set up Shared Workspaces with the same owner role, then migrate the Legacy Notebooks there.
- Shared Workspaces allow adding more roles with View or Edit access for more advanced collaboration.
Create compute pools and grant access to relevant roles
Each user needs to create their own Notebook Service (runs on SPCS compute pools) to run notebooks. Each Notebook Service occupies a single compute pool node while it’s active in the RUNNING state.
- In addition to the two default compute pools SYSTEM_COMPUTE_POOL_CPU and SYSTEM_COMPUTE_POOL_GPU, create separate compute pools as needed for different teams and roles to better compartmentalize usage.
- When setting MAX_NODES on compute pools, take into consideration the expected number of concurrent users of the same compute pool to avoid users encountering the issue of lack of node resources.
Leverage Cortex Code for troubleshooting
In the Bulk Migration flow, use the Fix with Cortex Code button that appears at the top of each migrated notebook. Click that button to enable a Cortex Code process that handles visualization and syntax conversions.
- When you run into errors, consider using the Fix error button in cell outputs or directly ask Cortex Code in the right-hand side panel using plain English.