About Openflow
Snowflake Openflow is an integration service that connects any data source and any destination with hundreds of processors supporting structured and unstructured text, images, audio, video and sensor data. Built on Apache NiFi (https://nifi.apache.org/), Openflow lets you run a fully managed service in your own cloud for complete control.
Note
The Openflow platform is currently available for deployment in customers’ own VPCs in both AWS and Snowpark Container Services.
For operational safeguards (backing up flows, avoiding data loss when you remove deployments or runtimes), see Manage Openflow.
This topic describes the key features of Openflow, its benefits, architecture, and workflow, and use cases.
Key features and benefits
- Open and extensible
An extensible managed service that’s powered by Apache NiFi, enabling you to build and extend processors from any data source to any destination.
- Unified data integration platform
Openflow enables data engineers to handle complex, bi-directional data extraction and loading through a fully managed service that can be deployed inside your own VPC or within your Snowflake deployment.
- Enterprise-ready
Openflow offers out-of-the box security, compliance, and observability and maintainability hooks for data integration.
- High speed ingestion of all types of data
One unified platform lets you handle structured and unstructured data, in both batch and streaming modes, from your data source to Snowflake at virtually any scale.
- Continuous ingestion of multimodal data for AI processing
Near real-time unstructured data ingestion, so you can immediately chat with your data coming from sources such as Sharepoint, Google Drive, and so on.
Openflow deployment types
Openflow is supported in both the Bring Your Own Cloud (BYOC) and Snowpark Container Services (SPCS) versions.
- Openflow - Snowflake Deployment
Openflow - Snowflake Deployment, using Snowpark Container Services (SPCS), provides a streamlined and integrated solution for connectivity. Because SPCS is a self-contained service within Snowflake, it’s easy to deploy and manage. SPCS offers a convenient and cost-effective environment for running your data flows. A key advantage of Openflow - Snowflake Deployment is its native integration with Snowflake’s security model, which allows for seamless authentication, authorization, network security and simplified operations.
When configuring Openflow - Snowflake Deployments, follow the process as outlined in Setup Openflow - Snowflake Deployment.
- Openflow - Bring Your Own Cloud
Openflow - Bring Your Own Cloud (BYOC) provides a connectivity solution that you can use to connect public and private systems securely and handle sensitive data preprocessing locally, within the secure bounds of your organization’s cloud environment. BYOC refers to a deployment option where the Openflow data processing engine, or data plane, runs within your own cloud environment while Snowflake manages the overall Openflow service and control plane.
When configuring BYOC deployments, follow the process as outlined in Set up Openflow - BYOC.
Use cases
Use Openflow if you want to fetch data from any source and put it in any destination with minimal management, coupled with Snowflake’s built-in data security and governance.
Openflow use cases include:
- Ingest data from unstructured data sources, such as Google Drive and Box, and make it ready for chat in your AI assistants with Snowflake Cortex or use the data for your own custom processing.
- Replicate the change data capture (CDC) of database tables into Snowflake for comprehensive, centralized reporting.
- Ingest real-time events from streaming services, such as Apache Kafka, into Snowflake for near real-time analytics.
- Ingest data from SaaS platforms, such as LinkedIn Ads, to Snowflake for reporting, analytics, and insights.
- Create an Openflow dataflow using Snowflake and NiFi processors and controller services.
Security
Openflow uses industry-leading security features that help ensure you have the highest levels of security for your account, and users, and all the data you store in Snowflake. Some key aspects include:
- Authentication
- Runtimes use Snowflake Managed Token as the default and recommended authentication method.
- Snowflake Managed Token works consistently across SPCS and BYOC deployment types.
- BYOC deployments can alternatively use key-pair authentication for explicit credential management.
- Authorization
- Openflow supports fine-grained roles for RBAC.
- ACCOUNTADMIN to grant privileges to be able to create deployments and runtimes.
- Encryption in-transit
- Openflow connectors support TLS protocol, using standard Snowflake clients for data ingestion.
- All the communications between the Openflow deployments and Openflow control plane are encrypted using TLS protocol.
- Secrets management (BYOC)
- Integration with AWS Secrets Manager or Hashicorp Vault. For more information, see Encrypted Passwords in Configuration Files (https://nifi.apache.org/docs/nifi-docs/html/administration-guide.html#encrypt-config_tool).
- Private link support
- Openflow connectors are compatible with reading and writing data to Snowflake using inbound AWS PrivateLink.
- Tri-Secret Secure support
- Openflow connectors are compatible with Tri-Secret Secure for writing data to Snowflake.
Snowflake Managed Token authentication
Snowflake Managed Token is the recommended and default authentication method for Openflow runtimes to connect to Snowflake. This authentication method works consistently across both Openflow - Snowflake Deployments and BYOC deployments. Snowflake Managed Token provides a unified and simplified experience for configuring Snowflake connectivity.
Key benefits
- Simplified configuration
Snowflake Managed Token eliminates the need to generate, store, and rotate long-lived credentials such as key pairs. The token is automatically managed by Snowflake, reducing operational overhead.
- Unified across deployment types
Whether you deploy Openflow in Snowpark Container Services (SPCS) or Bring Your Own Cloud (BYOC), you configure authentication the same way using the
SNOWFLAKE_MANAGEDauthentication strategy.- Enhanced security
Tokens are short-lived and automatically refreshed, minimizing the risk associated with credential exposure.
How it works
When you configure a connector or processor to connect to Snowflake, select SNOWFLAKE_MANAGED
as the Snowflake Authentication Strategy. The runtime automatically obtains and manages
the token used to authenticate to Snowflake on your behalf.
The behavior of Snowflake Managed Token varies based on your deployment type:
- Openflow - Snowflake Deployments
When running in a Snowflake-managed deployment, the runtime uses SPCS session tokens provided natively by the SPCS environment. These tokens are available at runtime and require no additional configuration.
- BYOC deployments
When running in a BYOC deployment, the runtime uses workload identity federation to authenticate to Snowflake. The runtime automatically exchanges its cloud provider identity (for example, an AWS IAM role) for a Snowflake token.
Note
To use Snowflake Managed Token in BYOC deployments, you must first configure runtime roles for your deployment.
When to use Snowflake Managed Token
Use Snowflake Managed Token for:
- All new connector configurations in both SPCS and BYOC deployments.
- Migrations from key-pair authentication to the simplified, managed authentication model.
- Scenarios where you want to avoid managing key pairs or other long-lived credentials.
Alternative authentication methods
While Snowflake Managed Token is recommended, BYOC deployments also support key-pair authentication
(KEY_PAIR) for cases where you require explicit credential management.
For more information about key-pair authentication, see Key-pair authentication and key-pair rotation.
For information about the underlying authentication mechanisms, see the following:
- Workload identity federation: Information about the authentication mechanism used in BYOC deployments.
- Snowpark Container Services: Working with services: Information about how SPCS services authenticate to Snowflake.
Architecture
The following diagram illustrates the architecture of Openflow:
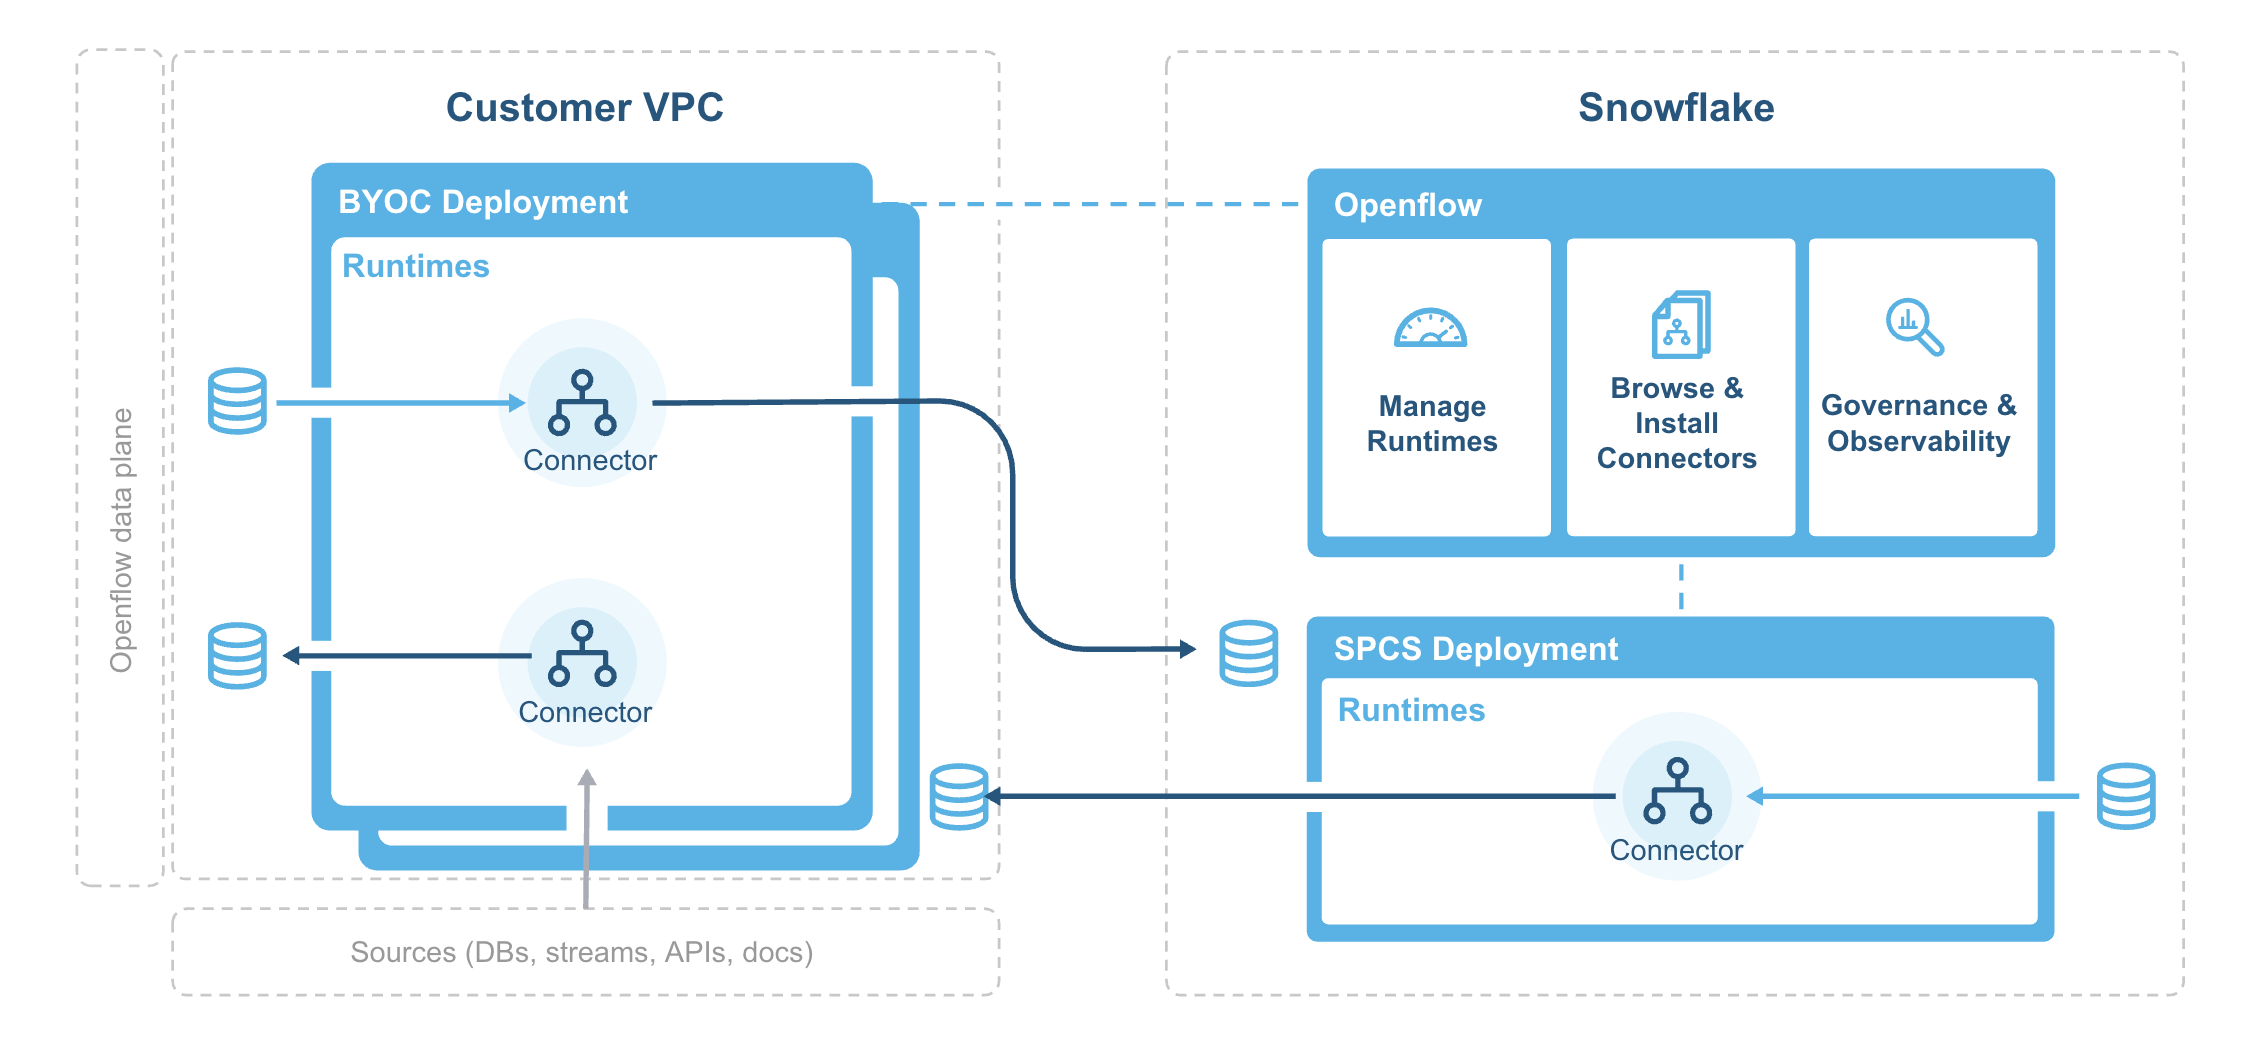
The deployment agent installs and bootstraps the Openflow deployment infrastructure in your VPC and regularly sync container images from the Snowflake system image registry.
Openflow components include:
- Deployments
A deployment is where your data flows execute, within individual runtimes. You will often have multiple runtimes to isolate different projects, teams, or for SDLC reasons, all associated with a single deployment. Deployments come in two types Bring Your Own Cloud (BYOC) and Openflow - Snowflake.
- Control plane
The control plane is a layer containing all components used to manage and observe Openflow runtimes. This includes the Openflow service and API, which users interact with via the Openflow canvas or through interaction with Openflow APIs. On Openflow - Snowflake Deployments, the Control Plane consists of Snowflake-owned public cloud infrastructure and services as well as the control plane application itself.
- BYOC deployments
BYOC deployments are deployments acting as containers for runtimes that are deployed in your cloud environment. They incur charges based on their compute, infrastructure, and storage use. See Openflow BYOC cost and scaling considerations for more information.
- Openflow - Snowflake Deployments
Openflow - Snowflake Deployments are containers for runtimes and are deployed using a compute pool. They incur utilization charges based on their uptime and usage of compute. See Openflow Snowflake Deployment cost and scaling considerations for more information.
- Runtime
Runtimes host data pipelines, with the framework providing security, simplicity, and scalability. You can deploy Openflow runtimes in your VPC using Openflow. You can deploy Openflow connectors to your runtimes, and also build completely new pipelines using Openflow processors and controller services.
- Openflow - Snowflake Deployment Runtime
Openflow - Snowflake Deployment Runtimes are deployed as Snowpark Container Services service to an Openflow - Snowflake Deployment deployment, which is represented by an underlying compute pool. Customers request a Runtime through the deployment, which executes a request on behalf of the user to service. Once created, customers access it via a web browser at the URL generated for that underlying service.