Manage Openflow
This topic describes the steps to manage Openflow components.
Back up flow definitions and protect runtime state
Warning
Flow definitions and runtime-local state (including processor configuration and Apache NiFi flow state held on the runtime) live on Openflow runtime storage, not in Snowflake tables. If you remove, replace, or manually tear down that infrastructure without exporting your flows first, that data can be lost permanently. Snowflake does not provide Time Travel or Fail-safe for this storage.
Before you delete a deployment, delete or recreate a runtime, or manually remove underlying Snowpark Container Services resources or compute tied to Openflow, export your flows from the canvas. Right-click the process group » Version » Export (or use the equivalent command your canvas shows).
Routine upgrades through the supported Openflow UI (Upgrade a deployment and Upgrade a runtime) are different from destructive removal. You should still export flows regularly as a best practice.
Note
Do not run DROP ROLE for a role that provisions or owns Openflow objects until you transfer ownership and privileges to another role you intend to keep (for example with GRANT OWNERSHIP). Dropping a role revokes grants and can leave deployments in a broken state.
Runtime availability and autoscaling behavior
Openflow runtime nodes are not strictly always-on, single-host processes. Each runtime is a Kubernetes workload that the cluster can reschedule onto a different compute host. When that happens, the runtime briefly restarts while a new pod becomes ready. Plan your flows to tolerate short interruptions rather than assuming the runtime stays on the same host indefinitely.
Snowflake doesn’t automatically upgrade BYOC runtimes. Upgrades happen only when a deployment owner initiates them through the Openflow UI or the deployment agent. Restarts you observe outside of an upgrade window are typically caused by cluster rebalancing or by host-level events on the underlying compute.
For Openflow Snowflake deployments running on Snowpark Container Services (SPCS), runtimes can also be affected briefly by the scheduled SPCS maintenance window.
Causes of runtime restarts
- Runtime or deployment upgrades
When the owner of a deployment runs an upgrade, the affected runtime restarts to pick up the new version. See Upgrade a runtime and Upgrade a deployment.
- Cluster rebalancing and autoscaling
Openflow scales the underlying compute up and down based on demand. See Openflow BYOC cost and scaling considerations for details on how BYOC deployments scale the EC2 node group. During scale-in, node-drain, or rebalancing events, the cluster can reschedule a runtime pod from one node to another so that the cluster continues to run efficiently.
- Cloud provider host events
The virtual machines that host BYOC runtimes are subject to events outside Snowflake’s control, including instance retirement, unexpected reboots, and host-level maintenance performed by the cloud service provider. When a host becomes unavailable, the cluster reschedules the affected runtime onto a healthy node.
What to expect during a restart
- Openflow runtimes and connectors maintain data integrity across restarts. In-flight data held in the runtime’s persistent storage is preserved, and the flow resumes after the new pod is ready.
- Expect a short service interruption while the new pod starts and reattaches its storage.
- Diagnostic output may report
LAST_REQUESTED_RESTART_REASON: "nifi.properties changed"after a reschedule, even when no NiFi configuration was modified. The runtime operator reconciles the underlying StatefulSet whenever the pod identity or node assignment changes, so this message can reflect a reschedule rather than an actual configuration change.
Design flows for resilience
Because brief runtime interruptions are expected, design your flows to recover automatically:
- Configure source and destination connectors to checkpoint progress so that processing resumes from the last committed position after a restart.
- For streaming sources such as Kafka or Kinesis, rely on consumer-group offsets or sequence numbers rather than in-memory state on the runtime.
- Monitor your runtimes so that you’re notified if a restart doesn’t recover on its own within the expected window.
- Choose your caching strategy with restarts in mind. A local, in-memory cache is cleared when a runtime node restarts, and Openflow’s locally persisted caches are managed per runtime node rather than shared across the cluster. If your flow depends on cache state surviving restarts or being shared across nodes, use an external cache service such as Redis.
Delete a deployment
Deleting a deployment removes the management compute pool and all deployment-level configuration. You must delete all runtimes first. Any data or objects already integrated into Snowflake aren’t affected.
Warning
Deleting a deployment can’t be undone. Before you delete, make sure all runtimes have been removed and you no longer need the deployment configuration.
From the AWS Console:
-
Navigate to EC2 Instances.
-
Select the
openflow-agent-{deployment-key}instance with your deployment key. -
Click Connect at the top of the page.
-
Switch from EC2 Instance Connect to Connect using EC2 Instance Connect Endpoint. Leave the default EC2 Instance Connect Endpoint in place.
-
Click Connect. A new browser tab or window will appear with a command-line interface.
-
Run
./destroy.shfrom the shell.- This may take 20-30 minutes. If your connection is interrupted, the process continues running in the background.
- You can log back in and view its status with the command:
journalctl -u docker -f -n 250 - The
destroyprocess is complete when you see output ofdelete successful.
-
Navigate to CloudFormation (https://us-east-1.console.aws.amazon.com/cloudformation/home) in the AWS Console for your region.
-
Delete the CloudFormation stack for your deployment.
From Snowsight:
- In the navigation menu, select Ingestion » Openflow.
- Select Launch Openflow.
- Select the Deployments tab.
- In the row of the deployment you want to delete, select the More options icon.
- Select Delete.
- In the confirmation dialog, type
deleteto confirm deletion. - Click Delete deployment.
Upgrade a deployment
A deployment includes several components: the agent, deployment service, deployment UI, runtime gateway, and runtime operator. You can upgrade via the UI or, for BYOC deployments, via the deployment agent script. For details on what’s included in each release, see Openflow version history.
Note
Only the owner of a deployment can perform an upgrade.
Upgrade from the UI
-
Sign in to Snowsight.
-
In the navigation menu, select Ingestion » Openflow.
-
Select Launch Openflow.
-
Select the Deployments tab.
-
Look for the upgrade arrow to the left of the deployment name. This indicates an upgrade is available.
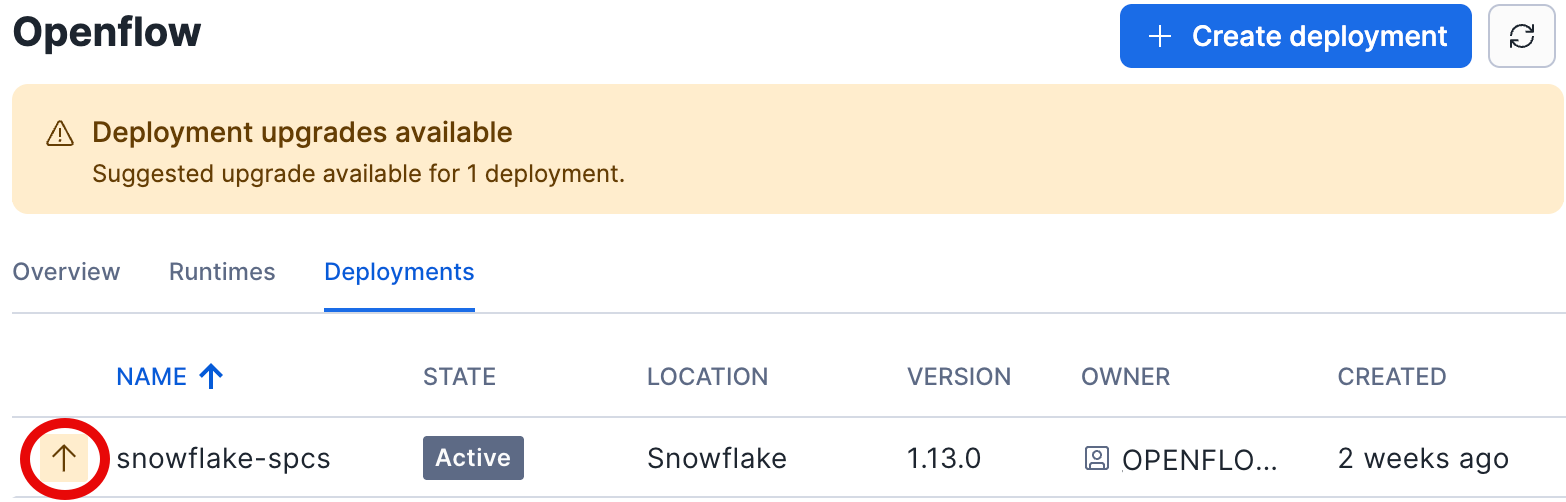
-
Select
 next to the deployment » Upgrade.
Upgrade via the deployment agent (BYOC)
For BYOC deployments, use the deployment agent script to upgrade the agent, deployment service, deployment UI, runtime gateway, and runtime operator.
Connect to the deployment agent
- Navigate to Openflow.
- Select the Deployments tab.
- View your deployment details and note the deployment key.
- In your AWS account, view the EC2 instances and filter using the deployment key.
- Locate the deployment agent EC2 instance named
openflow-agent-{deployment-key}. - Connect using EC2 Instance Connect Endpoint and accepting all defaults.
- Run the remaining commands from the new browser tab or window that appears with a command-line interface.
Check for available upgrades
The script will display the latest available version of the various deployment components.
If no upgrades are available, you will see an output similar to this:
Otherwise, you will see the version that upgraded components will use, such as:
Upgrading the AMI for the Openflow BYOC deployment
When you upgrade your Openflow BYOC deployment, Openflow will find and upgrade to the latest AMI for Amazon Linux 2023 recommended by AWS Systems Manager (https://aws.amazon.com/systems-manager/).
If a new AMI is found, it will restart all Openflow services in your deployment, and runtimes will be temporarily halted. Openflow runtimes and connectors maintain data integrity across restarts automatically.
Snowflake does not automatically upgrade deployments. You determine upgrade timing and frequency.
Initiate the upgrade
If the output indicates that upgrades are available, run the following script to initiate the upgrade. Older Openflow deployments may use the script upgrade-data-plane.sh instead.
You will see output similar to this:
Then, you have two options:
- Wait for an automatic upgrade: The system will automatically initiate the upgrade process within approximately 10 minutes.
- Manual upgrade: To start the upgrade immediately, run the following command:
Monitor the upgrade process
To track the progress of the upgrade, use the journalctl command:
Verify a successful upgrade
A successful upgrade will typically show output similar to this:
Upgrade a runtime
Snowflake periodically releases runtime updates that introduce new Openflow processors, newer versions of existing processors, or new runtime functionality. When updates are available, an indicator appears next to the runtime name in the UI. For details on what’s included in each release, see Openflow version history.
Note
Only the owner of a deployment can perform an upgrade.
-
Sign in to Snowsight.
-
In the navigation menu, select Ingestion » Openflow.
-
Select Launch Openflow.
-
Select the Runtimes tab.
-
Look for the upgrade arrow to the left of the runtime name. This indicates an upgrade is available.

-
Select
next to the runtime » Upgrade.
Upgrade a connector
Connector updates are made available by Snowflake when functionality is added, processing logic is improved, or new processor versions are used–for example, to add support for a new source API version.
When connector updates are available, you will see an Upgrade icon in your process group on the canvas.
Note
You can only upgrade connectors after you have upgraded their runtime.
To upgrade a connector, do the following:
- In the navigation menu, select Ingestion » Openflow.
- Select Launch Openflow.
- Select the Runtimes tab.
- Select the runtime name, or select View Canvas in the More Options menu to navigate to the canvas.
- Find the processor groups with a red upgrade arrow next to their names. For each of these groups, change the version:
-
Recommended: Check to see whether the parameter uses a custom value for the Parameter context. If so, make a note of the custom value. You will need to reapply it after the upgrade.
- Right-click the process group and select Parameters.
- Select Parameters in the Parameter Contexts list.
- Select the Inheritance tab, and check if it uses custom values. If so, make a note of the custom values.
-
Right-click the group and select Version » Change Version.
-
Select the latest available version and select Change.
-
Confirm that the connector was upgraded to the latest version. The upgraded version should show a green check mark.
-
Confirm that all processors in the connector’s process group are running. If not, start them.
You can also validate the version by hovering over the speech bubble at the bottom right of the process group.
-
If you noted a custom parameter value in step 4, reapply the custom value. For more information, see Openflow connectors.
-
Configure Snowflake Connector Flow Registry
Important
Early preview releases of Openflow did not configure a runtime for connector upgrades. If you don’t see the Version option when right clicking on a process group, you have to configure the Snowflake Connector Flow Registry and manually enable version control for existing connectors.
To configure the Snowflake Connector Flow Registry, do the following:
- Navigate to the canvas.
- Click on the menu in the top right corner and select Controller Settings.
- Switch to the Registry Clients tab.
- Click the + icon to add a new Registry Client.
- Select the ConnectorFlowRegistryClient and select Add.
- Click More Options for the ConnectorFlowRegistryClient row and select Edit.
- Enter
/nifi/configuration_resources/connector_flow_registryas the value for Storage Location and select Apply.
After configuring the Snowflake Connector Flow Registry you can now enable version control for your existing connectors.
To enable version control for existing connectors, do the following:
-
Navigate to the canvas and locate the process group where you want to add version control.
-
Right click on the process group and select Version » Set Version.
-
In the Set Version dialog, choose the flow that matches your process group.
For example, choose sqlserver if you are using the SQL Server connector.
Note that flow names do not exactly match the connector name.
-
Select the latest version and then select Set version to enable version control.
-
From the canvas, right click on the process group again and select Version » Revert Local Changes to apply the latest connector version.
-
Review the list of changes and select Revert.
-
Confirm that your connector was upgraded to the latest version which should now show a green check mark. You can also validate the version by hovering over the speech bubble at the bottom right of the process group.