This section provides a guide and sample code for reading data from and writing
data to external databases (such as MySQL and PostgreSQL) using the Snowpark Connect for Spark
JDBC data source feature. It covers both client-side and Snowflake Notebook setup.
Configure the JAVA_HOME environment variable to point to the
root directory of your Java installation.
Example (macOS/Linux):
export JAVA_HOME=/path/to/your/jdk/home
Set CLASSPATH Environment Variable:
Add the path to your specific database’s JDBC driver .jar file
to the CLASSPATH environment variable. This allows the Java
environment to find the necessary driver.
This example demonstrates how to read a table from a MySQL database
using spark_session.read.jdbc().
from pyspark.sql import Row
# Adjust the URL for your server host, port, and database nameMYSQL_JDBC_URL="jdbc:mysql://localhost/test_db"# Ensure this driver name matches your version of the JDBC driverMYSQL_JDBC_DRIVER="com.mysql.cj.jdbc.Driver"deftest_jdbc_read_from_mysql(self, spark_session):
# This code snippet uses the Snowpark Connect Spark session
jdbc_df = spark_session.read.jdbc(
MYSQL_JDBC_URL,
"my_schema.my_table", # Specify your table name in MySQLproperties={
"user": "root", # Your MySQL user name"password": "****", # Your password for MySQL"driver": MYSQL_JDBC_DRIVER,
},
).collect()
# After reading via JDBC, the data is loaded into a temporary table in Snowflake.# You can now perform any standard DataFrame operations supported by Snowpark Connect.
This example demonstrates how to write data into a MySQL database using
spark_session.write.jdbc().
from pyspark.sql import Row
# Adjust the URL for your server host, port, and database nameMYSQL_JDBC_URL="jdbc:mysql://localhost/test_db"# Ensure this driver name matches your version of the JDBC driverMYSQL_JDBC_DRIVER="com.mysql.cj.jdbc.Driver"deftest_jdbc_write_overwrite_to_mysql(self, spark_session):
# This code snippet uses the Snowpark Connect Spark session
jdbc_df = spark_session.createDataFrame(
[
Row(a=1, b=2.0, c="test1"),
Row(a=2, b=3.0, c="test2"),
Row(a=4, b=5.0, c="test3"),
]
)
jdbc_df.write.jdbc(
MYSQL_JDBC_URL,
"my_schema.my_table2", # Specify your table name in MySQLmode="overwrite",
properties={
"user": "root", # Your MySQL user name"password": "****", # Your password for MySQL"driver": MYSQL_JDBC_DRIVER,
},
)
Upload the downloaded .jar file directly into your notebook
environment.
Create External Integration:
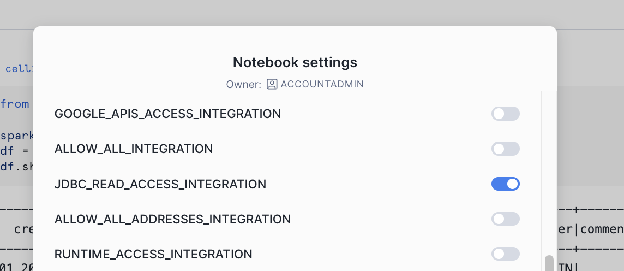
-- 1. Create a Network Rule for the external database host and portCREATE OR REPLACENETWORK RULEJDBC_READ_NETWORK_RULEMODE=EGRESSTYPE=HOST_PORTVALUE_LIST=('hh-pgsql-public.ebi.ac.uk:5432');-- REPLACE with your host:port-- 2. Create the External Access Integration using the new Network RuleCREATE OR REPLACEEXTERNALACCESSINTEGRATIONJDBC_READ_ACCESS_INTEGRATIONALLOWED_NETWORK_RULES=(JDBC_READ_NETWORK_RULE)ENABLED=true;-- NOTE: This integration must be referenced/activated within your notebook's settings.
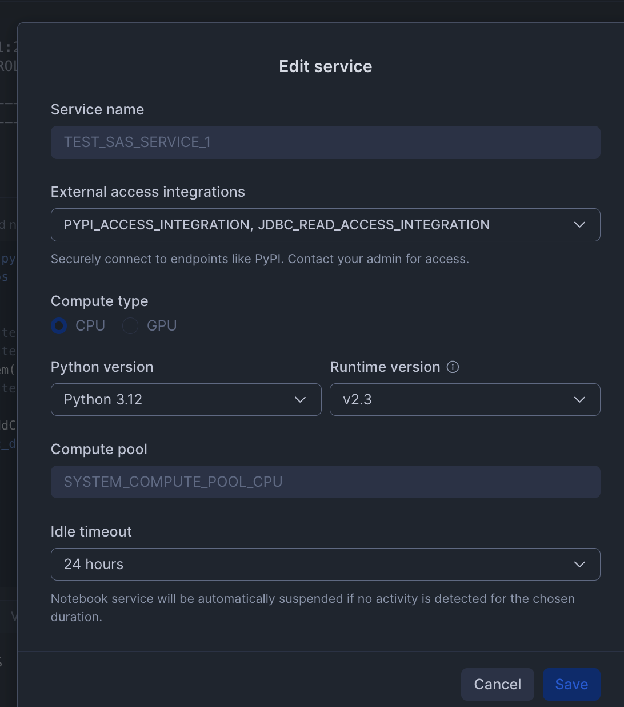
Snowflake requires an External Access Integration to allow the
notebook to communicate with external network locations. You must
define a Network Rule for the host and port of your external
database.
Sample Workspace Notebook code (read from PostgreSQL)
This example shows the necessary Python code to initialize the session,
load the driver, and read data from PostgreSQL.
from snowflake import snowpark_connect
import jpype
import os
# Initialize the Spark session for Snowpark Connect
spark = snowpark_connect.server.init_spark_session()
df = spark.sql("show schemas").limit(2)
df.show()
# Add the uploaded JDBC driver JAR to the Java Classpath using jpype# Adjust the path to match the name of the JAR file you uploaded# Copy the driver to /tmp directory
os.system("cp ./postgresql-42.7.8.jar /tmp/postgresql-42.7.8.jar")
jpype.addClassPath('/tmp/postgresql-42.7.8.jar')
# Using public PostgreSQL DB as an example: https://rnacentral.org/help/public-database
jdbc_df = spark.read.jdbc(
# Adjust this URL as per your server host, port, and database"jdbc:postgresql://hh-pgsql-public.ebi.ac.uk:5432/pfmegrnargs",
"", # Empty string for table name when providing a custom queryproperties={
"user": "reader", # Your PostgreSQL user name"password": "***", # Your password for PostgreSQL"driver": "org.postgresql.Driver",
# Use the "query" property for a custom SQL statement"query": """SELECT upi, -- RNAcentral URS identifier taxid, -- NCBI taxid ac -- external accessionFROM xrefWHERE ac IN ('OTTHUMT00000106564.1', 'OTTHUMT00000416802.1')"""
},
)
jdbc_df.show()
Sample Workspace Notebook code (write to PostgreSQL)
This example shows the necessary Python code to initialize the session,
load the driver, and write data into PostgreSQL.
from snowflake import snowpark_connect
from pyspark.sql import Row
import jpype
import os
# Initialize the Spark session for Snowpark Connect
spark = snowpark_connect.server.init_spark_session()
df = spark.sql("show schemas").limit(2)
df.show()
# Add the uploaded JDBC driver JAR to the Java Classpath using jpype# Adjust the path to match the name of the JAR file you uploaded# Copy the driver to /tmp directory
os.system("cp ./postgresql-42.7.8.jar /tmp/postgresql-42.7.8.jar")
jpype.addClassPath('/tmp/postgresql-42.7.8.jar')
# Create dataframe
jdbc_df = spark.createDataFrame(
[
Row(a=1, b=2.0, c="test1"),
Row(a=2, b=3.0, c="test2"),
Row(a=4, b=5.0, c="test3"),
]
)
# Using public PostgreSQL DB as an example: https://rnacentral.org/help/public-database
jdbc_df.write.jdbc(
# Adjust this URL as per your server host, port, and database"jdbc:postgresql://hh-pgsql-public.ebi.ac.uk:5432/pfmegrnargs",
"public.my_table2", # Specify your table name in PostgreSQLmode="overwrite",
properties={
"user": "writer", # Your PostgreSQL user name"password": "***", # Your password for PostgreSQL"driver": "org.postgresql.Driver",
},
)
Snowflake requires an External Access Integration to allow the
notebook to communicate with external network locations. You must
define a Network Rule for the host and port of your external
database.
-- 1. Create a Network Rule for the external database host and portCREATE OR REPLACENETWORK RULEJDBC_READ_NETWORK_RULEMODE=EGRESSTYPE=HOST_PORTVALUE_LIST=('hh-pgsql-public.ebi.ac.uk:5432');-- REPLACE with your host:port-- 2. Create the External Access Integration using the new Network RuleCREATE OR REPLACEEXTERNALACCESSINTEGRATIONJDBC_READ_ACCESS_INTEGRATIONALLOWED_NETWORK_RULES=(JDBC_READ_NETWORK_RULE)ENABLED=true;-- NOTE: This integration must be referenced/activated within your notebook's settings.
Sample Warehouse Notebook code (read from PostgreSQL)
This example shows the necessary Python code to initialize the session,
load the driver, and read data from PostgreSQL.
from snowflake import snowpark_connect
import jpype
# Initialize the Spark session for Snowpark Connect
spark = snowpark_connect.server.init_spark_session()
df = spark.sql("show schemas").limit(2)
df.show()
# Add the uploaded JDBC driver JAR to the Java Classpath using jpype# Adjust the path to match the name of the JAR file you uploaded
jpype.addClassPath('/tmp/appRoot/postgresql-42.7.8.jar')
# Using public PostgreSQL DB as an example: https://rnacentral.org/help/public-database
jdbc_df = spark.read.jdbc(
# Adjust this URL as per your server host, port, and database"jdbc:postgresql://hh-pgsql-public.ebi.ac.uk:5432/pfmegrnargs",
"", # Empty string for table name when providing a custom queryproperties={
"user": "reader", # Your PostgreSQL user name"password": "***", # Your password for PostgreSQL"driver": "org.postgresql.Driver",
# Use the "query" property for a custom SQL statement"query": """SELECT upi, -- RNAcentral URS identifier taxid, -- NCBI taxid ac -- external accessionFROM xrefWHERE ac IN ('OTTHUMT00000106564.1', 'OTTHUMT00000416802.1')"""
},
)
jdbc_df.show()
Sample Warehouse Notebook code (write to PostgreSQL)
This example shows the necessary Python code to initialize the session,
load the driver, and write data into PostgreSQL.
from snowflake import snowpark_connect
from pyspark.sql import Row
import jpype
# Initialize the Spark session for Snowpark Connect
spark = snowpark_connect.server.init_spark_session()
df = spark.sql("show schemas").limit(2)
df.show()
# Add the uploaded JDBC driver JAR to the Java Classpath using jpype# Adjust the path to match the name of the JAR file you uploaded
jpype.addClassPath('/tmp/appRoot/postgresql-42.7.8.jar')
# Create dataframe
jdbc_df = spark.createDataFrame(
[
Row(a=1, b=2.0, c="test1"),
Row(a=2, b=3.0, c="test2"),
Row(a=4, b=5.0, c="test3"),
]
)
# Using public PostgreSQL DB as an example: https://rnacentral.org/help/public-database
jdbc_df.write.jdbc(
# Adjust this URL as per your server host, port, and database"jdbc:postgresql://hh-pgsql-public.ebi.ac.uk:5432/pfmegrnargs",
"public.my_table2", # Specify your table name in PostgreSQLmode="overwrite",
properties={
"user": "writer", # Your PostgreSQL user name"password": "***", # Your password for PostgreSQL"driver": "org.postgresql.Driver",
},
)
Snowpark Connect for Spark supports reading and writing data from Neo4j graph databases using the org.neo4j.spark.DataSource
format. This section covers client-side setup.
To connect to Neo4j from a Snowflake Notebook (Warehouse or Workspace), follow the same Network Rule and
External Access Integration steps described in the PostgreSQL sections above. Use the Neo4j Bolt port
(typically 7687) in your Network Rule, upload the Neo4j JDBC full-bundle JAR, and load it with
spark.jars configuration. The read and write code is identical to the client-side examples.