Snowflake ML Model Development

Note

The Snowflake ML Modeling API is Generally Available as of snowflake-ml-python package version 1.1.1.

The Snowflake ML Modeling API uses familiar Python frameworks such as scikit-learn, LightGBM, and XGBoost for preprocessing data, feature engineering, and training models inside Snowflake.

Benefits of developing models with Snowflake ML Modeling include:

  • Feature engineering and preprocessing: Improve performance and scalability with distributed execution for frequently-used scikit-learn preprocessing functions.

  • Model training: Accelerate training for scikit-learn, XGBoost and LightGBM models without the need to manually create stored procedures or user-defined functions (UDFs), leveraging distributed hyperparameter optimization.

    Tip

    See Introduction to Machine Learning (https://quickstarts.snowflake.com/guide/intro_to_machine_learning_with_snowpark_ml_for_python/#0) for an example of an end-to-end ML workflow, including the modeling API.

Note

This topic assumes that snowflake-ml-python and its modeling dependencies are already installed. See Using Snowflake ML Locally.

Developing models

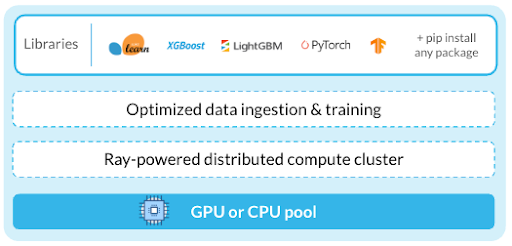
With Container Runtime for ML, available in Notebooks on Container Runtime, you can use popular open-source ML packages vith your Snowflake data, leveraging one or more GPU nodes, within the Snowflake cloud, ensuring security and governance for the entire ML workflow. The included data loading and training APIs are automatically distributed across all available CPUs or GPUs on a node, acelerating model training with large datasets.

For more information, see Getting Started with Snowflake Notebook Container Runtime (https://quickstarts.snowflake.com/guide/notebook-container-runtime/index.html#0), which presents a simple ML workflow leveraging the capabilities of the Container Runtime for ML.

Along with the flexibility and power of the Container Runtime for ML, the Snowflake ML Modeling API provides estimators and transformers that have APIs similar to those in the scikit-learn, xgboost, and lightgbm libraries. You can use these APIs to build and train machine learning models that can be used with Snowflake ML Operations such as the Snowpark Model Registry.

Examples

Review the following examples to get a sense of the similarities of the Snowflake Modeling API to the machine learning libraries you might be familiar with.

Preprocessing

This example illustrates the using Snowflake Modeling data preprocessing and transformation functions. The two preprocessing functions used in the example (MixMaxScaler and OrdinalEncoder) use Snowflake’s distributed processing engine to provide significant performance improvements over client-side or stored procedure implementations. For details, see Distributed Preprocessing.

import numpy as np
import pandas as pd
import random
import string

from sklearn.datasets import make_regression
from snowflake.ml.modeling.preprocessing import MinMaxScaler, OrdinalEncoder
from snowflake.ml.modeling.pipeline import Pipeline
from snowflake.snowpark import Session

# Create a session with your preferred method
# session =

NUMERICAL_COLS = ["X1", "X2", "X3"]
CATEGORICAL_COLS = ["C1", "C2", "C3"]
FEATURE_COLS = NUMERICAL_COLS + CATEGORICAL_COLS
CATEGORICAL_OUTPUT_COLS = ["C1_OUT", "C2_OUT", "C3_OUT"]
FEATURE_OUTPUT_COLS = ["X1_FEAT_OUT", "X2_FEAT_OUT", "X3_FEAT_OUT", "C1_FEAT_OUT", "C2_FEAT_OUT", "C3_FEAT_OUT"]

# Create a dataset with numerical and categorical features
X, _ = make_regression(
    n_samples=1000,
    n_features=3,
    noise=0.1,
    random_state=0,
)
X = pd.DataFrame(X, columns=NUMERICAL_COLS)

def generate_random_string(length):
    return "".join(random.choices(string.ascii_uppercase, k=length))

categorical_feature_length = 2
categorical_features = {}
for c in CATEGORICAL_COLS:
    categorical_column = [generate_random_string(categorical_feature_length) for _ in range(X.shape[0])]
    categorical_features[c] = categorical_column

X = X.assign(**categorical_features)

features_df = session.create_dataframe(X)

# Fit a pipeline with OrdinalEncoder and MinMaxScaler on Snowflake
pipeline = Pipeline(
    steps=[
        (
            "OE",
            OrdinalEncoder(
                input_cols=CATEGORICAL_COLS,
                output_cols=CATEGORICAL_OUTPUT_COLS,
            )
        ),
        (
            "MMS",
            MinMaxScaler(
                input_cols=NUMERICAL_COLS + CATEGORICAL_OUTPUT_COLS,
                output_cols=FEATURE_OUTPUT_COLS,
            )
        ),
    ]
)

pipeline.fit(features_df)

# Use the pipeline to transform a dataset.
result = pipeline.transform(features_df)
Copy

Data Loading

This example shows how to load data from a Snowflake table to a pandas DataFrame or a pytorch Dataset using the DataConnector API, which disributes data ingestion over multiple cores or GPUs to speed up loading.

Note

The DataConnector API is available in the Container Runtime for ML and can be used from Snowsight notebooks running on Snowpark Container Services (SPCS).

from snowflake.ml.data.data_connector import DataConnector

# Retrieve data from a snowflake table
table_name = 'LARGE_TABLE_MULTIPLE_GBs'
snowpark_df = session.table(table_name)

# Materialize it into a pandas dataframe using DataConnector
pandas_df = DataConnector.from_dataframe(snowpark_df).to_pandas()

# Materialize it into a pytroch dataset using DataConnector
torch_dataset = data.to_torch_dataset(batch_size=1024)
Copy

Training

This example shows how to train a simple xgboost classifier model using Snowflake ML Modeling, then run predictions. The API is similar to xgboost here, with only a few differences in how the columns are specified. For details on these differences, see General API Differences.

import pandas as pd
from sklearn.datasets import make_classification

from snowflake.ml.modeling.xgboost import XGBClassifier
from snowflake.ml.utils.connection_params import SnowflakeLoginOptions
from snowflake.snowpark import Session

# Create a session with your preferred method
# session =

FEATURE_COLS = ["X1", "X2", "X3", "X4", "X5", "X6"]
LABEL_COLS = ["Y"]
OUTPUT_COLS = ["PREDICTIONS"]

# Set up data.
X, y = make_classification(
    n_samples=40000,
    n_features=6,
    n_informative=4,
    n_redundant=1,
    random_state=0,
    shuffle=True,
)

X = pd.DataFrame(X, columns=FEATURE_COLS)
y = pd.DataFrame(y, columns=LABEL_COLS)

features_pandas = pd.concat([X, y], axis=1)
features_df = session.create_dataframe(features_pandas)

# Train an XGBoost model on snowflake.
xgboost_model = XGBClassifier(
    input_cols=FEATURE_COLS,
    label_cols=LABEL_COLS,
    output_cols=OUTPUT_COLS
)

xgboost_model.fit(features_df)

# Use the model to make predictions.
predictions = xgboost_model.predict(features_df)
predictions[OUTPUT_COLS].show()
Copy

Feature Preprocessing and Training on Non-Synthetic Data

This example uses the high-energy gamma particle data from a ground-based atmospheric Cherenkov telescope. The telescope observes high energy gamma particles, taking advantage of the radiation emitted by charged particles produced in the electromagnetic showers initiated by the gamma rays. The detector records the Cherenkov radiation (of visible to ultraviolet wavelengths) that leaks through the atmosphere, allowing reconstruction of the gamma shower parameters. The telescope also detects hadron rays that are abundant in cosmic showers and produce signals that mimic gamma rays.

The goal is to develop a classification model for distinguishing between gamma rays and hadron rays. The model enables scientists to filter out background noise and focus on the genuine gamma-ray signals. Gamma rays allow scientists to observe cosmic events like the birth and death of stars, cosmic explosions, and the behavior of matter in extreme conditions.

The particle data is available for download from MAGIC Gamma Telescope (https://archive.ics.uci.edu/dataset/159/magic+gamma+telescope). Download and unzip the data, set the DATA_FILE_PATH variable to point to the data file, and run the code below to load it to Snowflake.

DATA_FILE_PATH = "~/Downloads/magic+gamma+telescope/magic04.data"

# Setup
from snowflake.ml.utils.connection_params import SnowflakeLoginOptions
from snowflake.snowpark import Session
import posixpath
import os

##
# Note: Create session https://docs.snowflake.com/en/developer-guide/snowpark/reference/python/latest/api/snowflake.snowpark.Session
##
session = Session.builder.configs(SnowflakeLoginOptions()).create()

session.sql("""
CREATE OR REPLACE TABLE Gamma_Telescope_Data(
    F_LENGTH FLOAT,
    F_WIDTH FLOAT,
    F_SIZE FLOAT,
    F_CONC FLOAT,
    F_CONC1 FLOAT,
    F_ASYM FLOAT,
    F_M3_LONG FLOAT,
    F_M3_TRANS FLOAT,
    F_ALPHA FLOAT,
    F_DIST FLOAT,
    CLASS VARCHAR(10))
""").collect()
session.sql("CREATE OR REPLACE STAGE SNOWPARK_ML_TEST_DATA_STAGE").collect()
session.file.put(
    DATA_FILE_PATH,
    "SNOWPARK_ML_TEST_DATA_STAGE/magic04.data",
    auto_compress=False,
    overwrite=True,
)

session.sql("""
COPY INTO Gamma_Telescope_Data FROM @SNOWPARK_ML_TEST_DATA_STAGE/magic04.data
FILE_FORMAT = (TYPE = 'CSV' field_optionally_enclosed_by='"',SKIP_HEADER = 0);
""").collect()

session.sql("select * from Gamma_Telescope_Data limit 5").collect()
Copy

Once you have loaded the data, use the following code to train and predict, using the following steps.

  • Preprocess the data:

    • Replace missing values with the mean.

    • Center the data using a standard scaler.

  • Train an xgboost classifier to determine the type of events.

  • Test the accuracy of the model on both training and test datasets.

from snowflake.ml.utils.connection_params import SnowflakeLoginOptions
from snowflake.snowpark import Session, DataFrame

from snowflake.ml.modeling.preprocessing import StandardScaler
from snowflake.ml.modeling.impute import SimpleImputer
from snowflake.ml.modeling.pipeline import Pipeline
from snowflake.ml.modeling.xgboost import XGBClassifier

from snowflake.ml.modeling.metrics import accuracy_score

##
# Note: Create session https://docs.snowflake.com/en/developer-guide/snowpark/reference/python/latest/api/snowflake.snowpark.Session
##
session = Session.builder.configs(SnowflakeLoginOptions()).create()

# Step 1: Create train and test dataframes
all_data = session.sql("select *, IFF(CLASS = 'g', 1.0, 0.0) as LABEL from Gamma_Telescope_Data").drop("CLASS")
train_data, test_data = all_data.random_split(weights=[0.9, 0.1], seed=0)

# Step 2: Construct training pipeline with preprocessing and modeling steps
FEATURE_COLS = [c for c in train_data.columns if c != "LABEL"]
LABEL_COLS = ["LABEL"]

pipeline = Pipeline(steps = [
    ("impute", SimpleImputer(input_cols=FEATURE_COLS, output_cols=FEATURE_COLS)),
    ("scaler", StandardScaler(input_cols=FEATURE_COLS, output_cols=FEATURE_COLS)),
    ("model", XGBClassifier(input_cols=FEATURE_COLS, label_cols=LABEL_COLS))
])

# Step 3: Train
pipeline.fit(train_data)

# Step 4: Eval
predict_on_training_data = pipeline.predict(train_data)
training_accuracy = accuracy_score(df=predict_on_training_data, y_true_col_names=["LABEL"], y_pred_col_names=["OUTPUT_LABEL"])

predict_on_test_data = pipeline.predict(test_data)
eval_accuracy = accuracy_score(df=predict_on_test_data, y_true_col_names=["LABEL"], y_pred_col_names=["OUTPUT_LABEL"])

print(f"Training accuracy: {training_accuracy} \nEval accuracy: {eval_accuracy}")
Copy

Distributed Hyperparameter Optimization

This example shows how to run distributed hyperparameter optimization using Snowflake’s implementation of scikit-learn’s GridSearchCV. The individual runs are executed in parallel using distributed warehouse compute resources. For details on distributed hyperparameter optimization, see Distributed Hyperparameter Optimization.

from snowflake.snowpark import Session, DataFrame
from snowflake.ml.utils.connection_params import SnowflakeLoginOptions

from sklearn.datasets import make_classification
from snowflake.snowpark import Session, DataFrame
from snowflake.ml.modeling.xgboost import XGBClassifier
from snowflake.ml.modeling.model_selection.grid_search_cv import GridSearchCV

FEATURE_COLS = ["X1", "X2", "X3", "X4", "X5", "X6"]
LABEL_COLS = ["Y"]
OUTPUT_COLS = ["PREDICTIONS"]

# Create a session using your favorite login option.
# In this example we use a session builder with `SnowflakeLoginOptions`.
session = Session.builder.configs(SnowflakeLoginOptions()).create()

# Set up data.
def set_up_data(session: Session, n_samples: int) -> DataFrame:
    X, y = make_classification(
        n_samples=n_samples,
        n_features=6,
        n_informative=2,
        n_redundant=0,
        random_state=0,
        shuffle=True,
    )

    X = pd.DataFrame(X, columns=FEATURE_COLS)
    y = pd.DataFrame(y, columns=LABEL_COLS)

    features_pandas = pd.concat([X, y], axis=1)
    features_pandas.head()

    features_df = session.create_dataframe(features_pandas)
    return features_df

features_df = set_up_data(session, 10**4)

# Create a warehouse to use for the tuning job.
session.sql(
    """
CREATE or replace warehouse HYPERPARAM_WH
    WITH WAREHOUSE_SIZE = 'X-SMALL'
    WAREHOUSE_TYPE = 'Standard'
    AUTO_SUSPEND = 60
    AUTO_RESUME = TRUE
    INITIALLY_SUSPENDED = FALSE;"""
).collect()
session.use_warehouse("HYPERPARAM_WH")

# Tune an XGB Classifier model using sklearn GridSearchCV.
DISTRIBUTIONS = dict(
    n_estimators=[10, 50],
    learning_rate=[0.01, 0.1, 0.2],
)
estimator = XGBClassifier()
grid_search_cv = GridSearchCV(estimator=estimator, param_grid=DISTRIBUTIONS, input_cols=FEATURE_COLS, label_cols=LABEL_COLS, output_cols=OUTPUT_COLS)

grid_search_cv.fit(features_df)

# Use the best model to make predictions.
predictions = grid_search_cv.predict(features_df)
predictions[OUTPUT_COLS].show()

# Retrieve sklearn model, and print the best score
sklearn_grid_search_cv = grid_search_cv.to_sklearn()
print(sklearn_grid_search_cv.best_score_)
Copy

To really see the power of distributed optimization, train on a million rows of data.

large_features_df = set_up_data(session, 10**6)

# Scale up the warehouse for a faster fit. This takes 2m15s to run on an L warehouse versus 4m5s on a XS warehouse.
session.sql(f"ALTER WAREHOUSE {session.get_current_warehouse()} SET WAREHOUSE_SIZE='LARGE'").collect()

grid_search_cv.fit(large_features_df)
print(grid_search_cv.to_sklearn().best_score_)
Copy

Snowflake Modeling Classes

All Snowflake modeling and preprocessing classes are in the snowflake.ml.modeling namespace. The snowflake-ml-python modules have the same name as the corresponding modules from the sklearn namespace. For example, the module corresponding to sklearn.calibration is snowflake.ml.modeling.calibration. The xgboost and lightgbm modules correspond to snowflake.ml.modeling.xgboost and snowflake.ml.modeling.lightgbm, respectively.

The modeling API provides wrappers for underlying scikit-learn, xgboost, and lightgbm classes, the majority of which are executed as stored procedures (running on a single warehouse node) in the virtual warehouse. Not all of the classes from scikit-learn are supported. See the Python API Reference for a list of the classes currently available.

Some classes (including preprocessing and metrics classes) support distributed execution and may provide significant performance benefits compared to running the same operations locally. For more information, see Distributed Preprocessing and Distributed Hyperparameter Optimization. The table below lists the specific classes that support distributed execution.

snowflake-ml-python module name

Distributed classes

snowflake.ml.modeling.impute

  • SimpleImputer

snowflake.ml.modeling.metrics

correlation:

  • correlation

covariance:

  • covariance

classification:

  • accuracy_score

  • confusion_matrix

  • f1_score

  • fbeta_score

  • log_loss

  • precision_recall_fscore_support

  • precision_score

  • recall_score

regression:

  • mean_absolute_error

  • mean_absolute_percentage_error

  • mean_squared_error

snowflake.ml.modeling.model_selection

  • GridSearchCV

  • RandomizedSearchCV

snowflake.ml.modeling.preprocessing

  • Binarizer

  • KBinsDiscretizer

  • LabelEncoder

  • MaxAbsScaler

  • MinMaxScaler

  • Normalizer

  • OneHotEncoder

  • OrdinalEncoder

  • RobustScaler

  • StandardScaler

General API Differences

Tip

See the API Reference for complete details of the modeling API.

Snowflake modeling classes includes data preprocessing, transformation, and prediction algorithms based on scikit-learn, xgboost, and lightgbm. The Snowpark Python classes are replacements for the corresponding classes from the original packages, with similar signatures. However, these APIs are designed to work with Snowpark DataFrames instead of NumPy arrays.

Although the API is similar to scikit-learn, there are some key differences. This section explains how to call the __init__ (constructor), fit, and predict methods for the Snowflake estimator and transformer classes.

  • The constructor of all Snowflake model classes accepts five additional parameters (input_cols, output_cols, sample_weight_col, label_cols, and drop_input_cols) in addition to the parameters accepted by the equivalent classes in scikit-learn, xgboost, or lightgbm. These are strings or sequences of strings that specify the names of the input columns, output columns, sample weight column, and label columns in a Snowpark or Pandas DataFrame. If some of the datasets you use have different names, you can change these names after instantiation using one of the provided setter methods, such as set_input_cols.

  • Because you specify column names when instantiating the class (or afterward, using setter methods) the fit and predict methods accept a single DataFrame instead of separate arrays for inputs, weights, and labels. The provided column names are used to access the appropriate column from the DataFrame in fit or predict. See fit and predict.

  • By default, the transform and predict methods return a DataFrame containing all of the columns from the DataFrame passed to the method, with the output from the prediction stored in additional columns. You can transform in place by specifying output column names that match the input column names, or drop the input columns by passing drop_input_cols = True.) The scikit-learn, xgboost, and lightgbm equivalents return arrays containing only the results.

  • Snowpark Python transformers do not have a fit_transform method. However, as with scikit-learn, parameter validation is only performed in the fit method, so you should call fit at some point before transform, even when the transformer does not do any fitting. fit returns the transformer, so the method calls may be chained; for example, Binarizer(threshold=0.5).fit(df).transform(df).

  • Snowflake transformers do not currently have an inverse_transform method. In many use cases, this method is unnecessary because the input columns are retained in the output dataframe by default.

You can convert any Snowfalke modeling object to the corresponding scikit-learn, xgboost, or lightgbm object, allowing you to use all the methods and attributes of the underlying type. See Retrieving the Underlying Model.

Constructing a Model

In addition to the parameters accepted by individual scikit-learn model classes, all modeling classes accept the following additional parameters at instantiation.

These parameters are all technically optional, but you will often want to specify input_cols, output_cols, or both. label_cols and sample_weight_col are required in specific situations noted in the table, but can be omitted in other cases.

Tip

All column names must follow the Snowflake identifier requirements. To preserve case or use special characters (besides dollar sign and underscore) when creating a table, column names must be wrapped in double quotes. Use all-caps column names whenever possible to maintain compatibility with case-sensitive Pandas DataFrames.

from snowflake.ml.modeling.preprocessing import MinMaxScaler
from snowflake.snowpark import Session

# Snowflake identifiers are not case sensitive by default.
# These column names will be automatically updated to ["COLUMN_1", "COLUMN_2", "COLUMN_3"] by the Snowpark DataFrame.
schema = ["column_1", "column_2", "column_3"]
df = session.create_dataframe([[1, 2, 3]], schema = schema)
df.show()
Copy
--------------------------------------
|"COLUMN_1"  |"COLUMN_2"  |"COLUMN_3"|
--------------------------------------
|1           |2          |3          |
--------------------------------------
Copy
# Identify the column names using the Snowflake identifier.
input_cols = ["COLUMN_1", "COLUMN_2", "COLUMN_3"]
mms = MinMaxScaler(input_cols=input_cols)
mms.fit(df)

# To maintain lower case column names, include a double quote within the string.
schema = ['"column_1"', '"column_2"', '"column_3"']
df = session.create_dataframe([[1, 2, 3]], schema = schema)
df.show()
Copy
----------------------------------------
|'"column_1"'|'"column_2"'|'"column_3"'|
----------------------------------------
|1           |2           |3           |
----------------------------------------
Copy
# Since no conversion took place, the schema labels can be used as the column identifiers.
mms = MinMaxScaler(input_cols=schema)
mms.fit(df)
Copy

Parameter

Description

input_cols

A string or list of strings representing column names that contain features.

If you omit this parameter, all columns in the input DataFrame, except the columns specified by label_cols, sample_weight_col, and passthrough_cols parameters, are considered input columns.

label_cols

A string or list of strings representing the names of columns that contain labels.

You must specify label columns for supervised estimators because inferring these columns is not possible. These label columns are used as targets for model predictions and should be clearly distinguished from input_cols.

output_cols

A string or list of strings representing the names of columns that will store the output of predict and transform operations. The length of output_cols must match the expected number of output columns from the specific predictor or transformer class used.

If you omit this parameter, output column names are derived by adding an OUTPUT_ prefix to the label column names for supervised estimators, or OUTPUT_IDX for unsupervised estimators. These inferred output column names work for predictors, but output_cols must be set explicitly for transformers. In general, explicitly specifying output column names is clearer, especially if you don’t specify the input column names.

To transform in place, pass the same names for input_cols and output_cols.

passthrough_cols

A string or a list of strings indicating names of columns to exclude from training, transformation, and inference. Passthrough columns remain untouched between the input and output DataFrames.

This option is helpful where you want to avoid using specific columns, such as index columns, during training or inference, but do not pass input_cols. When you do not pass input_cols, those columns would ordinarily be considered inputs.

sample_weight_col

A string representing the column name containing the examples’ weights.

This argument is required for weighted datasets.

drop_input_cols

A Boolean value indicating whether the input columns are removed from the result DataFrame. The default is False.

Example

The DecisionTreeClassifier constructor does not have any required arguments in scikit-learn; all arguments have default values. So in scikit-learn, you might write:

from sklearn.tree import DecisionTreeClassifier

model = DecisionTreeClassifier()
Copy

In Snowflake’s version of this class, you must specify the column names (or accept the defaults by not specifying them). In this example, they are explicitly specified.

You can initialize a DecisionTreeClassifier by passing the arguments directly to the constructor or by setting them as attributes of the model after instantiation. (The attributes may be changed at any time.)

  • As constructor arguments:

    from snowflake.ml.modeling.tree import DecisionTreeClassifier
    
    model = DecisionTreeClassifier(
        input_cols=feature_column_names, label_cols=label_column_names, sample_weight_col=weight_column_name,
        output_cols=expected_output_column_names
    )
    
    Copy
  • By setting model attributes:

    from snowflake.ml.modeling.tree import DecisionTreeClassifier
    
    model = DecisionTreeClassifier()
    model.set_input_cols(feature_column_names)
    model.set_label_cols(label_column_names)
    model.set_sample_weight_col(weight_column_name)
    model.set_output_cols(output_column_names)
    
    Copy

fit

The fit method of a Snowflake classifier takes a single Snowpark or Pandas DataFrame containing all columns, including features, labels, and weights. This is different from scikit-learn’s fit method, which takes separate inputs for features, labels, and weights.

In scikit-learn, the DecisionTreeClassifier.fit method call looks like this:

model.fit(
    X=df[feature_column_names], y=df[label_column_names], sample_weight=df[weight_column_name]
)
Copy

In Snowflake’s fit, you only need to pass the DataFrame. You have already set the input, label, and weight column names at initialization or by using setter methods, as shown in Constructing a Model.

model.fit(df)
Copy

predict

The predict method also takes a single Snowpark or Pandas DataFrame containing all feature columns. The result is a DataFrame that contains all the columns in the input DataFrame unchanged and the output columns appended. You must extract the output columns from this DataFrame. This is different from the predict method in scikit-learn, which returns only the results.

Example

In scikit-learn, predict returns only the prediction results:

prediction_results = model.predict(X=df[feature_column_names])
Copy

To get only the prediction results in Snowflake’s predict, extract the output columns from the returned DataFrame. Here, output_column_names is a list containing the names of the output columns:

prediction_results = model.predict(df)[output_column_names]
Copy

Distributed Training and Inference with SPCS

When running in a Snowflake Notebook on Snowpark Container Services (SPCS), model training and inference for these modeling classes are executed on the underlying compute cluster, not in a warehouse, and are transparently distributed across all nodes in the cluster to employ all available compute capability.

Preprocessing and metrics operations are pushed down to the warehouse. Many preprocessing classes support distributed execution when run in the warehouse; see Distributed Preprocessing.

Distributed Preprocessing

Many Snowflake data preprocessing and transformation functions are implemented using Snowflake’s distributed execution engine, which yields significant performance benefit compared to single-node execution (that is, stored procedures). To find out which functions support distributed execution, see Snowflake Modeling Classes.

The chart below shows illustrative performance numbers on large public datasets, running in a medium Snowpark-optimized warehouse, comparing scikit-learn running in stored procedures to Snowflake’s distributed implementations. In mary scenarios, your code can run 25 to 50 times faster when using Snowflake modeling classes.

Illustration of performance improvements possible by distributed preprocessing

How Fits Are Distributed

The fit method of a Snowflake preprocessing transformer accepts a Snowpark or pandas DataFrame, fits the dataset, and returns the fitted transformer.

  • For Snowpark DataFrames, distributed fitting uses the SQL engine. The transformer generates SQL queries to compute the necessary states (such as mean, maximum, or count). These queries are then executed by Snowflake, and the results are materialized locally. For complex states that cannot be computed in SQL, the transformer fetches intermediate results from Snowflake and performs local computations over metadata.

    For complex transformers that require temporary state tables during transformation (for example, OneHotEncoder or OrdinalEncoder), these tables are represented locally using pandas DataFrames.

  • pandas DataFrames are fitted locally, similar to fitting with scikit-learn. The transformer creates a corresponding scikit-learn transformer with the provided parameters. Then the scikit-learn transformer is fitted, and the Snowflake transformer derives necessary states from the scikit-learn object.

How Transforms Are Distributed

The transform method of a preprocessing transformer accepts a Snowpark or Pandas DataFrame, transforms the dataset, and returns a transformed dataset.

  • For Snowpark DataFrames, distributed transformation is performed using the SQL engine. The fitted transformer generates a Snowpark DataFrame with underlying SQL queries representing the transformed dataset. The transform method performs lazy evaluation for simple transforms (for example, StandardScaler or MinMaxScaler), so that no transform is actually performed during the transform method.

    However, certain complex transforms involve execution. This includes transformers that require temporary state tables (such as OneHotEncoder and OrdinalEncoder) during transformation. For such a transformer, the transformer creates a temporary table from the Pandas DataFrame (which stores the state of the object) for joins and other operations.

    Furthermore, when certain parameters are set, for example when the transformer is set to handle unknown values found during transformation by raising errors, the transformer materializes the data, including columns, unknown values, and so forth.

  • Pandas DataFrames are transformed locally, similar to transformation with scikit-learn. The transformer creates a corresponding scikit-learn transformer using the to_sklearn API and performs the transform in memory.

Distributed Hyperparameter Optimization

Hyperparameter tuning is an integral part of the data science workflow. The Snowflake API provides distributed implementations of the scikit-learn GridSearchCV and RandomizedSearchCV APIs to enable efficient hyperparameter tuning on both single-node and multiple-node warehouses.

Tip

Snowflake enables distributed hyperparameter optimization by default. To disable it, use the following Python import.

import snowflake.ml.modeling.parameters.disable_distributed_hpo
Copy

The smallest Snowflake virtual warehouse (XS) or Snowpark-optimized warehouse (M) has one node. Each successively larger size doubles the number of nodes.

For single-node (XS) warehouses, the full capacity of the node is utilized by default using scikit-learn’s joblib multiprocessing framework.

Tip

Each fit operation requires its own copy of that training dataset loaded into RAM. To process extremely large datasets, disable distributed hyperparameter optimization (with import snowflake.ml.modeling.parameters.disable_distributed_hpo) and set the n_jobs parameter to 1 to minimize concurrency.

For multiple-node warehouses, the fit operations within your cross-validation tuning job are distributed across the nodes. No code changes are required to scale up. Estimator fits are executed in parallel across all available cores on all nodes in the warehouse.

Estimator fits are executed in parallel on all available CPUs on all machines in the warehouse

As an illustration, consider the California housing dataset (https://scikit-learn.org/stable/datasets/real_world.html#california-housing-dataset) provided with the scikit-learn library. The data includes 20,640 rows of data with the following information:

  • MedInc: Median income in the block group

  • HouseAge: Median house age in the block group

  • AveRooms: Ave number of rooms per household

  • AveBedrms: Average number of bedrooms per household

  • Population: The block group population

  • AveOccup: Average number of household members

  • Latitude and Longitude

The target of the dataset is the median income, expressed in hundreds of thousands of dollars.

In this example, we do grid search cross-validation on a random forest regressor to find the best hyperparameter combination to predict the median income.

from snowflake.ml.modeling.ensemble.random_forest_regressor import RandomForestRegressor
from snowflake.ml.modeling.model_selection.grid_search_cv import GridSearchCV
from sklearn import datasets

def load_housing_data() -> DataFrame:
    input_df_pandas = datasets.fetch_california_housing(as_frame=True).frame
    # Set the columns to be upper case for consistency with Snowflake identifiers.
    input_df_pandas.columns = [c.upper() for c in input_df_pandas.columns]
    input_df = session.create_dataframe(input_df_pandas)

    return input_df

input_df = load_housing_data()

# Use all the columns besides the median value as the features
input_cols = [c for c in input_df.columns if not c.startswith("MEDHOUSEVAL")]
# Set the target median value as the only label columns
label_cols = [c for c in input_df.columns if c.startswith("MEDHOUSEVAL")]


DISTRIBUTIONS = dict(
            max_depth=[80, 90, 100, 110],
            min_samples_leaf=[1,3,10],
            min_samples_split=[1.0, 3,10],
            n_estimators=[100,200,400]
        )
estimator = RandomForestRegressor()
n_folds = 5

clf = GridSearchCV(estimator=estimator, param_grid=DISTRIBUTIONS, cv=n_folds, input_cols=input_cols, label_cols=label_col)
clf.fit(input_df)
Copy

This example runs in just over 7 minutes on a Medium (single node) Snowpark-optimized warehouse, and takes just 3 minutes to run on an X-Large warehouse.

Illustration of performance improvements possible by distributed hyperparameter optimization

Deploying and Running Your Model

The result of training a model is a Python model object. You can use the trained model to make predictions by calling the model’s predict method. This creates a temporary user-defined function to run the model in your Snowflake virtual warehouse. This function is automatically deleted at the end of your Snowflake session (for example, when your script ends or when you close your notebook).

To keep the user-defined function after your session ends, you can create it manually. See the Quickstart (https://github.com/Snowflake-Labs/sfguide-getting-started-machine-learning/blob/main/hol/2_1_DEMO_model_building_scoring.ipynb) on the topic for further information.

The Snowflake model registry also supports persistent models and makes finding and deploying them easier. See Snowflake Model Registry.

Partitioned Custom Models

The model registry also supports a special type of custom model where fit and inference are executed in parallel for a set of partitions. This can be a performant way to create many models at once from one dataset and execute inference immediately. Please see Snowflake Model Registry: Partitioned Models for more details.

Pipeline for Multiple Transformations

With scikit-learn, it is common to run a series of transformations using a pipeline. scikit-learn pipelines do not work with Snowflake classes, so a Snowflake version of sklearn.pipeline.Pipeline is provided for running a series of transformations. This class is in the snowflake.ml.modeling.pipeline package, and it works the same as the scikit-learn version.

Retrieving the Underlying Model

Snowflake ML models can be “unwrapped,” that is, converted to the underlying third-party model types, with the following methods (depending on the library):

  • to_sklearn

  • to_xgboost

  • to_lightgbm

All attributes and methods of the underlying model can then be accessed and run locally against the estimator. For example, in the GridSearchCV example, we convert the grid search estimator to a scikit-learn object in order to retrieve the best score.

best_score = grid_search_cv.to_sklearn().best_score_
Copy

Known Limitations

  • Snowflake estimators and transformers do not currently support sparse inputs or sparse responses. If you have sparse data, convert it to a dense format before passing it to Snowflake’s estimators or transformers.

  • The snowflake-ml-python package does not currently support matrix data types. Any operation on estimators and transformers that would produce a matrix as a result fails.

  • The order of rows in result data is not guaranteed to match the order of rows in input data.

  • Snowflake ML does not yet support pandas on Snowflake DataFrames. Convert the Pandas on Snowflake dataframe to a Snowpark dataframe to use it with the Snowflake modeling classes. The following example converts a DataFrame we have read from a Snowflake table:

    import modin.pandas as pd
    import snowflake.snowpark.modin.plugin
    from snowflake.ml.modeling.xgboost import XGBClassifier
    
    snowpark_pandas_df: modin.pandas.DataFrame = read_snowflake('MY_TABLE')
    # converting to Snowpark DataFrame adds an index column
    index_label_name = "_INDEX"
    snowpark_df = snowpark_pandas_df.to_snowpark(index=True, index_label=index_label_name)
    snowpark_df.show()
    
    Copy

    The resulting Snowpark DataFrame is as follows:

    --------------------------------------------------
    |"COLUMN_1"  |"COLUMN_2" |"TARGET"   |  "_INDEX" |
    --------------------------------------------------
    |1           |2          |3          |1          |
    --------------------------------------------------
    
    Copy

    The DataFrame can then be used to train the an XGBoost classifier as follows:

    # Identify the column names using the Snowflake identifier
    input_cols = ["COLUMN_1", "COLUMN_2", "COLUMN_3"]
    # Pass through the _INDEX column rather than using it for training
    xgb_clf = XGBClassifier(input_cols=input_cols, passthrough_cols=index_label_name, label_cols="TARGET")
    xgb_clf.fit(snowpark_df)
    
    Copy

Troubleshooting

Adding More Detail to Logging

The Snowflake modeling library uses Snowpark Python’s logging. By default, snowflake-ml-python logs INFO level messages to standard output. To get more detailed logs, you can change the level to one of the supported levels (https://docs.python.org/3/library/logging.html#logging-levels).

DEBUG produces logs with the most details. To set the logging level to DEBUG:

import logging, sys

logging.basicConfig(stream=sys.stdout, level=logging.DEBUG)
Copy

Solutions to Common Issues

The following table provides some suggestions for solving possible problems with Snowflake ML Modeling.

Problem or error message

Possible cause

Resolution

NameError, such as “name x is not defined,” ImportError, or ModuleNotFoundError

Typographical error in module or class name, or snowflake-ml-python is not installed.

Refer to the modeling classes table for the correct module and class name. Ensure that snowflake-ml-python is installed (see Using Snowflake ML Locally).

KeyError (“not in index” or “none of [Index[..]] are in the [columns]”)

Incorrect column name.

Check and correct the column name.

SnowparkSQLException, “does not exist or not authorize”

Table does not exist, or you do not have sufficient privileges on the table.

Ensure that the table exists and that the user’s role has the privileges.

SnowparkSQLException, “invalid identifier PETALLENGTH”

Incorrect number of columns (usually a missing column).

Check the number of columns specified when you created the model class, and ensure that you are passing the right number.

InvalidParameterError

An inappropriate type or value has been passed as a parameter.

Check the class’s or method’s help using the help function in an interactive Python session, and correct the values.

TypeError, “unexpected keyword argument”

Typographical error in named argument.

Check the class’s or method’s help using the help function in an interactive Python session, and correct the argument name.

ValueError, “array with 0 sample(s)”

The dataset that was passed in is empty.

Ensure that the dataset is not empty.

SnowparkSQLException, “authentication token has expired”

The session has expired.

If you’re using a Jupyter notebook, restart the kernel to create a new session.

ValueError, such as “cannot convert string to float”

Data type mismatch.

Check the class’s or method’s help using the help function in an interactive Python session, and correct the values.

SnowparkSQLException, “cannot create temporary table”

A model class is being used inside a stored procedure that doesn’t run with the caller’s rights.

Create the stored procedure with the caller’s rights instead of with the owner’s rights.

SnowparkSQLException, “function available memory exceeded”

Your data set is larger than 5 GB in a standard warehouse.

Switch to a Snowpark-optimized warehouse.

OSError, “no space left on device”

Your model is larger than about 500 MB in a standard warehouse.

Switch to a Snowpark-optimized warehouse.

Incompatible xgboost version or error when importing xgboost

You installed using pip, which does not handle dependencies well.

Upgrade or downgrade the package as requested by the error message.

AttributeError involving to_sklearn, to_xgboost, or to_lightgbm

An attempt to use one of these methods on a model of a different type.

Use to_sklearn with scikit-learn-based models, etc.

Jupyter notebook kernel crashes on an arm-based Mac (M1 or M2 chip): “The Kernel crashed while executing code in the current cell or a previous cell.”

XGBoost or another library is installed with the incorrect architecture.

Recreate new conda environment with CONDA_SUBDIR=osx-arm64 conda create --name snowpark-ml and reinstall the Snowflake ML package.

“lightgbm.basic.LightGBMError: (0000) Do not support special JSON characters in feature name.”

LightGBM doesn’t support double quoted column names in input_cols, label_cols, or output_cols.

Rename the columns in your Snowpark DataFrames. Replacing non-alphanumeric characters with underscores is sufficient in most cases. The Python helper function below may be useful.

def fix_values(F, column):
    return F.upper(F.regexp_replace(F.col(column), "[^a-zA-Z0-9]+", "_"))
Copy

Further Reading

See the documentation of the original libraries for complete information on their functionality.

  • Scikit-Learn (https://scikit-learn.org/stable/modules/classes.html)

  • XGBoost (https://xgboost.readthedocs.io/en/stable/python/index.html)

  • LightGBM (https://lightgbm.readthedocs.io/en/stable/Python-API.html)

Acknowledgement

Some parts of this document are derived from the Scikit-learn documentation, which is licensed under the BSD-3 “New” or “Revised” license and Copyright © 2007-2023 The scikit-learn developers. All rights reserved.

Some parts of this document are derived from the XGboost documentation, which is covered by Apache License 2.0, January 2004 and Copyright © 2019. All rights reserved.

Some parts of this document are derived from the LightGBM documentation, which is MIT-licensed and Copyright © Microsoft Corp. All rights reserved.

Language: English