Tutorial: Get started with budgets
Introduction
This tutorial introduces you to account-level credit usage monitoring with Budgets by setting up the account budget and creating a custom budget that monitors a group of specified objects.
With budgets, you can monitor credit usage for the compute costs of supported objects, including credit usage for background maintenance tasks and serverless features. Budgets enables you to set a monthly spending limit for each budget and sends a notification email when your current spending is projected to exceed the monthly spending limit.
You can complete this tutorial using a worksheet in Snowsight or using a CLI client such as SnowSQL. Some portions of this tutorial can be completed using Snowsight.
By the end of this tutorial, you will learn how to do the following:
- Create custom roles to monitor and manage budgets.
- Grant the required privileges to add objects to a custom budget.
- Activate and set up an account budget.
- Create a custom budget and add objects to it.
Prerequisites
To complete this tutorial, the following prerequisites are required:
- You must be able to use the ACCOUNTADMIN role to create the roles used in this tutorial.
- You must verify your email address. Only verified email addresses can be added to a budget notification list.
Create a notification integration
Budgets use a notification integration to send notification emails when current credit usage is expected to exceed the monthly
spending limit. The ALLOWED_RECIPIENTS list must include the verified email addresses
of the users to receive budgets notifications.
A notification integration is required if you are completing the tutorial using SQL. Follow the steps below to create one.
When you use Snowsight to set up a budget, the notification integration is automatically created for you. If you are going to use Snowsight to set up your budgets, you can skip to the next step.
-
Execute the following statement to create a notification integration. Use your verified email address in the ALLOWED_RECIPIENTS list:
-
After you create the notification integration, grant the USAGE privilege to the SNOWFLAKE application. This privilege is required in order for Budgets to use the notification integration to send emails.
Execute the following statement to grant the USAGE privilege on the notification integration:
Create a database, schema, and custom roles
In this step, the following objects are created for the tutorial to create, manage, and monitor budgets:
- A database and schema in which to create custom budgets.
- A custom role to manage the account budget.
- A custom role to monitor the account budget.
- A custom role to create custom budgets.
-
Create a database and schema in which to create a custom budget using the following steps:
- Create the database and schema in which to create the custom budget:
- Create the database and schema in which to create the custom budget:
- Sign in to Snowsight.
- Switch to the ACCOUNTADMIN role.
- In the navigation menu, select Catalog » Database Explorer, and then select + Database.
- In the Name field, enter
budgets_db. - Select Create.
- After the database is created, select the
budgets_db. - Select Schemas » + Schema.
- In the Name field, enter
budgets_schema. - Select Create.
-
Create custom role
account_budget_adminfor the account budget administrator. The account budget administrator can take the following actions on the account budget:- Activate and deactivate the account budget.
- Set the spending limit.
- Edit notification settings.
- Monitor credit usage for the account.
-
Create custom role
account_budget_monitorto be granted to account budget monitors. An account budget monitor can take the following actions on the account budget:- Monitor credit usage for the account.
- View the email notification settings.
- View the monthly spending limit for the account.
-
Create a custom role
budget_ownerwith the required role and privileges to create custom budgets in the schemabudgets_db.budgets_schema: -
Create two custom roles to manage and monitor custom budgets. These roles will be granted additional privileges later in the tutorial after the custom budget is created. To create the custom roles, follow these steps:
-
Create a custom
budget_adminrole that can manage and monitor a custom budget: -
Create a custom
budget_monitorrole that can monitor a custom budget:
-
-
Grant custom budget roles to yourself to use in future steps of the tutorial:
-
Grant the
account_budget_adminrole to yourself: -
Grant the
account_budget_monitorrole to yourself: -
Grant the
budget_ownerrole to yourself: -
Grant the
budget_monitorrole to yourself:
Grant custom budget roles to yourself:
- Sign in to Snowsight.
- Switch to the ACCOUNTADMIN role.
- In the navigation menu, select Governance & security » Users & roles, and then select Roles.
- Select Table and locate and select the role
account_budget_admin. - In the section 0 users have been granted ACCOUNT_BUDGET_ADMIN, select Grant to User.
- For User to receive grant, select your username to grant the role to.
- Select Grant.
- After the role is granted, return to the previous page.
- Select the role
account_budget_monitor. - In the section 0 users have been granted ACCOUNT_BUDGET_MONITOR, select Grant to User.
- Select Grant.
- Repeat the previous four steps (h-k) to grant yourself the following additional roles:
budget_ownerbudget_monitor
-
In this section, you created custom roles to manage and monitor budgets, and create custom budgets.
Create the objects for the custom budget
In this step, create objects to add to a custom budget and grant privileges to the custom roles you created in the previous step. You will be creating the following objects:
- A warehouse to add to a custom budget.
- A database to add to a custom budget.
-
Create a warehouse and grant the USAGE and APPLYBUDGET privileges on the warehouse to the custom roles you created. The APPLYBUDGET privilege is required to add an object to a budget.
-
Create warehouse
na_finance_wh: -
Grant the USAGE privilege to custom budget roles:
-
Grant the APPLYBUDGET privilege on the warehouse to role
budget_owner:
-
Create warehouse
na_finance_wh:- Sign in to Snowsight.
- In the navigation menu, select Compute » Warehouses » + Warehouse.
- In the Warehouse Name field, enter
na_finance_wh. - Select Create Warehouse.
-
Grant the USAGE privilege on the warehouse to custom roles,
account_budget_adminandbudget_admin:- In the navigation menu, select Compute » Warehouses.
- Select warehouse you just created
na_finance_wh. - In the Privileges tile, select + Privilege.
- For the Role, select the
account_budget_adminrole. - For the Privileges, select USAGE.
- Select Grant Privileges.
- Repeat the previous 4 steps for the role
budget_admin.
-
Grant the USAGE and APPLYBUDGET privileges on the warehouse to role
budget_owner:- In the navigation menu, select Compute » Warehouses.
- Select warehouse you just created
na_finance_wh. - In the Privileges tile, select + Privilege.
- For the Role, select the
budget_ownerrole. - For the Privileges, select APPLYBUDGET and USAGE.
- Select Grant Privileges.
-
-
Create a database and grant the APPLYBUDGET privilege on the warehouse to the custom budget owner role you created. The APPLYBUDGET privilege is required to add an object to a budget.
-
Create a database:
-
Grant the APPLYBUDGET privilege on the database to role
budget_owner:
-
Create a database:
- Sign in to Snowsight.
- In the navigation menu, select Catalog » Database Explorer, and then select + Database.
- In the Name field, enter
na_finance_db. - Select Create.
-
Grant the APPLYBUDGET privilege on the database to role
budget_owner:- In the navigation menu, select Catalog » Database Explorer.
- Select the database you just created
na_finance_db. - In the Privileges tile, select + Privilege.
- For the Role, select the
budget_ownerrole. - For the Privileges, select APPLYBUDGET.
- Select Grant Privileges.
-
In this section, you created the objects to be added to a custom budget and granted the APPLYBUDGET privilege required to add those objects to a budget. You also created the database and schema in which to create the custom budget and granted the USAGE privilege required to create a budget in the schema. Now you are ready to activate, create, and set up budgets.
Activate and set up the account budget
The account budget monitors credit usage for the compute costs of all Budgets supported objects in the account, including background maintenance tasks (for example, automatic clustering) and serverless features. The account budget must be activated before it can start monitoring credit usage. After it is activated, you can set the monthly spending limit for the account and the email list of notification recipients. Budgets sends a notification email when current credit usage is expected to exceed the monthly spending limit.
Activate and set up the account budget using the following steps:
-
Use the
account_budget_adminrole you created in a previous step to activate the account budget: -
Set the spending limit for the account budget to 500 credits per month:
-
To set up the email notification list, use your verified email address and the notification integration you created earlier in the tutorial:
Activate and set up the account budget:
-
Sign in to Snowsight.
-
Select the ACCOUNT_BUDGET_ADMIN role you created in a previous step.
-
In the navigation menu, select Admin » Cost management.
-
Select Budgets.
-
If prompted, select
na_finance_whfor the warehouse. -
In the upper-right corner of the dashboard, select Set up Account Budget.
-
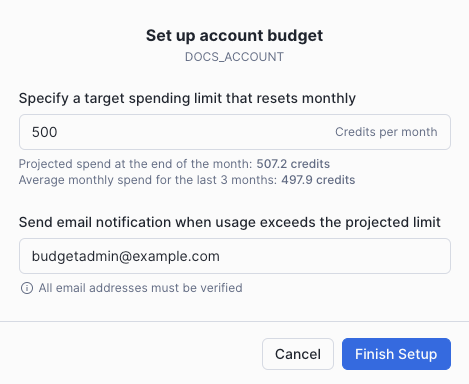
Enter 500 for the spending limit for the account.
To help you set your monthly spending limit, the configuration tool displays your projected spend for the month and your average monthly spend for the previous 3 months. For example, see the screenshot below.
-
Enter your email address to receive notification emails.
-
Select Finish Setup.
In this section, you activated the account budget and set the spending limit and the email address to receive budget notifications.
Create a custom budget
Now that you have activated and set up your account budget, create a custom budget to monitor the credit usage in your account for a specified group of objects. In this tutorial, you’ll:
- Use the
budget_ownerrole to create a custom budgetna_finance_budgetinbudgets_db.budgets_schema. - Set the monthly spending limit and email notification list for the budget.
- Add the
na_finance_whwarehouse andna_finance_dbdatabase to the custom budget.
To create the custom budget, complete the following steps:
-
Create the custom budget:
-
Set the monthly spending limit to 500 credits:
-
To set up the notification list, use your verified email address and the notification integration created in the first step of the tutorial:
-
Add database
na_finance_dband warehousena_finance_whto budgetna_finance_budget:
-
Sign in to Snowsight.
-
Select the BUDGET_OWNER role you created in a previous step.
-
In the navigation menu, select Admin » Cost management.
-
Select Budgets.
-
Select + Budget.
-
On the Basic Information page, complete the following steps:
- From the Location to store drop-down, select
budgets_db»budgets_schema. - In the Name field, specify
na_finance_budget. - In the Budget (credits per month) field, specify
500. - In the Notify field, enter your email address to receive notification emails.
- Select Next.
- From the Location to store drop-down, select
-
On the Budget scope page, complete the following steps:
-
Expand the Resources drop-down.
Note
If you are directly adding individual objects, you can only add an object to one custom budget. In this case, if an object is currently included in one custom budget and you add that object to a second custom budget, Budgets removes the object from the first custom budget without issuing a warning.
This behavior does not apply to using tags to add objects to budgets; an object with one or more tags can be included in multiple custom budgets if you are using tags to add the object to the budgets.
-
Select the search field.
-
Select Databases, then select
na_finance_db.When you select a database, all the Budgets supported objects the database contains are also selected. Additionally, any future objects created in the database are automatically added to the budget.
-
Select Warehouses, then select
na_finance_wh. -
Select Done.
-
-
Select Create.
To grant instance roles to the custom roles you created in a previous step, complete the following steps:
Grant the required roles and privileges to the
budget_adminrole to let thebudget_adminrole modify and monitor the custom budgetna_finance_budget:Grant the VIEWER instance role to the
budget_monitorrole to let thebudget_monitorrole monitor the custom budgetna_finance_budget:
In this section, you created a custom budget, added objects for the budget to monitor, and set up the email address to receive budget notifications.
Monitoring credit usage
You have completed all the steps in the tutorial to activate your account budget, create a custom budget, and create custom roles to monitor and manage both account and custom budgets. Credit usage data for your budgets takes some time to populate.
Budgets uses serverless tasks to collect credit usage data for the budgets in your account. After you activate the account budget or create a custom budget, it takes a while for the serverless task to execute. After credit usage data becomes available, you can monitor credit usage for budgets using Snowsight.
To monitor credit usage after usage data becomes available, use the following steps:
Use the account_budget_monitor role created in a previous step and view the spending history for the account budget
in the past week by executing the following statements:
You can monitor spending history by service type. To view the spending history for the search optimization serverless feature for the account budget in the past week, execute the following statement:
Use the budget_monitor role to view the spending history for the past week for custom budget na_finance_budget:
Use the account_budget_monitor role to view spending history for the account budget:
- Sign in to Snowsight.
- Select the ACCOUNT_BUDGET_MONITOR role you created in a previous step.
- In the navigation menu, select Admin » Cost management.
- Select Budgets.
- If prompted, select the
na_finance_wh.
Use the budget_monitor role to view spending history for the na_finance_budget custom budget:
- Sign in to Snowsight.
- Select the BUDGET_MONITOR role you created in a previous step.
- In the navigation menu, select Admin » Cost management.
- Select Budgets.
- If prompted, select the
na_finance_wh.
Clean up, summary, and additional resources
Congratulations! You have successfully completed this tutorial.
After credit usage data is populated for your account budget and custom budget, see Use Snowsight to monitor budgets.
Summary and key points
In summary, you learned how to:
-
Create custom roles to manage and monitor budgets.
Custom roles enable non-account administrators to monitor credit usage for a budget and modify budget settings. For more information, see Budgets roles and privileges.
-
Grant the required privileges to add objects to a custom budget.
The APPLYBUDGET privilege must be granted on an object to add or remove it from a custom budget. Objects are added or removed by reference. For more information, see Add or remove objects from a custom budget.
-
Activate and set up the account budget.
The account budget must be activated and set up to start monitoring credit usage for your account. The account budget monitors compute costs including background maintenance tasks and serverless features and sends an email notification when current spending is expected to exceed the monthly spending limit.
For more information, see Activating the account budget.
-
Create a custom budget to monitor a specified group of objects in your account.
Custom budgets monitor credit usage for a group of objects in your account. Custom budgets monitor credit usage for compute costs for the objects in the group including background maintenance tasks and serverless features.
For more information, see Custom budgets.
For more information, see the following topics:
- For a list of supported objects and the serverless features monitored by custom budgets, see Supported objects for custom budgets and Supported services.
- For more information on monitoring budgets spending, see Use Snowsight to monitor budgets.
Delete objects created in the tutorial
You can choose to keep the custom roles and custom budget you created in the tutorial to monitor credit usage. Otherwise, drop the budget and the related custom roles:
To delete the custom budget created in the tutorial, execute the following statements:
To delete the objects created in this tutorial, execute the following statements:
To delete the custom roles created for managing and monitoring the custom budget, execute the following statements:
Snowflake recommends leaving the account budget activated. However, if you decide to deactivate it, see Deactivating the account budget for more information and instructions.
To delete the account budget monitor and administrator roles, execute the following statements:
To delete the notification integration, execute the following statements:
Additional resources
Continue learning about budgets and Snowflake using the following resources: